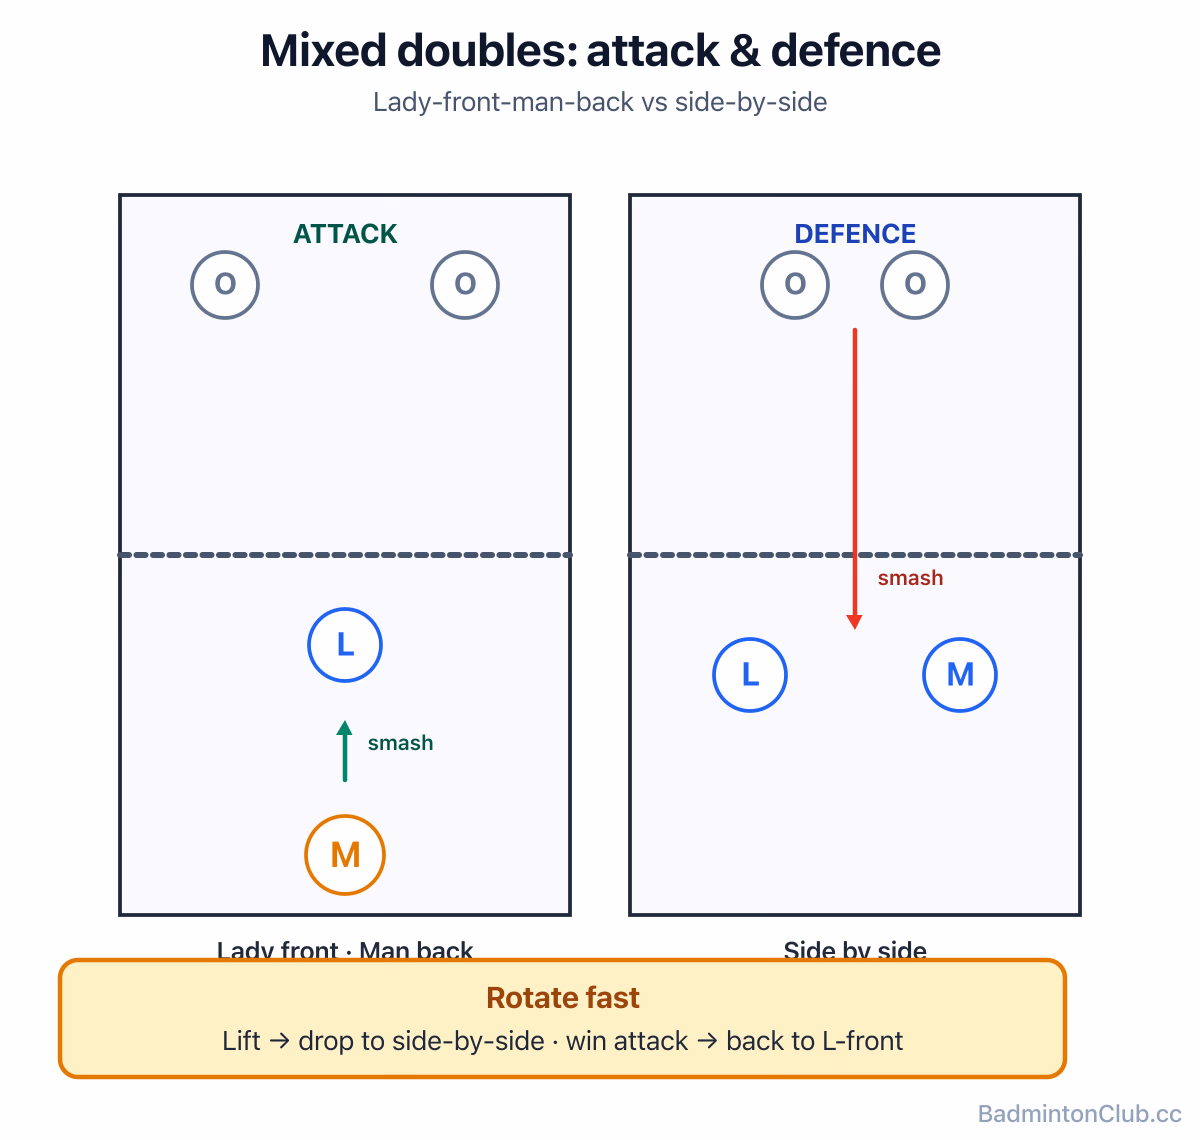
Mixed doubles badminton tactics — the lady-front-man-back attacking formation, the side-by-side defensive switch the instant they lift, and how to survive the opposition's near-universal 'attack the woman' plan with soft blocks, fast rotation and an active racket. Plus the serve and receive convention (low backhand serve, lady receives), the awkward weave on the male partner, and the honest reason mixed is where tactics beat raw talent more reliably than any other format.
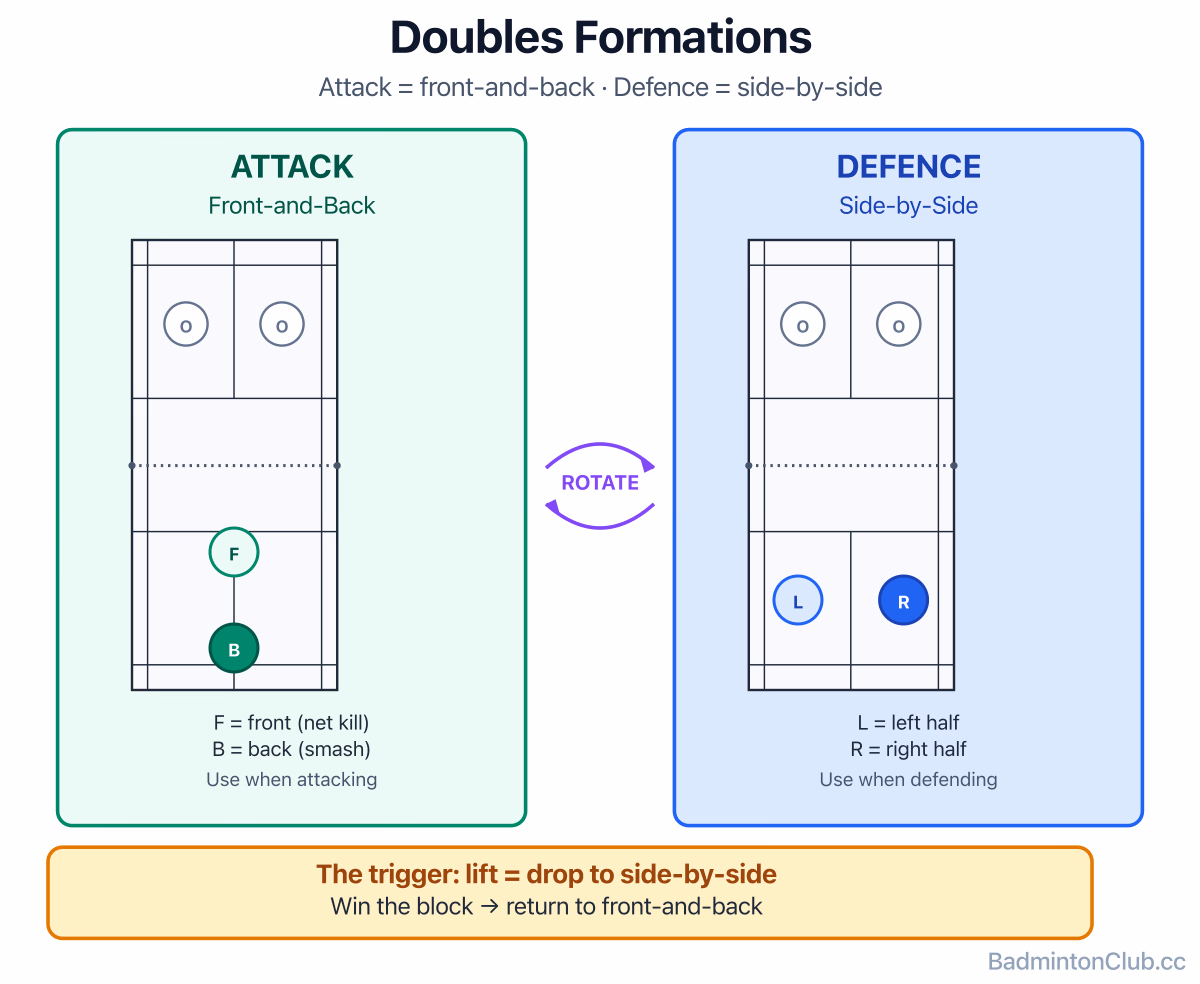
Master badminton doubles by learning when to attack in front-and-back formation and when to defend side-by-side — and how to rotate cleanly between them. Covers the serve-and-third-shot battle, court communication, and the "my side" rule that stops most middle-shuttle arguments. For club players who want to stop playing like two strangers sharing a court.
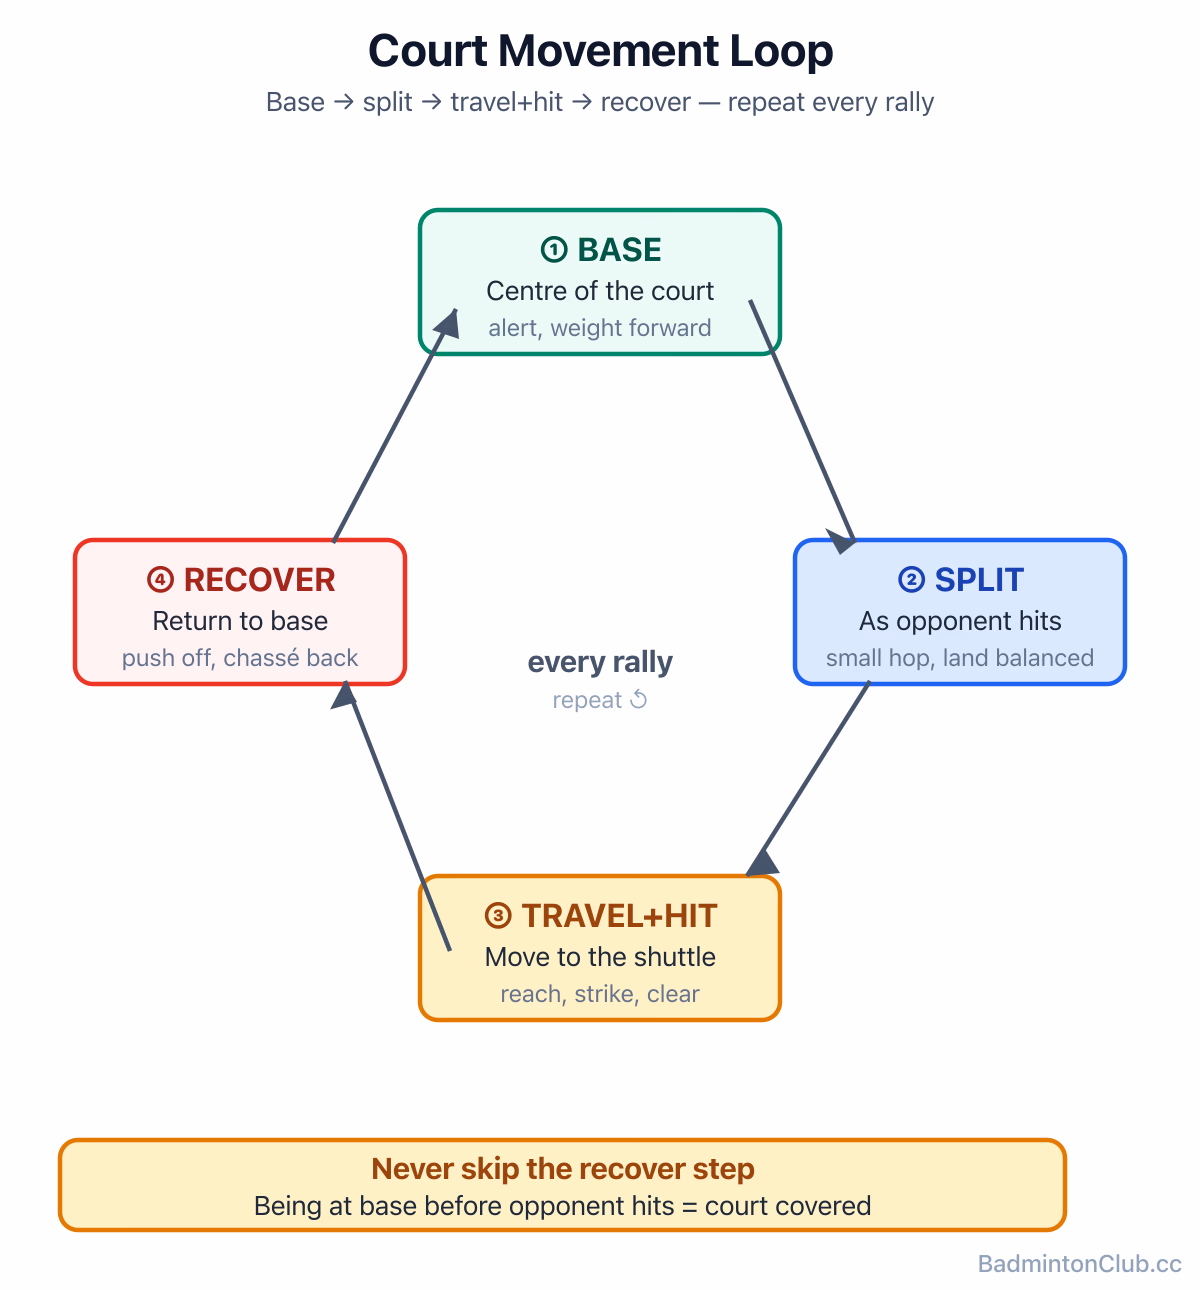
Badminton footwork starts with the split step — landing balanced the instant your opponent hits — then efficient chassé and crossover patterns to reach every corner and recover to base. This guide breaks down each movement, explains when and why to use it, and gives you a shadow-drill routine you can practise alone to make court coverage automatic.
Master the backhand low serve in badminton — a thumb-braced grip, a short push that skims the tape, and a fixed routine that holds under pressure. This guide covers technique, the 1.15 m service law, a 50-serve drill for repeatability, and how to disguise the flick behind the same action so receivers can never read you early.
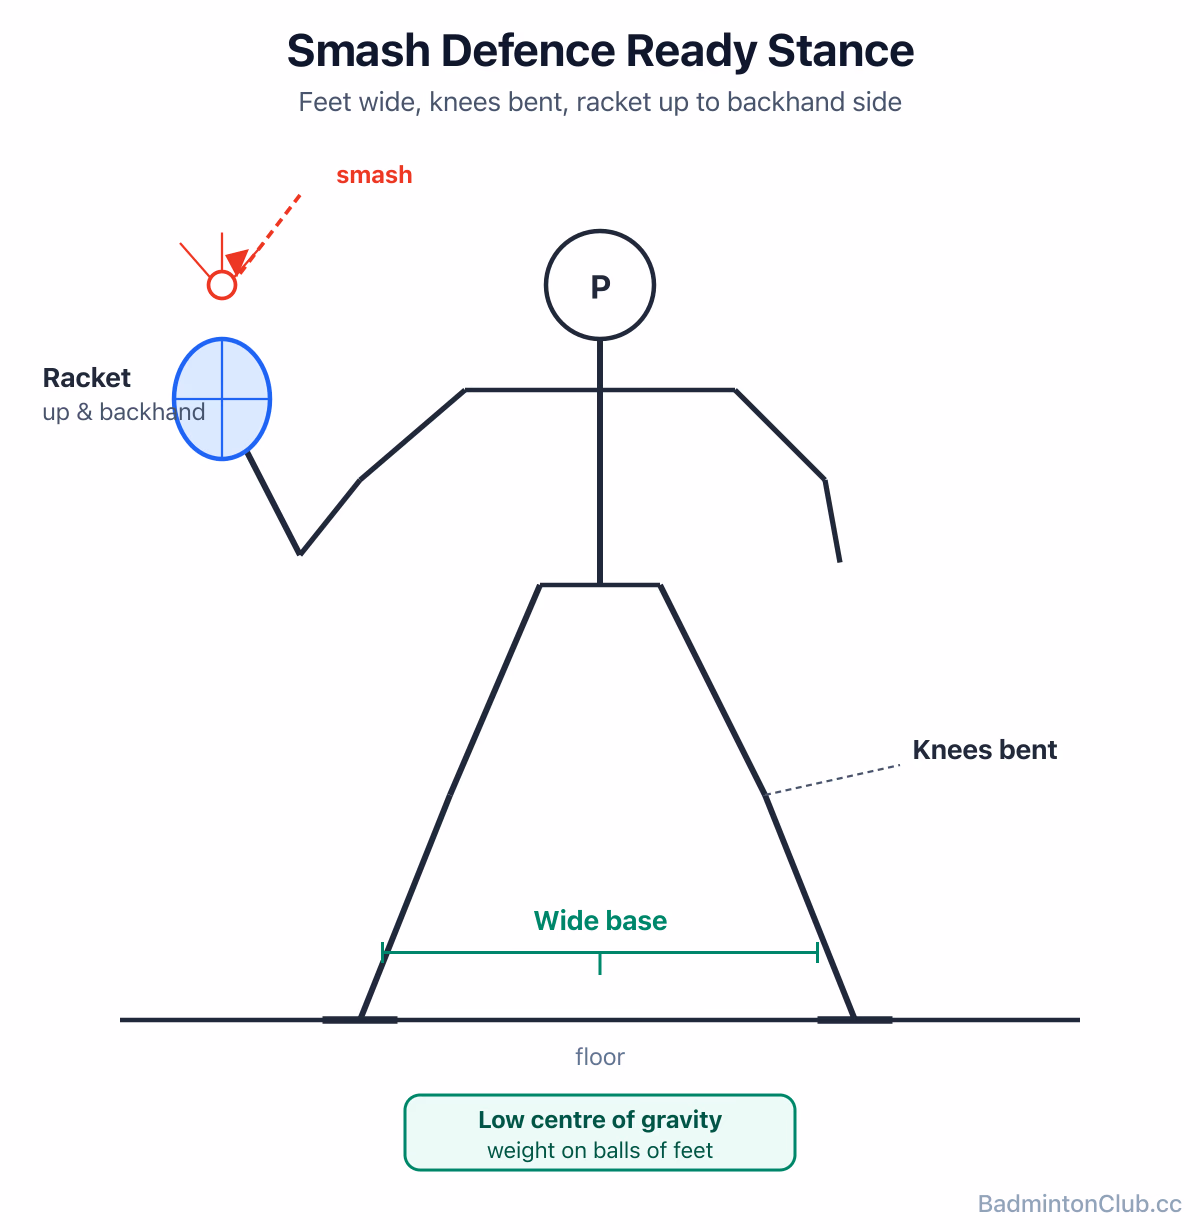
Learn how to defend a smash in badminton using the block and soft block. This guide covers the low defensive stance, racket position, where to place your return, and the mindset shift that turns a ferocious smash into your net opportunity — useful for singles and doubles players at any level.
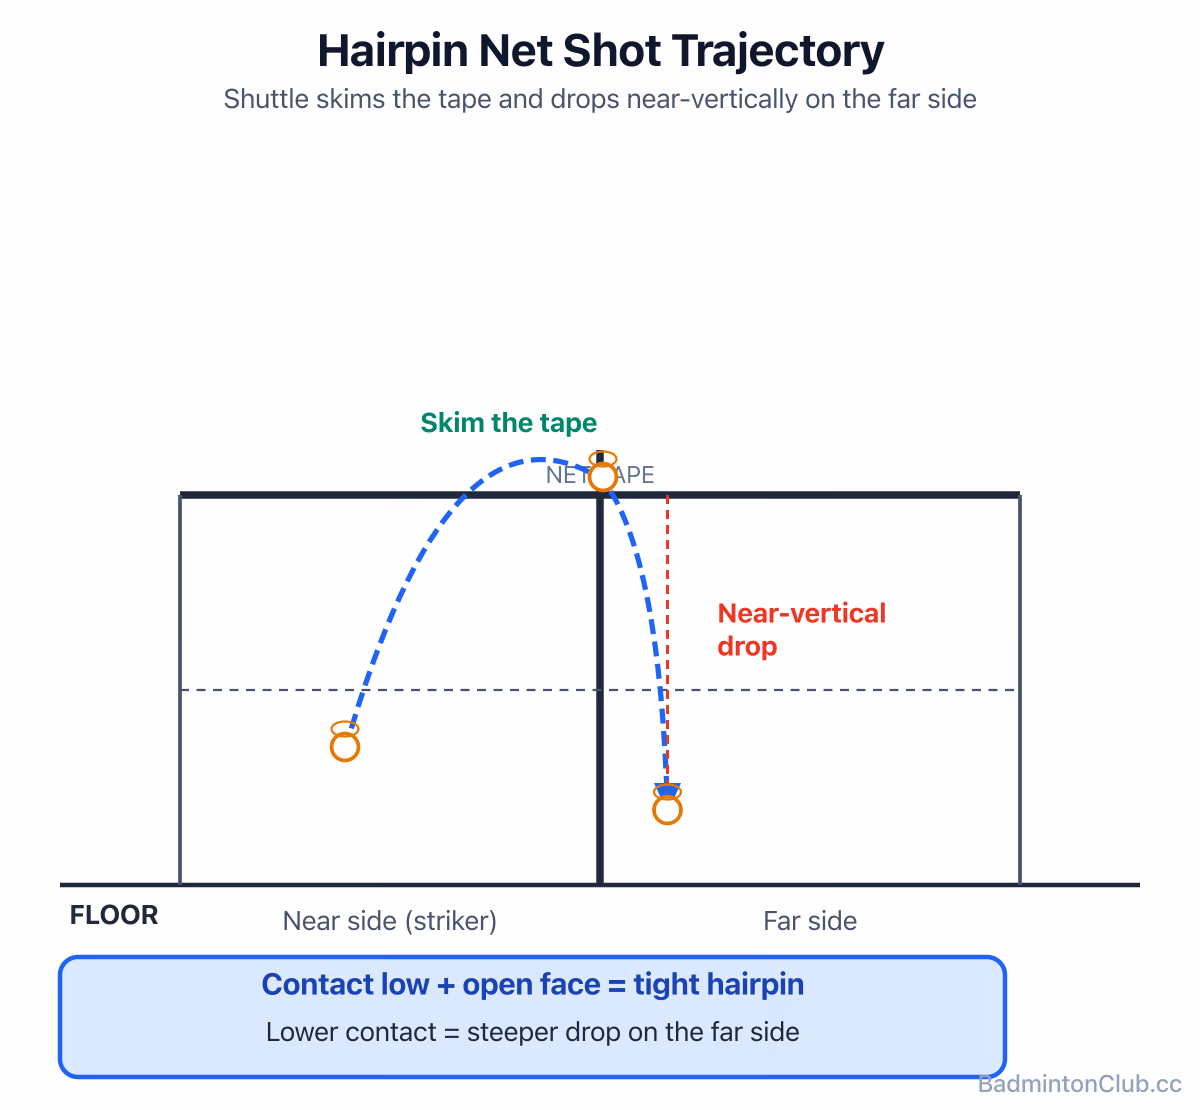
Tight net shots win points by forcing the opponent to lift — but only if the shuttle barely clears the tape. This guide explains the hairpin net shot: the fingertip grip, high contact point, and relaxed swing that make net play unattackable. Covers cross-court net shots, punishing loose replies, a tightness drill, and the gap test for honest self-assessment.
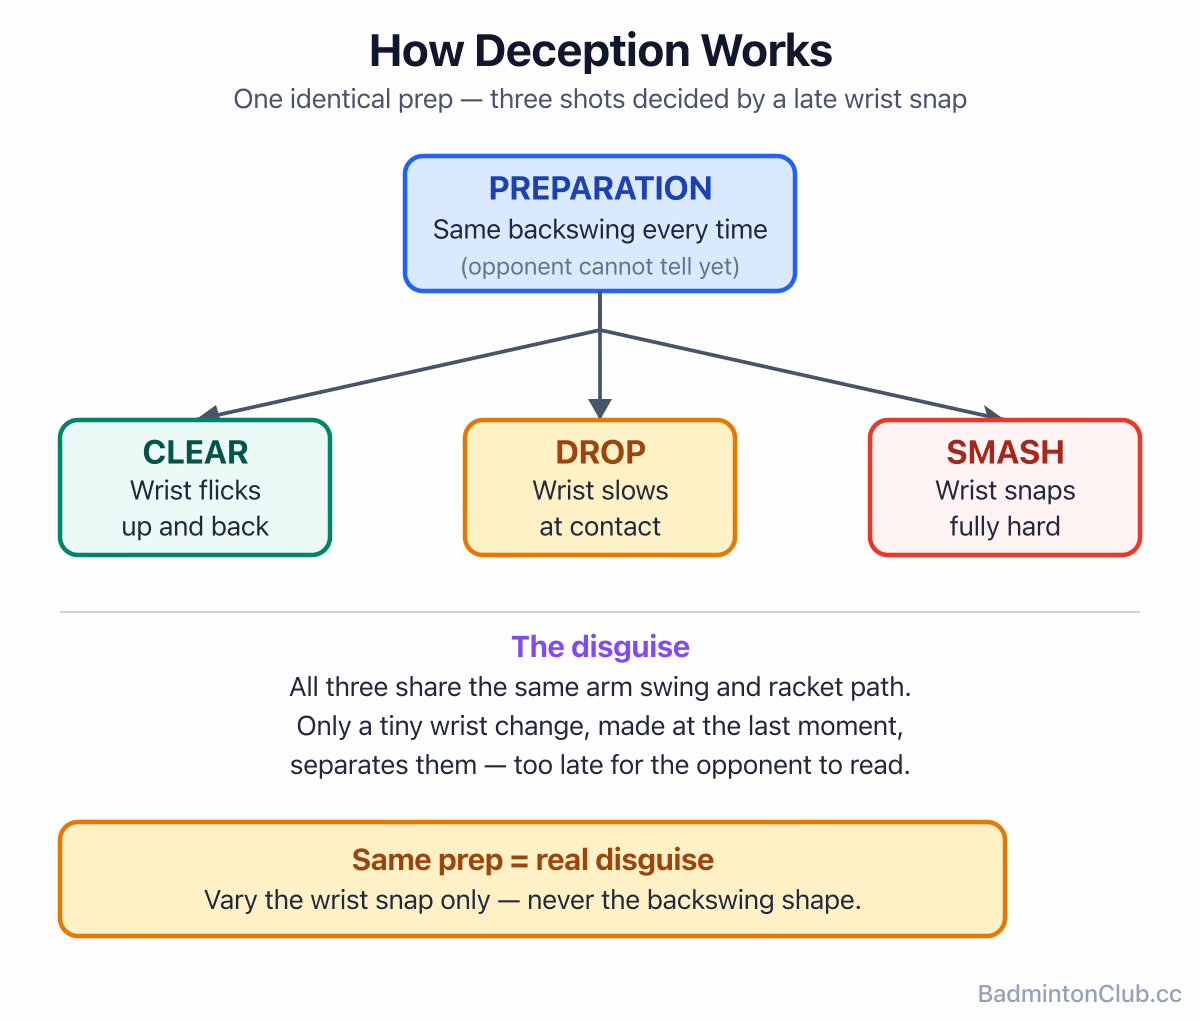
Deception in badminton turns the same preparation into multiple threats — learn how a late wrist snap, double action fake, and held hit freeze your opponents. Covers identical backswing technique, dummy shots, the hold-and-strike sequence, and the one tell (your eyes) that gives everything away at club level.
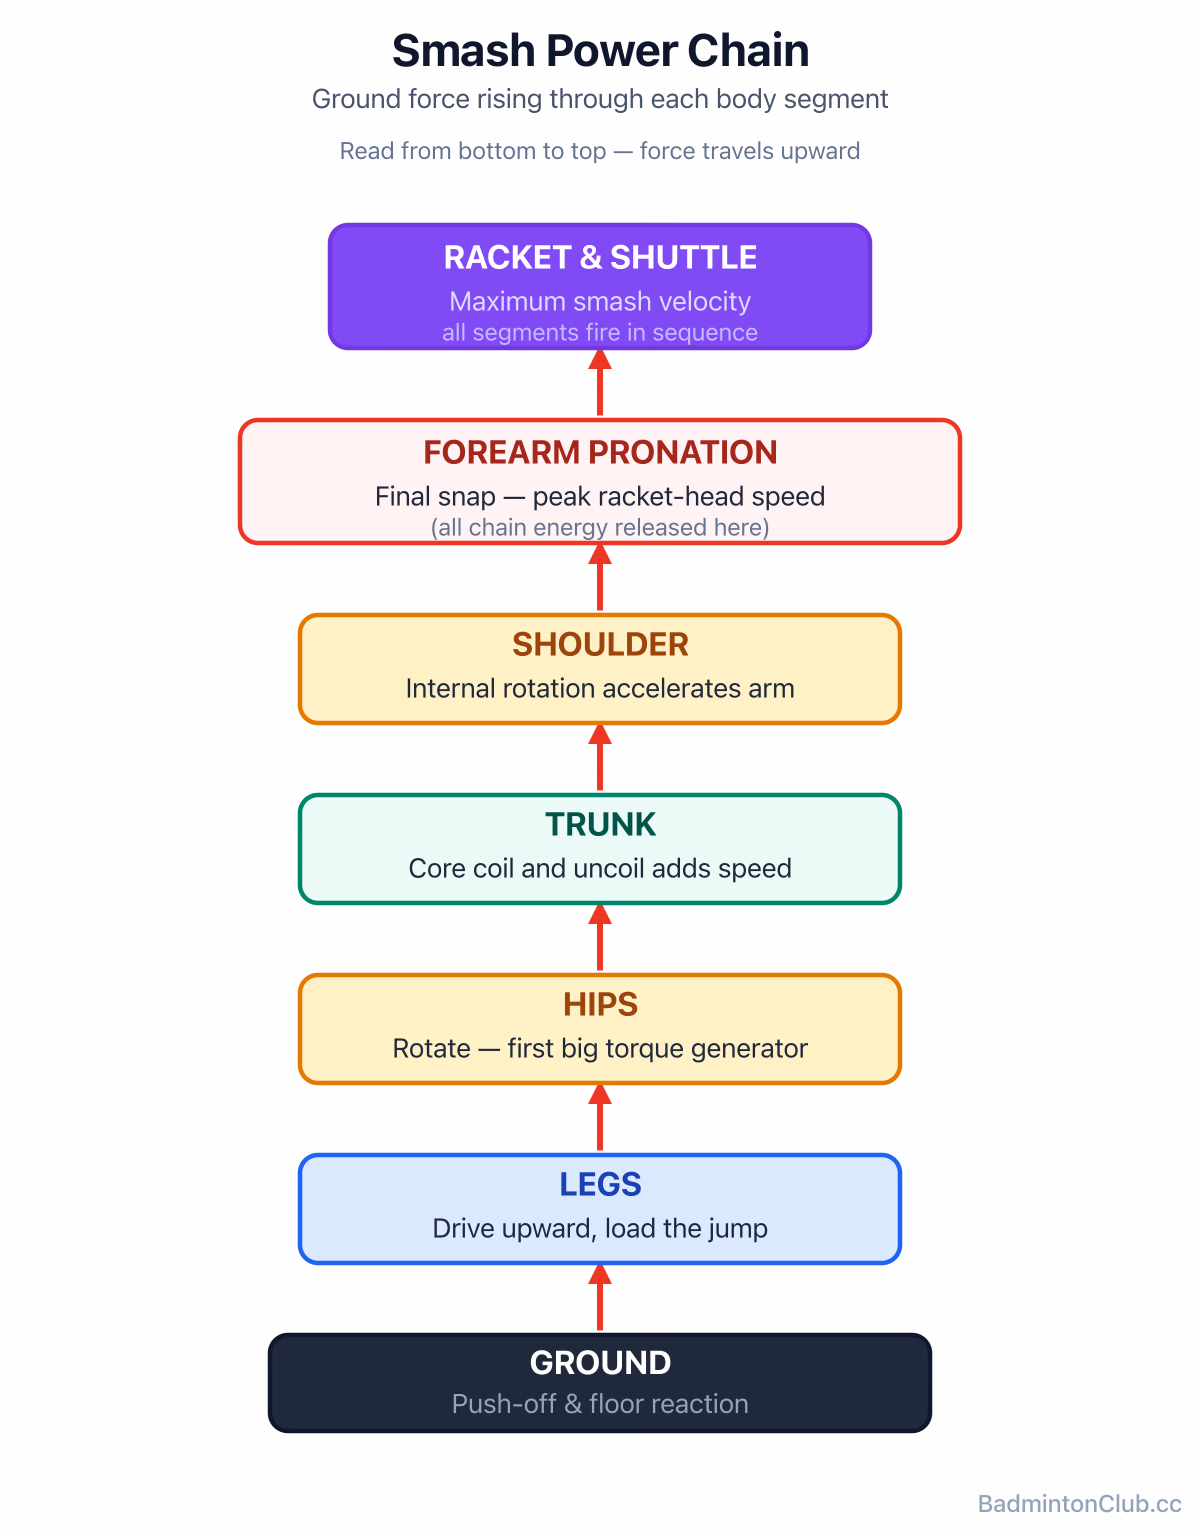
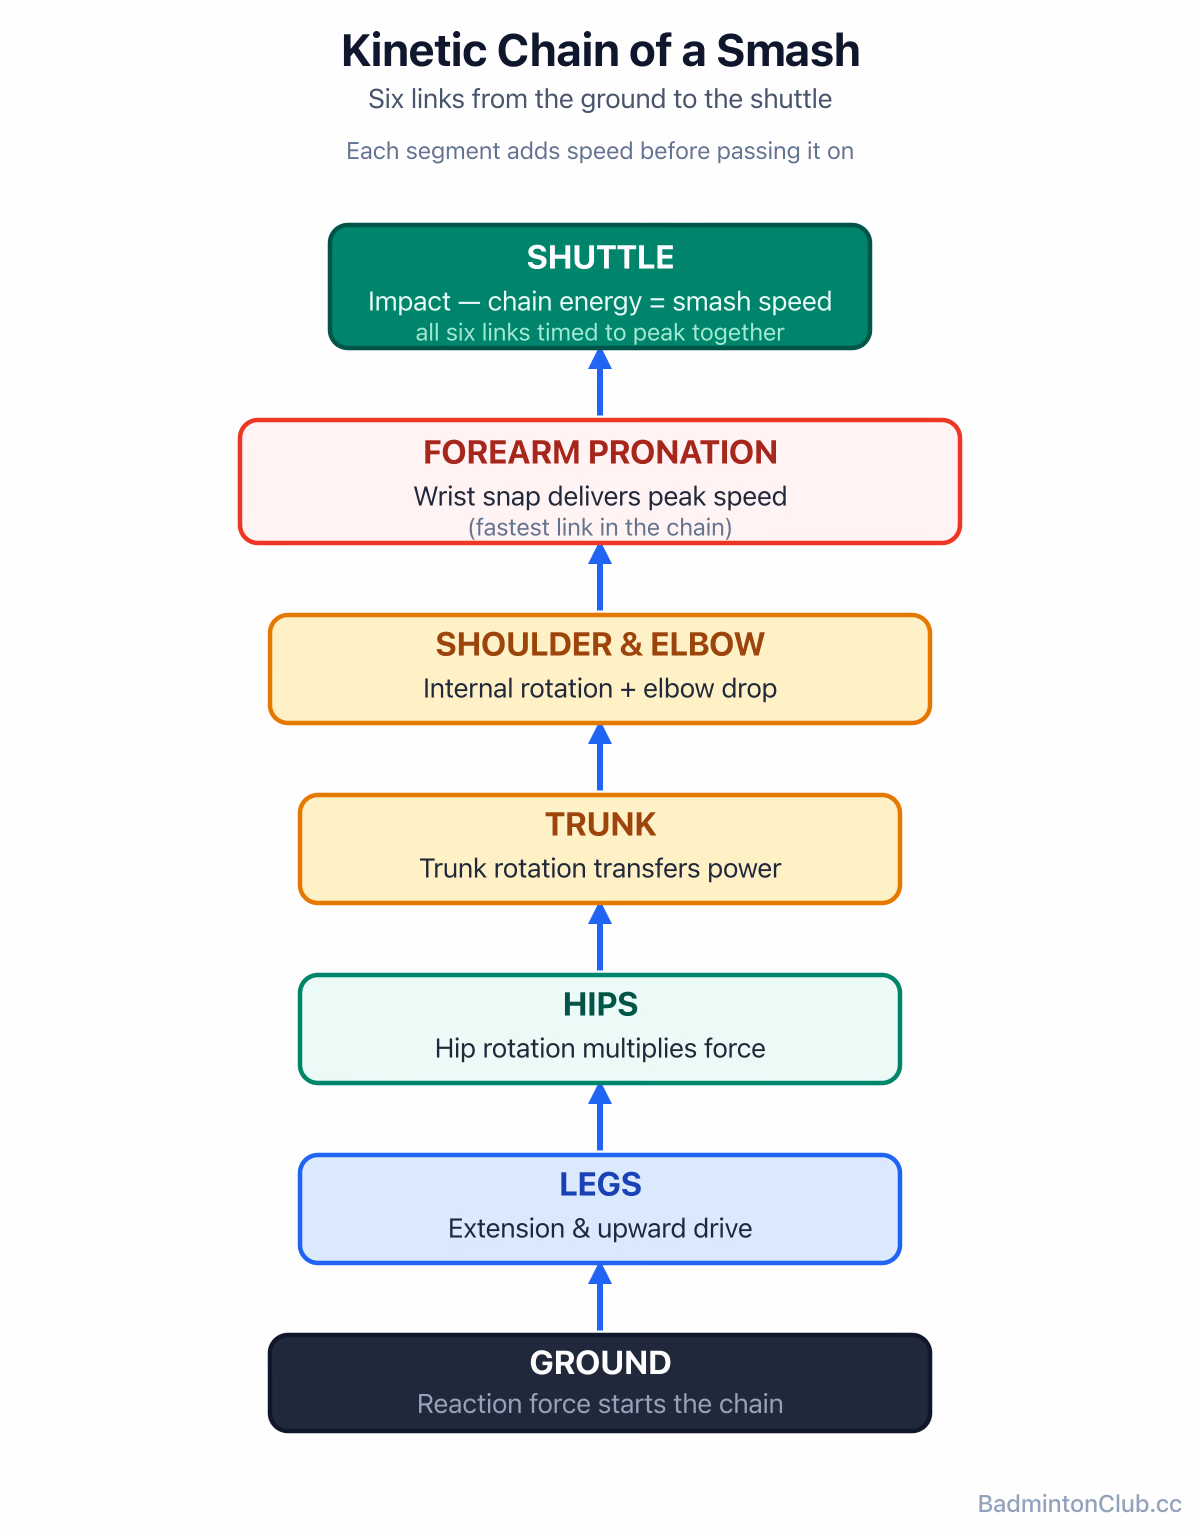
Forearm pronation is the true engine of a hard badminton smash — not arm muscle. This guide breaks down the ground-up kinetic chain (legs, hip, trunk, shoulder, forearm snap), why the jump smash is really about angle rather than speed, how to drill the late-pronation crack, and the sound test that instantly tells you whether your chain held. Perfect for club players who want a genuinely heavier smash.
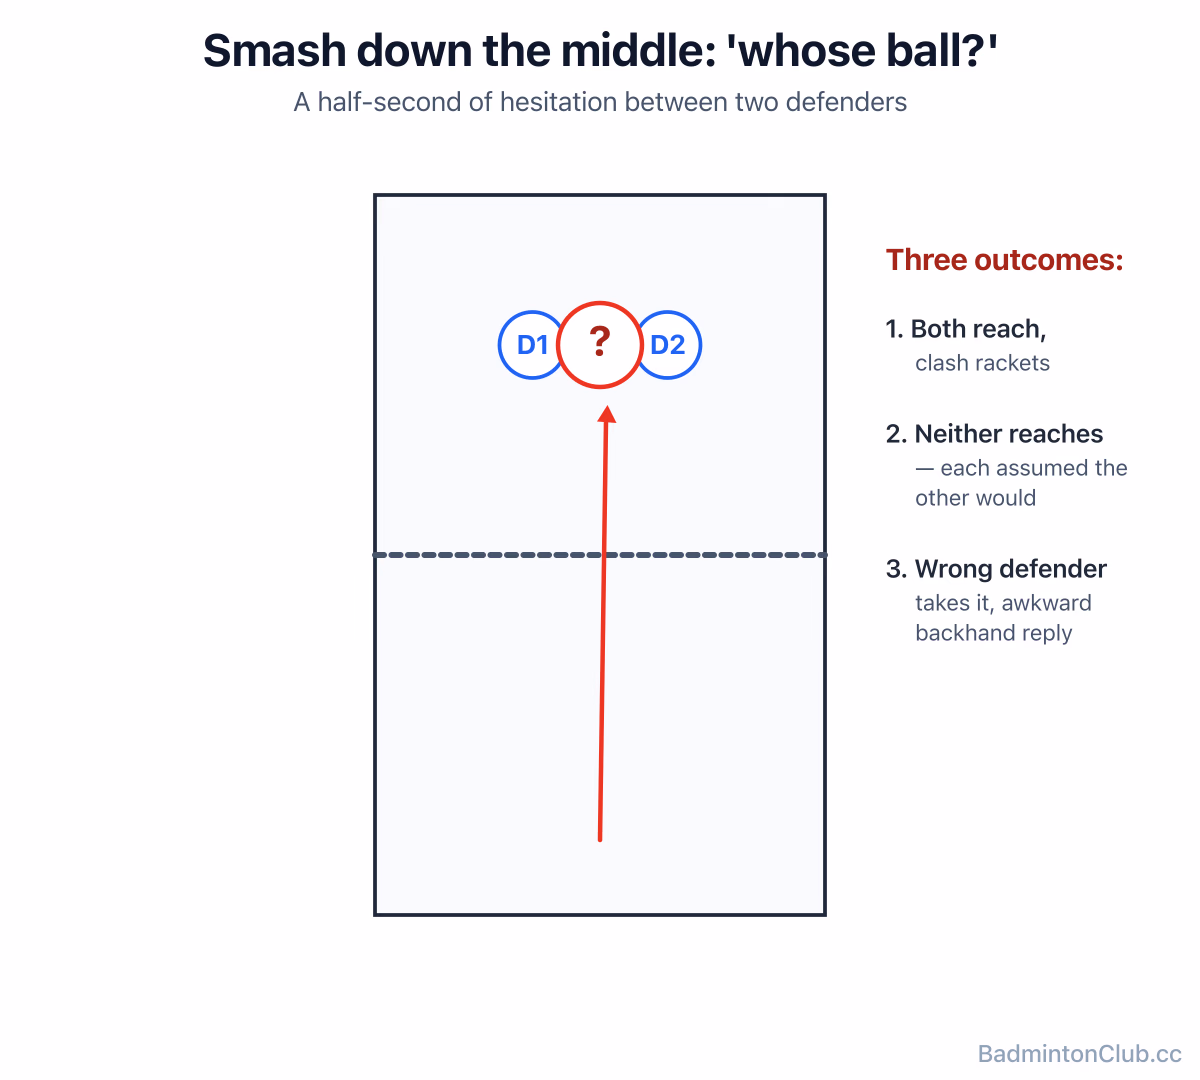
Smashing down the middle in badminton doubles — why it works (the 'whose ball is it?' moment of confusion between two defenders), where exactly to aim (slightly off-centre toward one defender's backhand body), and when to use it (after a couple of corner smashes have spread them outward). Plus the three default conventions for who takes the middle on your side — forehand-side player, whoever isn't already committed, or the back player on lifts.
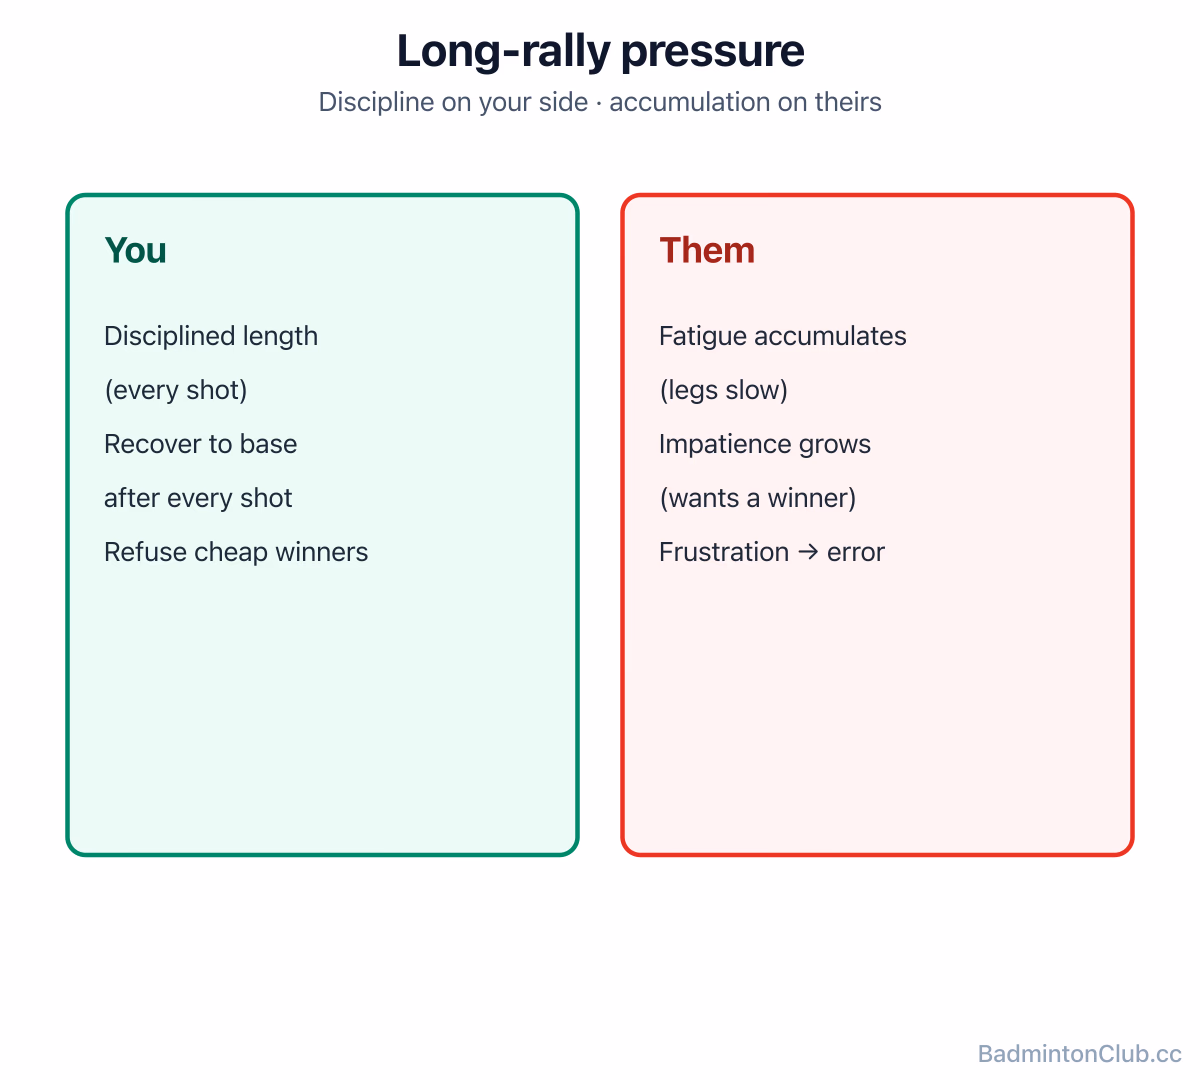
How to force unforced errors in badminton — extend rallies past the opponent's comfort window with disciplined length and base recovery, refuse cheap winners yourself, vary pace, and target a known weakness relentlessly until they overreach. Includes the four sources of errors (fatigue, impatience, frustration, mid-game lulls), a worked six-shot rally that wins on patience, and the honest opinion that at most club levels patience is the single most under-rated skill — and the cheapest one to add.
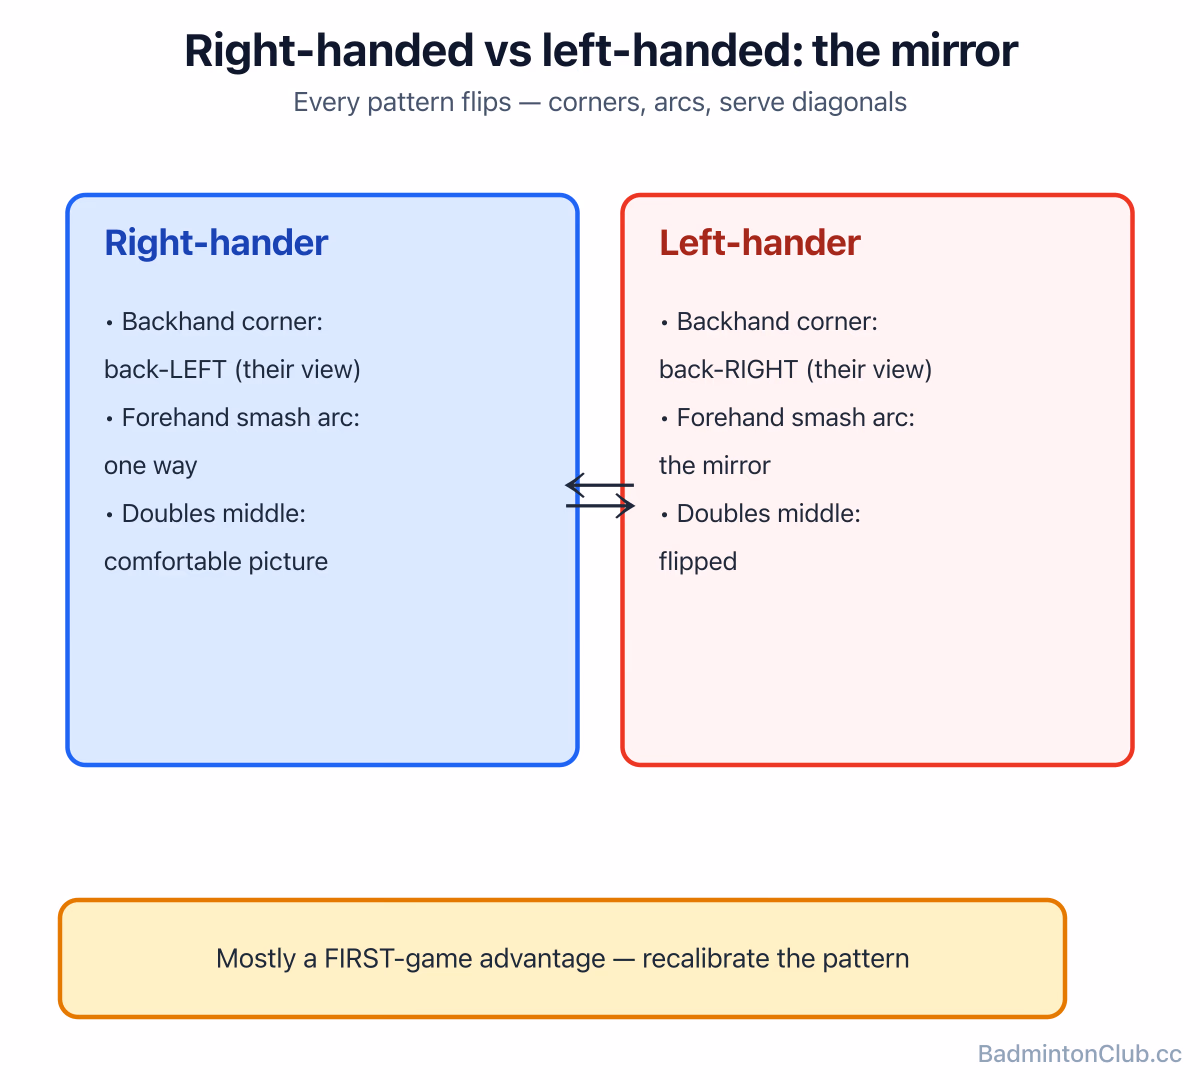
How to play against a left-handed badminton player — every spatial pattern is mirrored, so the backhand corner moves to your right, the smash arcs curve the other way, and the doubles middle shifts shape. The practical adjustment: target the reversed backhand corner deliberately, re-read every cross-court angle for the first game, and recalibrate 'attack the woman' geometry in mixed where forehands flank the centre differently. The lefty advantage is mostly a first-game advantage, and most opponents never adjust.
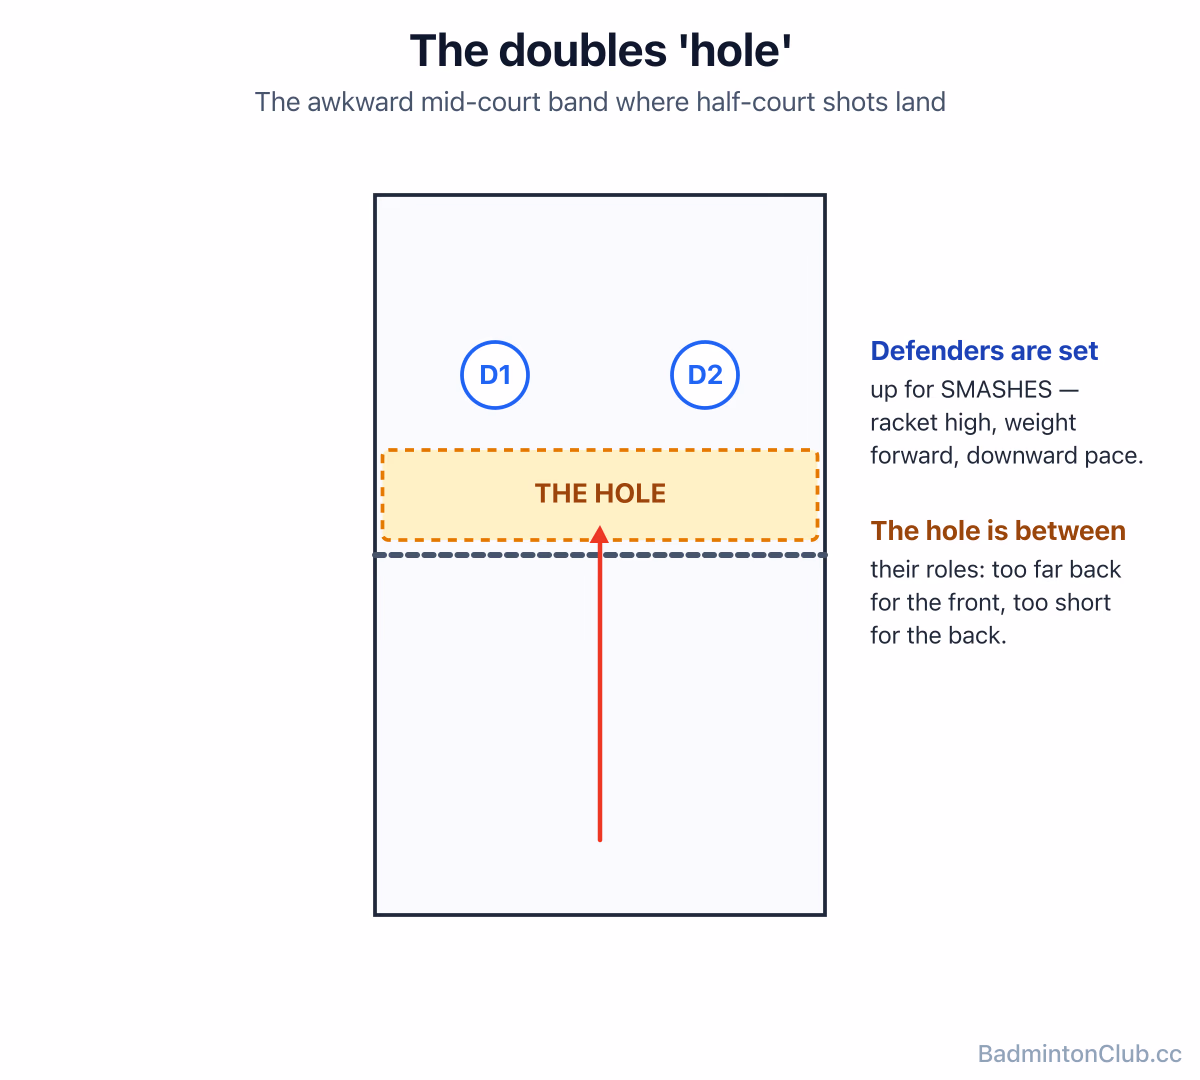
Half-court shot tactics in badminton doubles — the half-paced smashes, pushes and drives placed into the mid-court 'hole' between the opposing front and back defenders, which forces an awkward low pick-up that's too flat to lift and too deep to net-kill. Includes the three attack options, the smash-smash-half-smash-push-kill shot-construction pattern, and the frank reason half-court tactics are under-used at club level — the highlight-reel smash feels more satisfying than the boring shot that actually wins points.
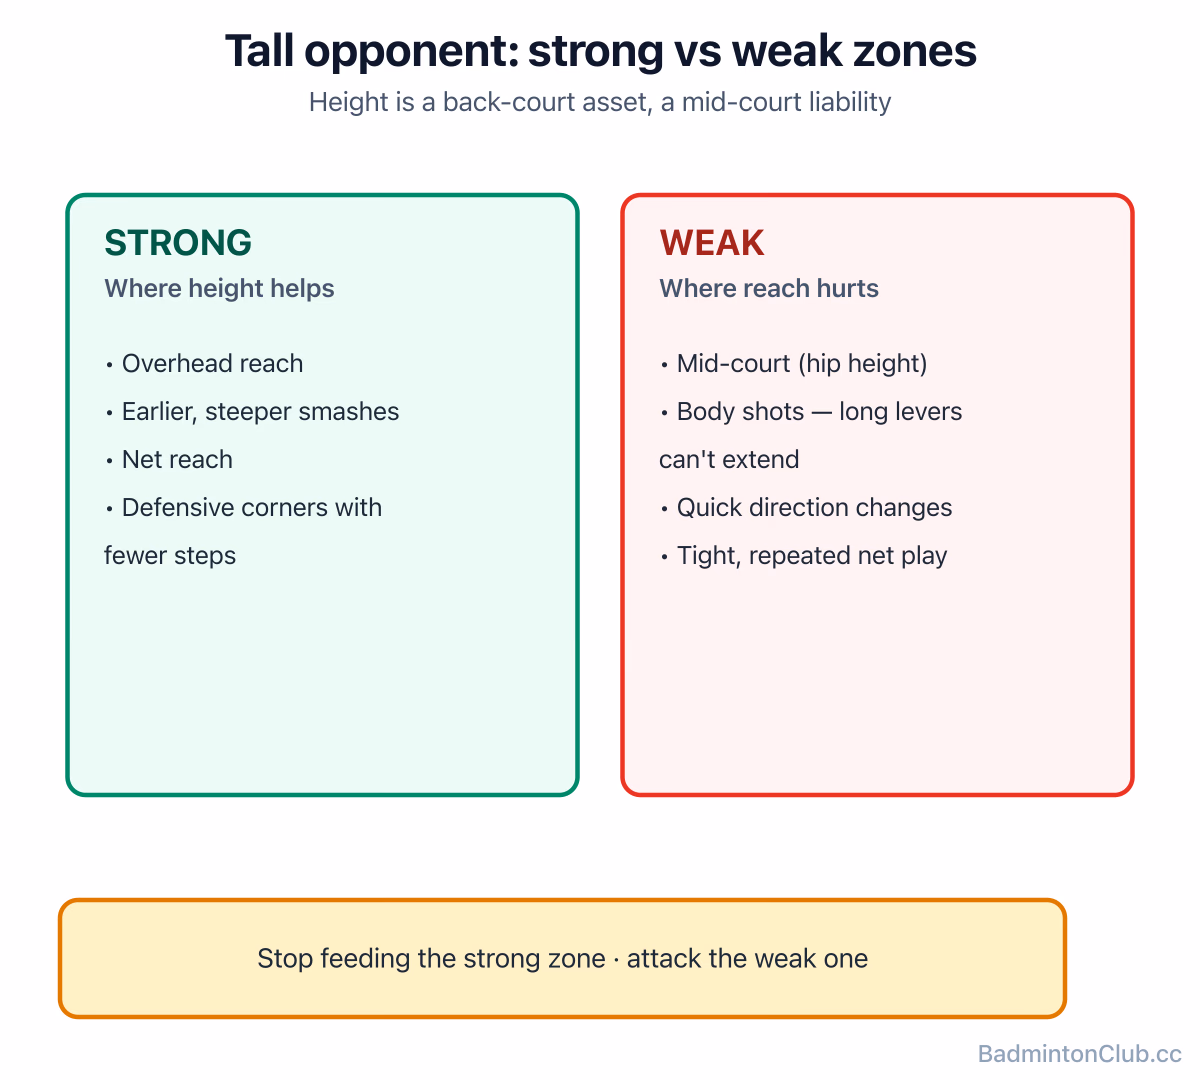
How to beat a tall badminton player — attack the mid-court (the awkward hip-to-shoulder zone), jam their body where long levers can't extend, and stop feeding clears their reach loves. The article walks through a worked rally pattern (flat drive to body, half-smash to mid-court, soft drop, net kill), the four mid-court tactics that neutralise height, and the patient mindset that beats taller opponents at club level — where most short players lose because they panic and lift, not because they're shorter.
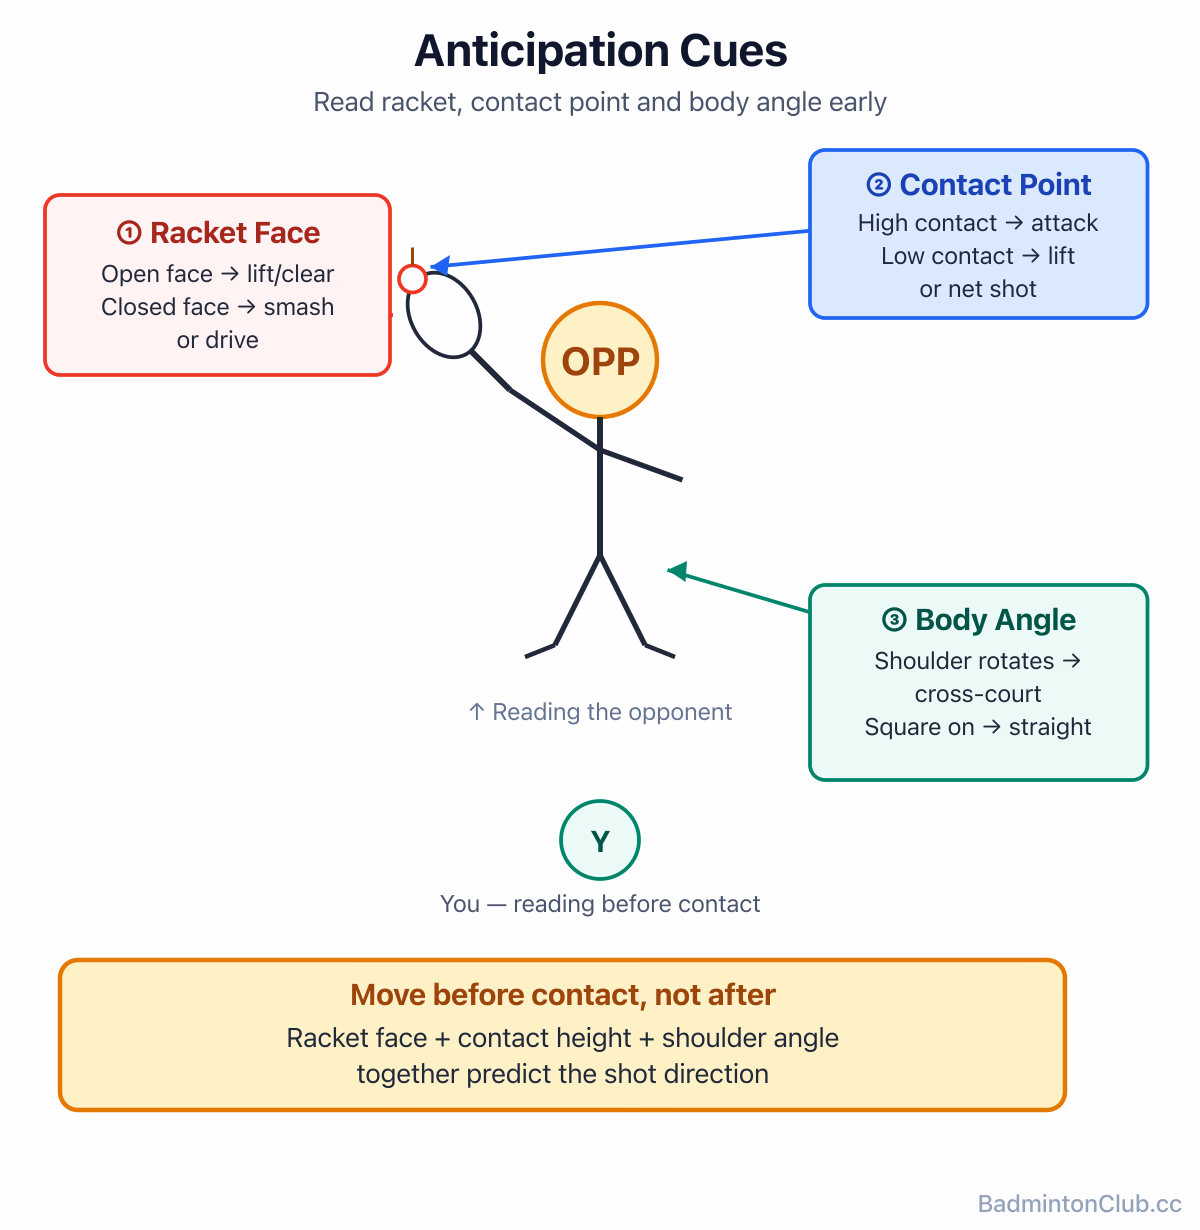
Anticipation in badminton is about reading your opponent's racket face, contact point, and body angle before the shuttle leaves the strings — so you move early and win points cheaply. This guide covers the cues that give shots away, how to spot court patterns and pre-empt them, long net strategy, and adjusting for shuttle drift and hall conditions.
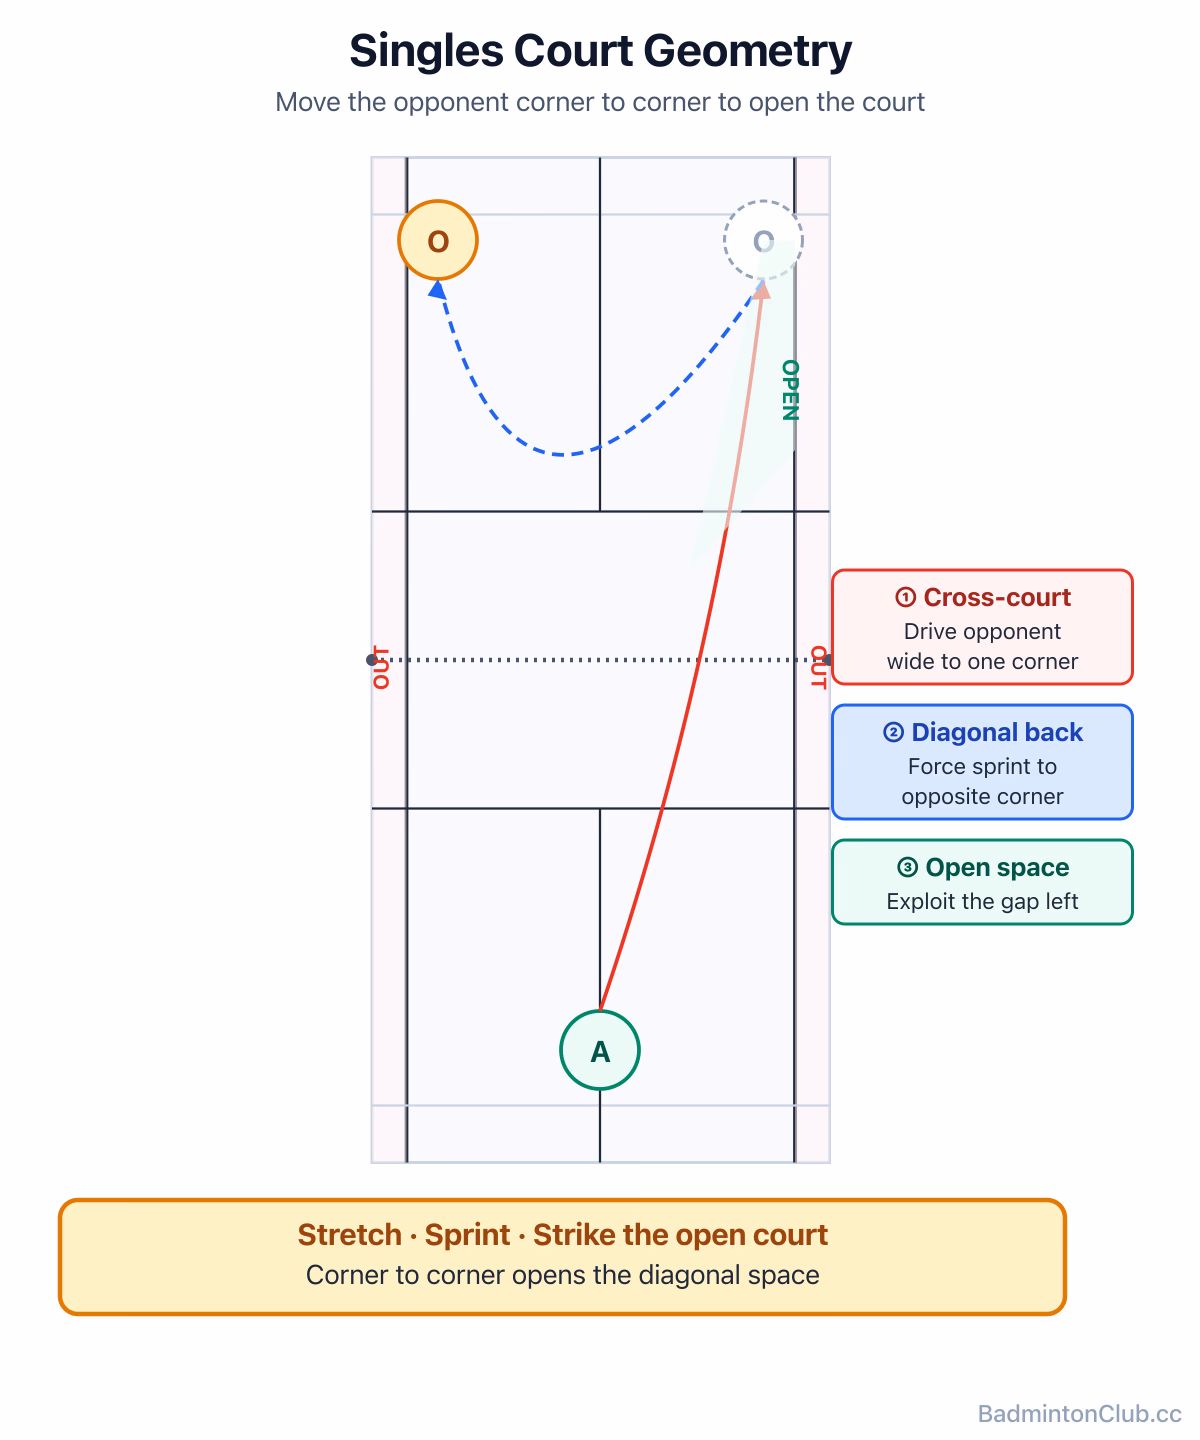
Badminton singles tactics explained: use corner-to-corner geometry to stretch your opponent, vary pace to break their rhythm, and systematically target the backhand rear corner. Covers mid-court exploitation, the first-three-shots review habit, and why patience plus fitness beats power for most club players.
Forearm pronation and supination are the final release points of a smash's kinetic chain — a ground-up sequence through legs, hips, trunk, shoulder, and elbow. This piece explains how the chain works, why timing beats strength, and why ankle stability underpins both power and injury prevention. For anyone wanting to smash harder without swinging harder.
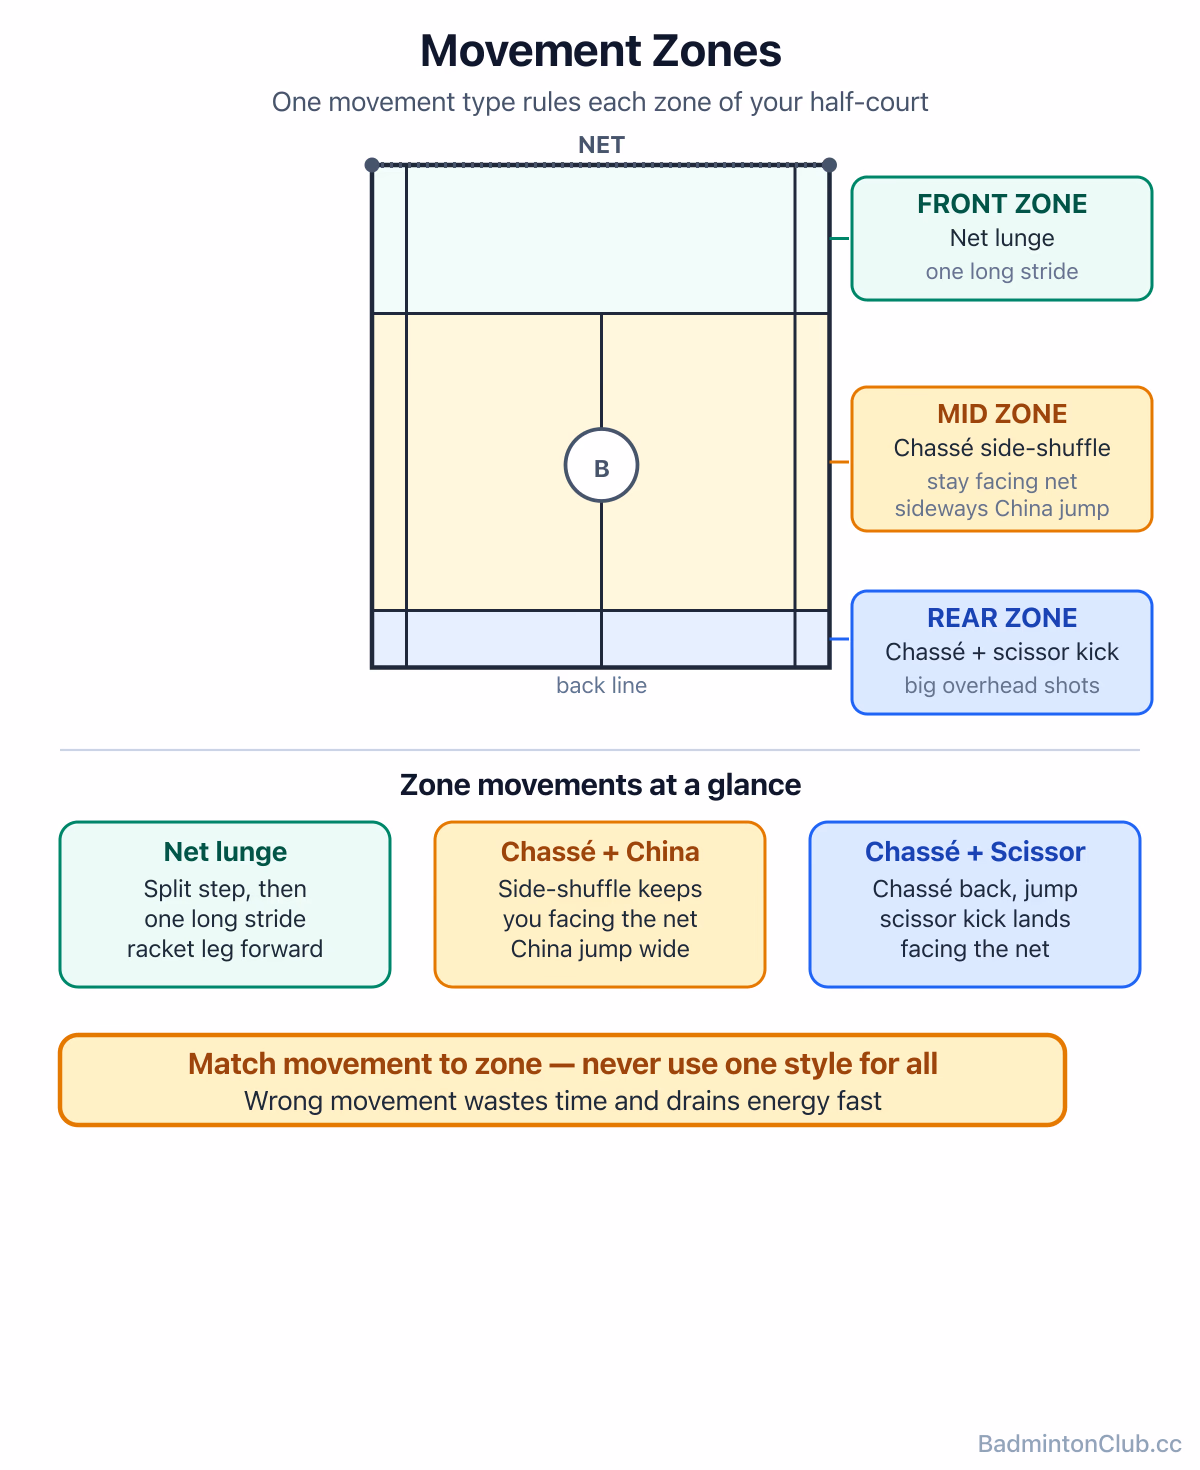
Master the key badminton movement techniques — the net lunge, scissor kick, and China jump — that get you to the corners and back. Covers correct lunge alignment, rear-court scissor recovery, explosive sideways movement, and the "quiet feet" cue that shows whether you're moving with control or just rushing around the court.
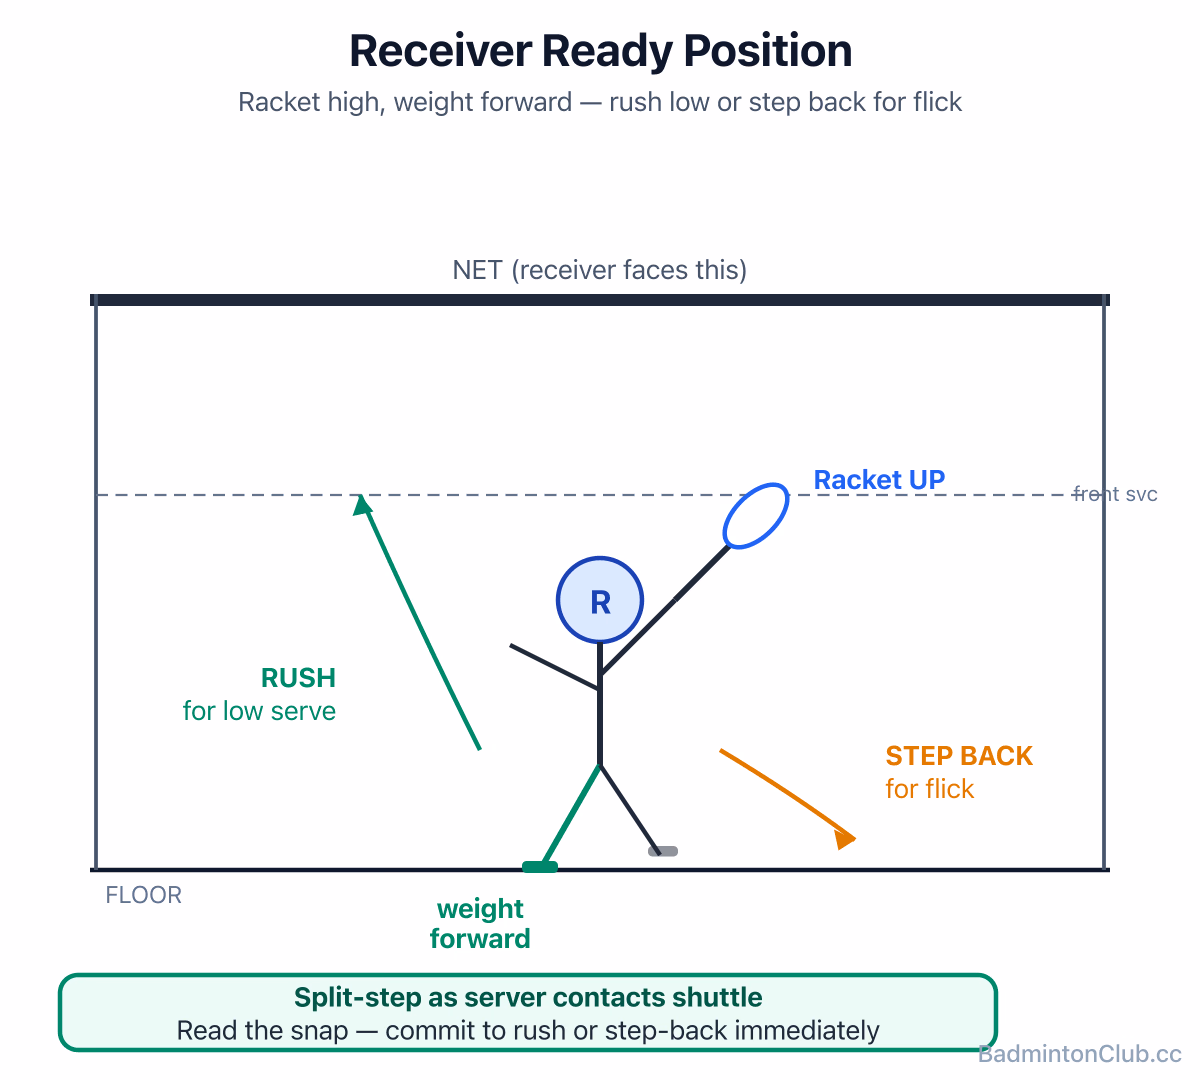
Mastering the return of serve in badminton means standing racket-up, weight forward, ready to rush any loose low serve — not waiting for it to land. This guide covers the aggressive receiver stance, how to intercept the flick without overcommitting, and how to use deceptive returns to keep the server guessing. Written for doubles players who want to seize the initiative from the very first shot of each rally.
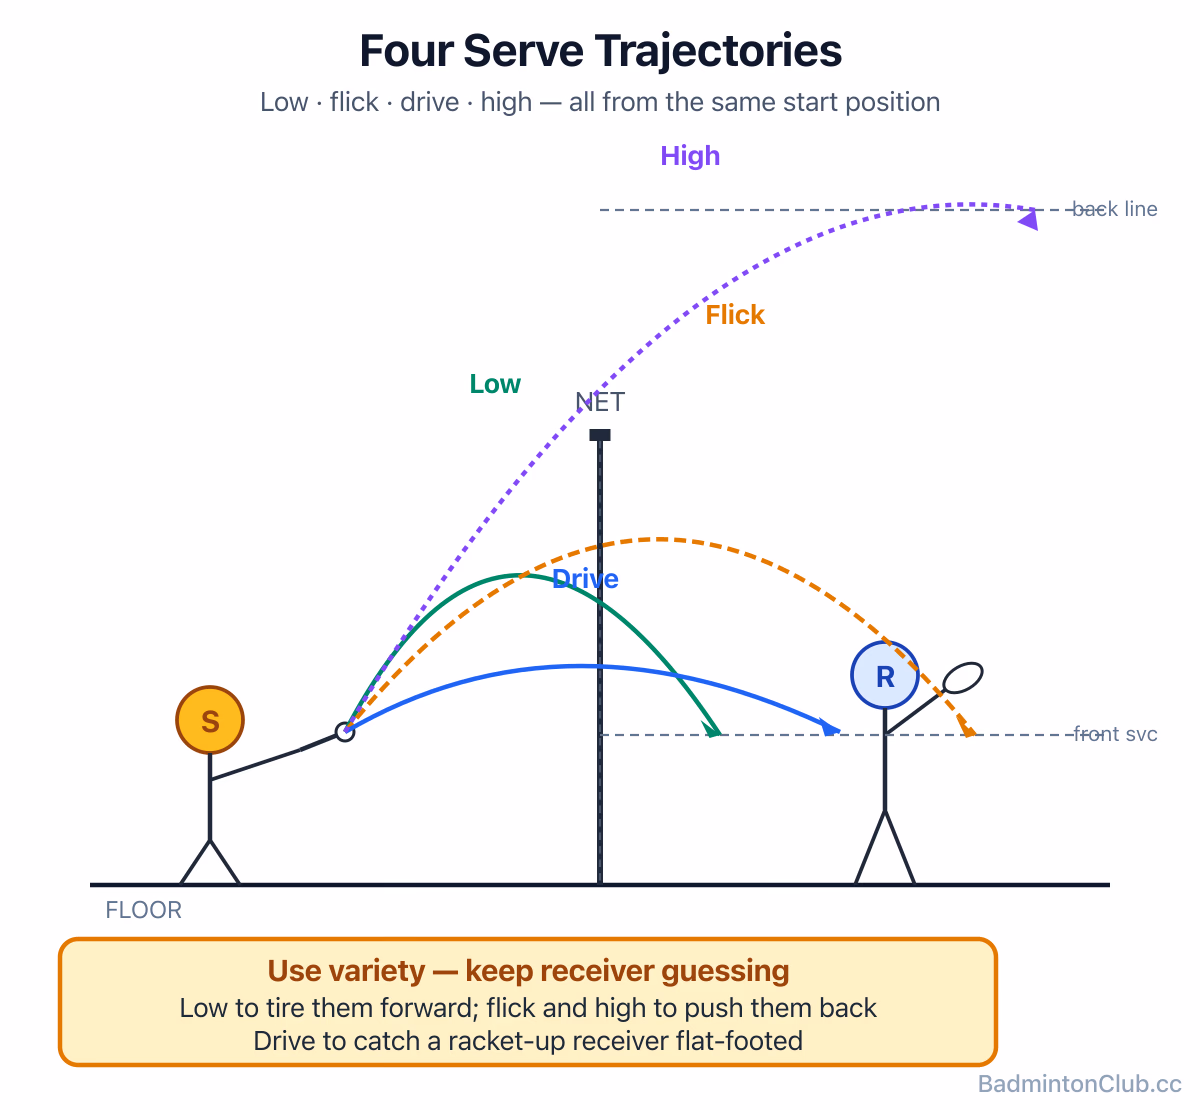
Master the flick, drive, swerve, and high serves in badminton — four weapons that punish receivers who guess wrong. Covers the identical low-serve disguise that makes the flick work, when to use a flat drive serve as a rare surprise, and why the high serve is a singles staple. Practical tips on reading when to vary, and how to reset after your flick gets smashed.
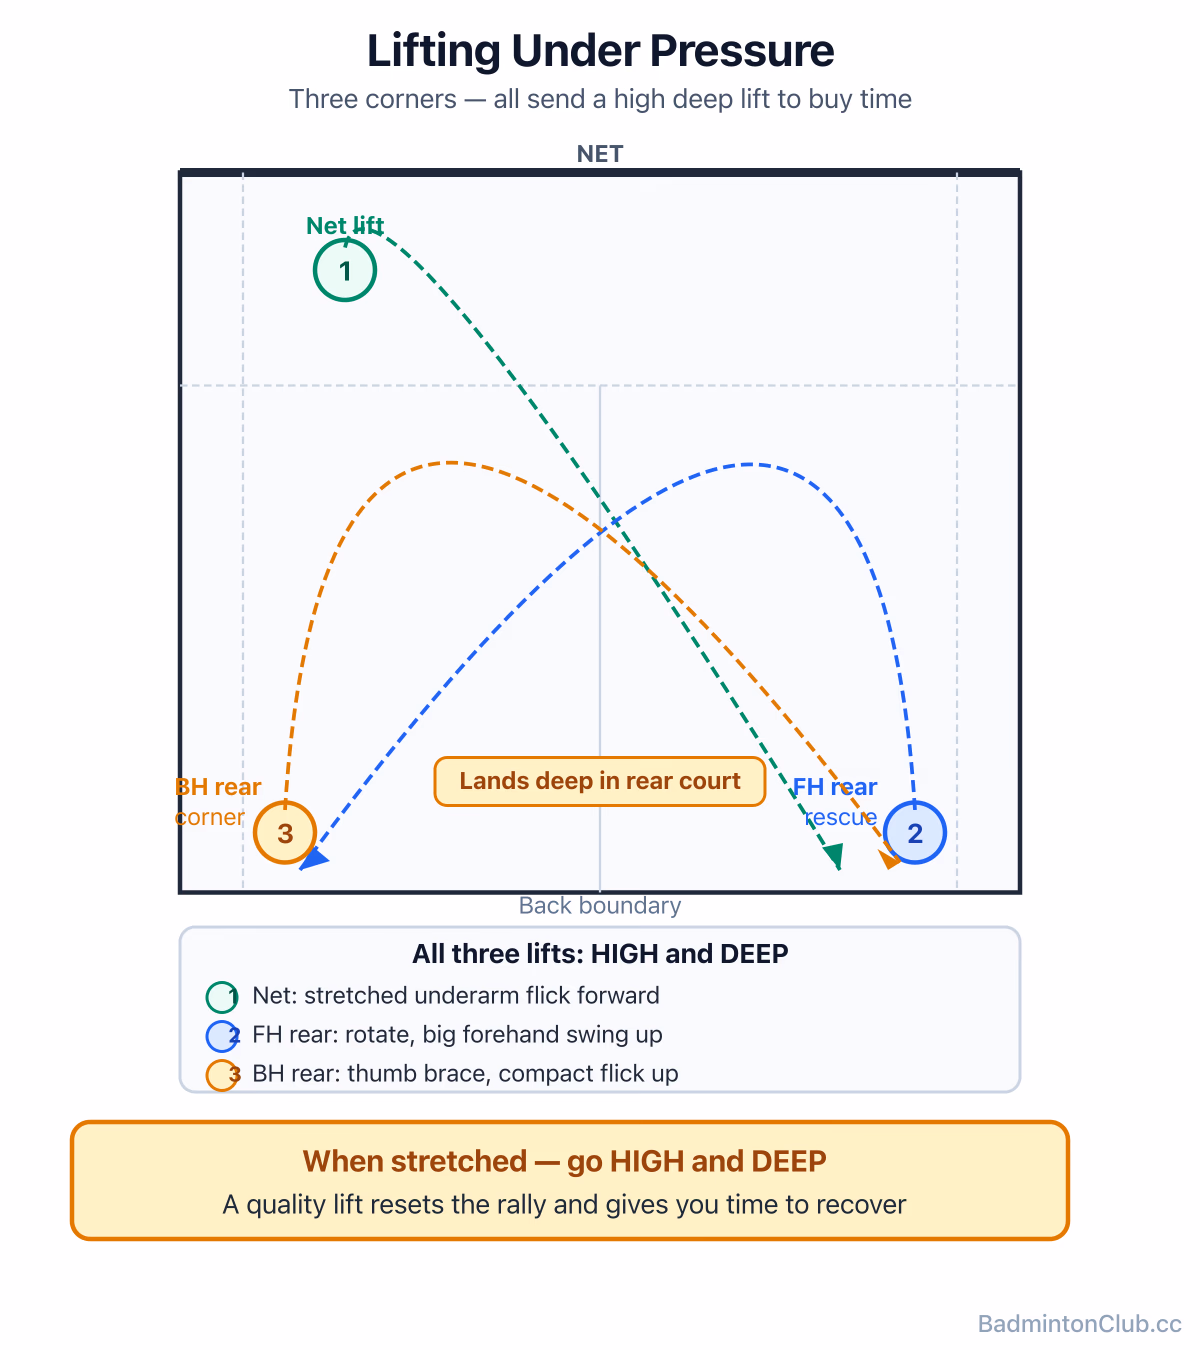
Master the pressure lift — the survival shot that resets a losing rally. Learn the thumb-braced backhand lift, forehand deep-corner rescue, and the "minimum lift" principle that keeps you in the point when you're scrambled and stretched.
The backhand clear is the shot that exposes every player who hasn't drilled it — a thumb-braced grip, back to the net, and a sharp late forearm snap are what turn a panicked scoop into a genuine reset. This guide covers grip, footwork, the supination snap that creates length, common faults, and a focused drill to build consistency from your backhand rear corner.
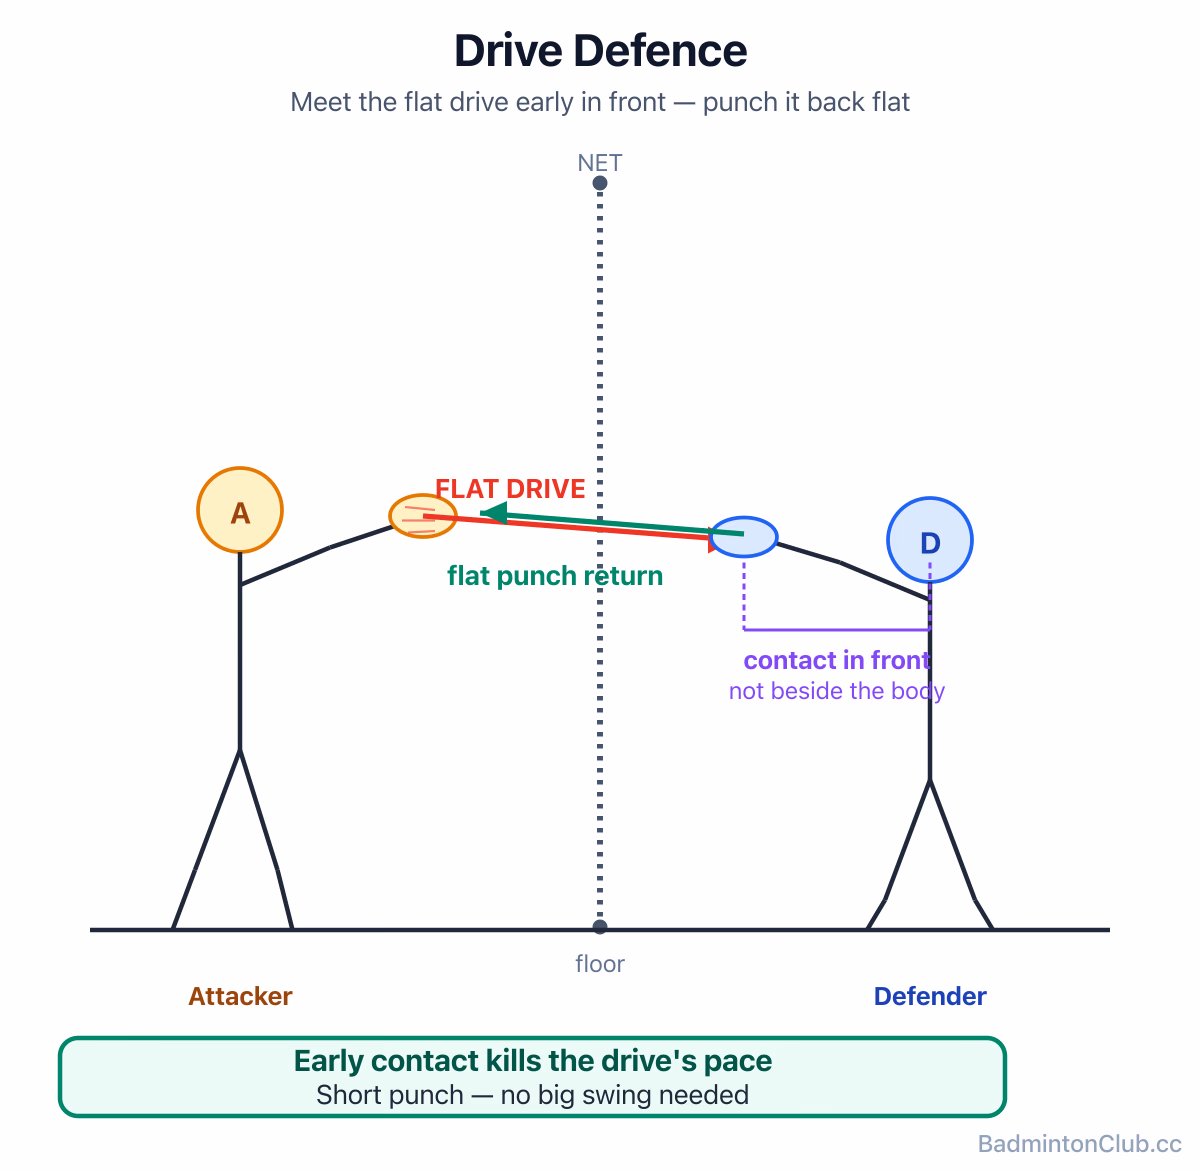
Drive defence turns fast, flat rallies in your favour by meeting the shuttle early and redirecting it rather than lifting. This guide covers drive exchanges, angle redirection, scramble recovery, the defensive dive, and the cross-court "wrong-foot" window — practical technique for club and intermediate players who want to stop being pinned on defence.
The net lift (underhand clear) is your reset button when a front-court exchange goes against you — hit it high, hit it deep, and recover fast. This piece covers lunge mechanics, forearm snap, straight vs cross-court choice, and a targeting trick for aiming past the back line. Practical and unglamorous, it's the shot that quietly keeps you in rallies you have no business still being in.
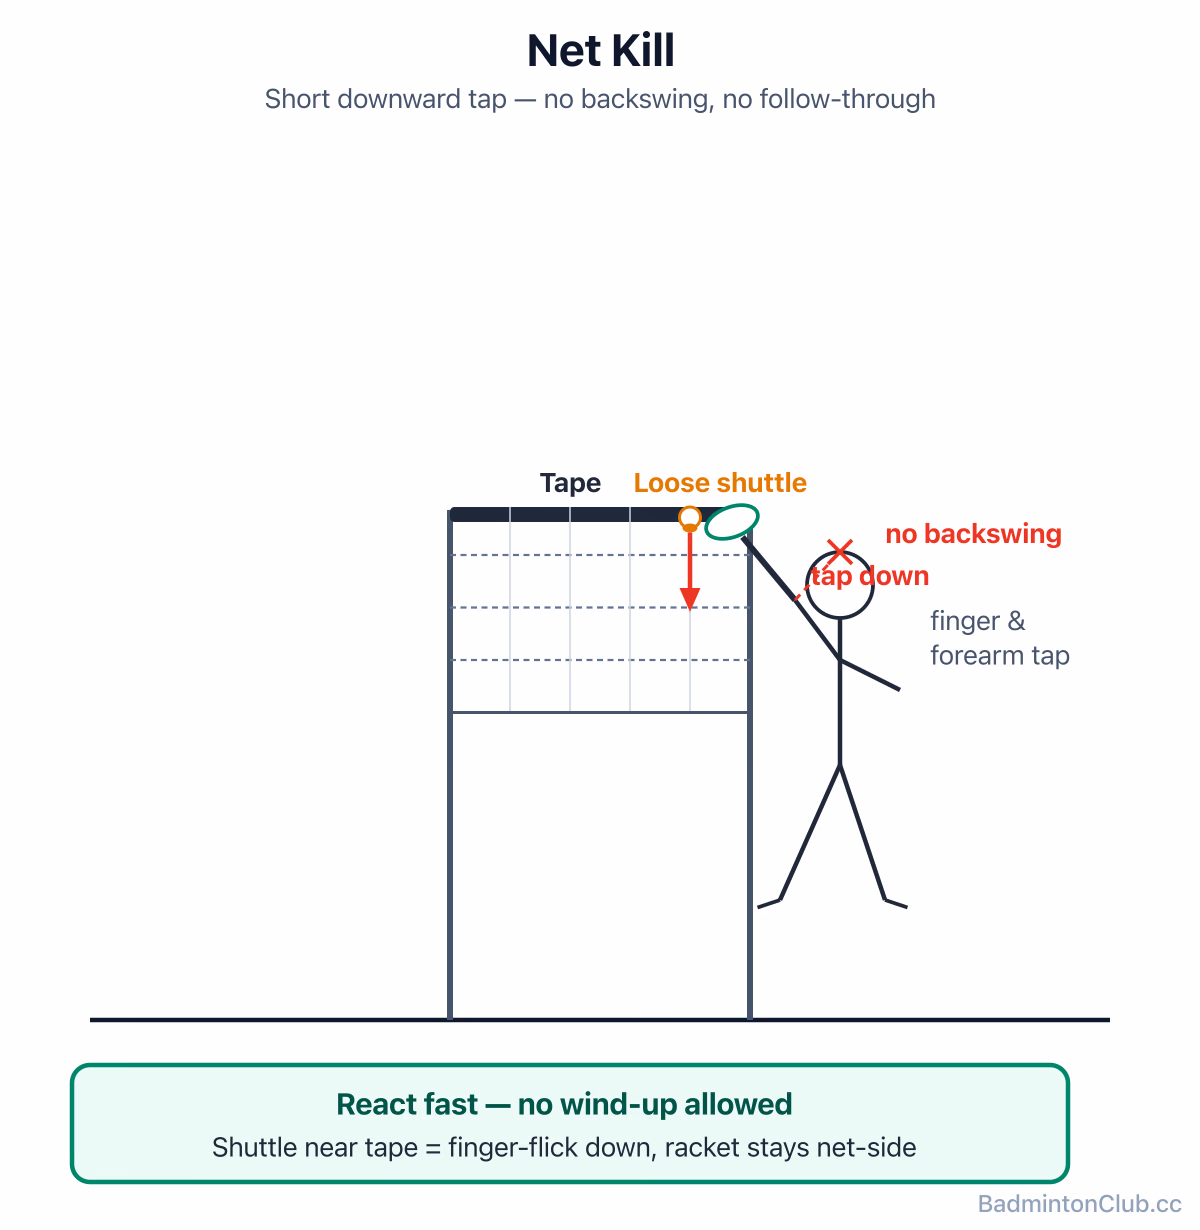
Master the net kill and brush kill — the short, snapping strokes that turn loose shuttles near the tape into instant winners. Covers technique, the sideways brush for tight positions, net tap drills to build finger speed, and the two errors (over-swing and hesitation) that give easy points away. A must-read for doubles players.
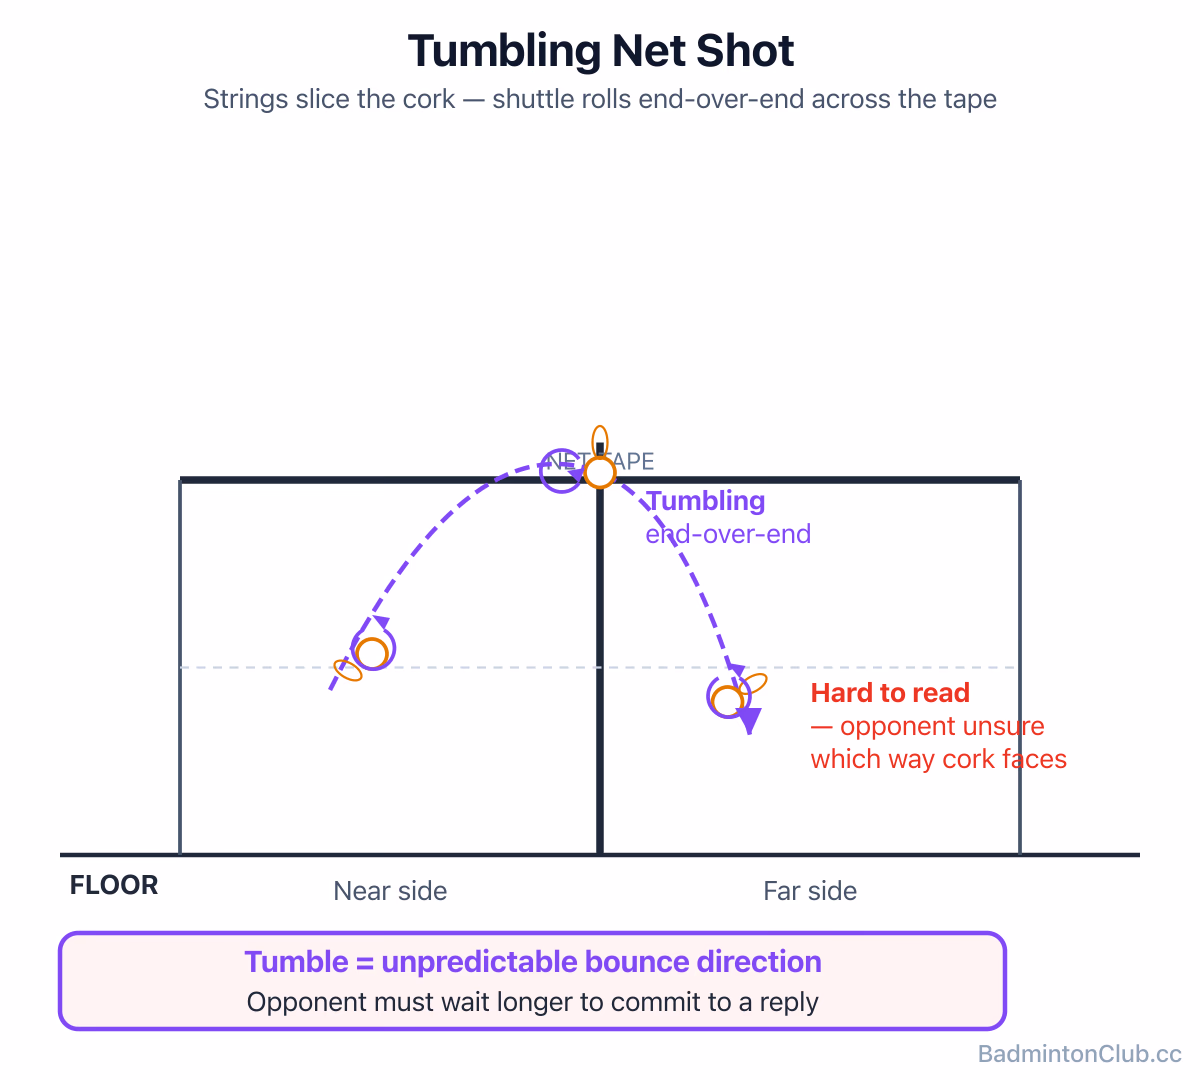
Master the spinning net shot by learning to slice across the cork with soft hands and high contact. This guide covers forehand and backhand technique, the cork-slicing detail most players miss, a drill to groove the tumble, and why the hum you hear — or don't hear — is your best diagnostic tool.
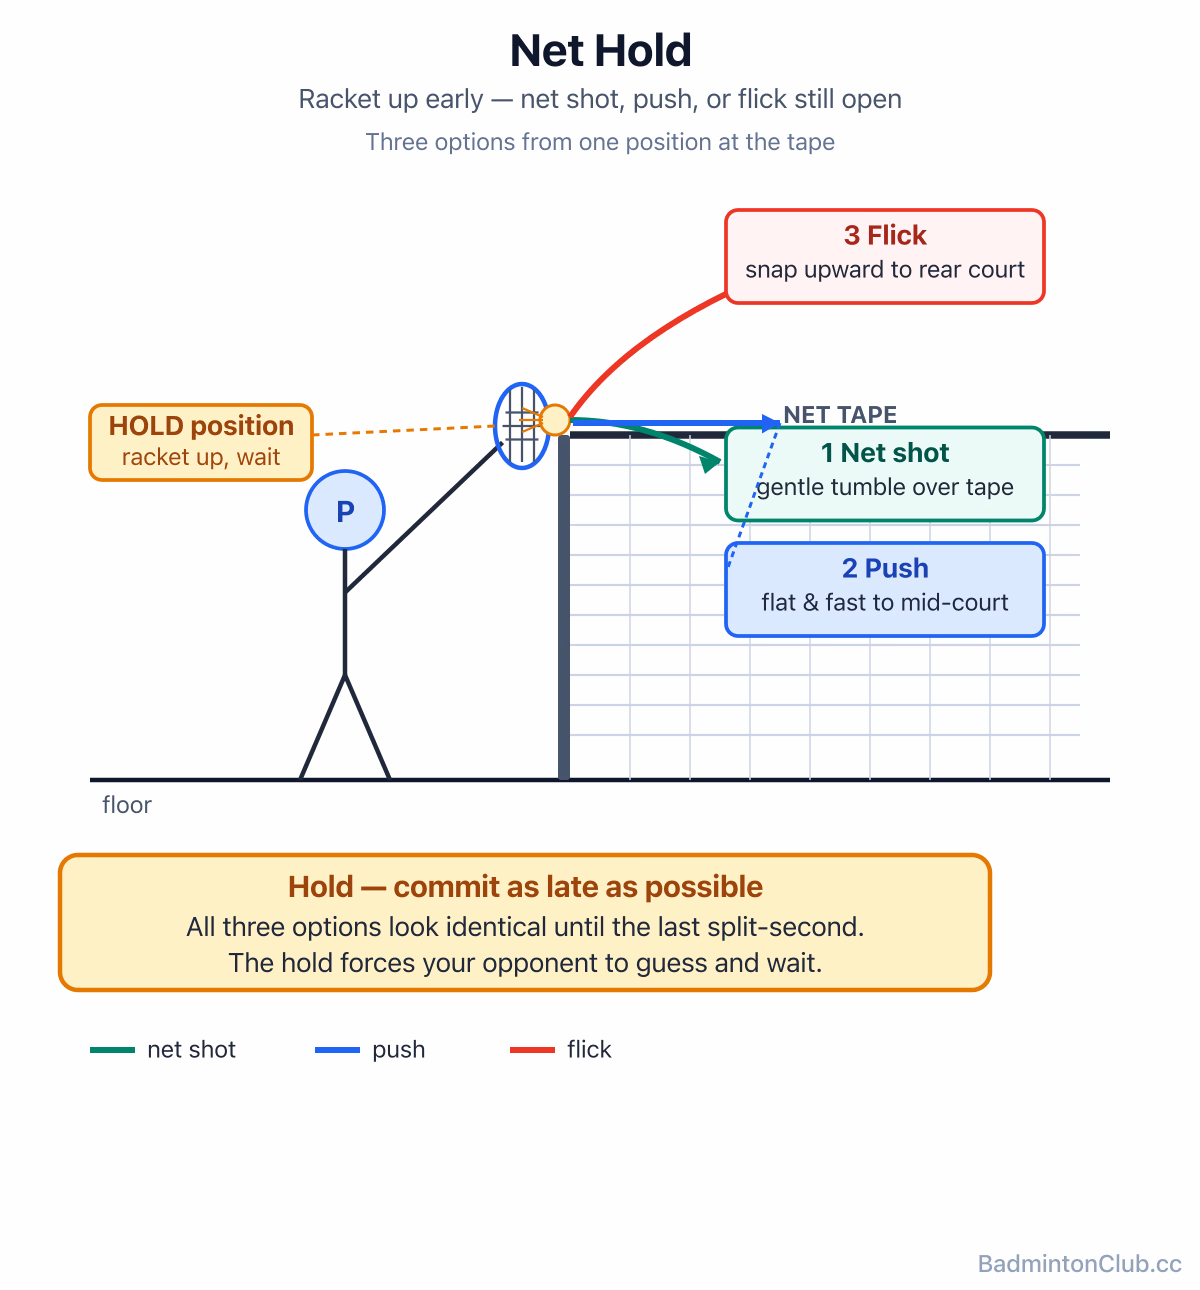
Master deceptive net shots in badminton by learning the hold-and-flick, deceptive push and cross-court flick. Taking the shuttle early keeps every option alive, letting you freeze opponents at the net without needing power or athleticism — just soft hands, a racket-up position and the patience to commit last.
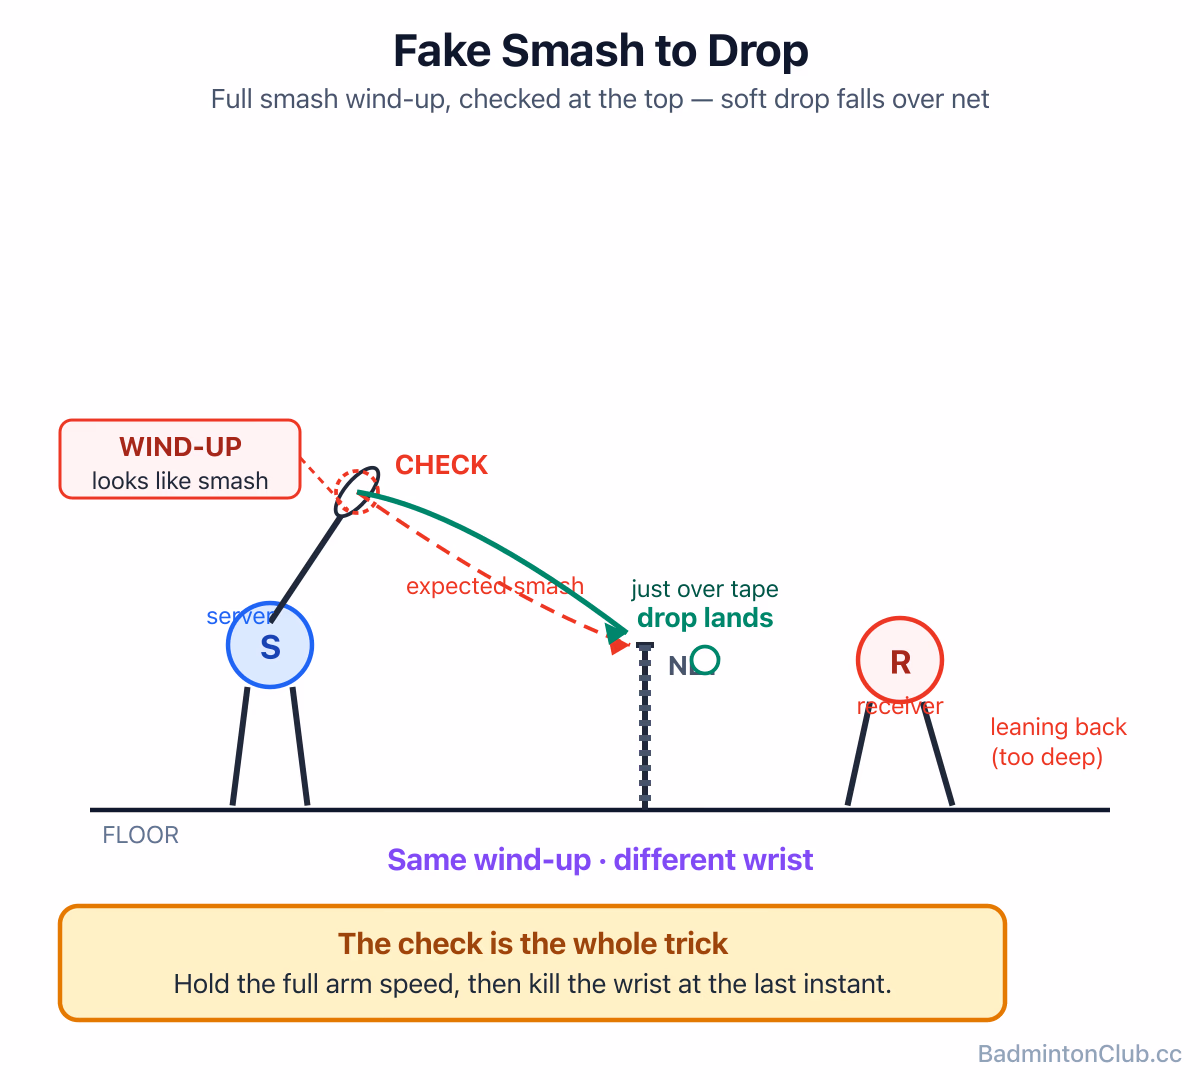
Master the fake smash drop, check smash, and stop drop — three deceptive overhead shots that weaponise the same smash wind-up to freeze defenders. Covers the hold technique, how to hide deceleration, the stop drop's soft-hands mechanics, when to deploy fakes (and how often), and why the threat of a real smash is the foundation for all of it.
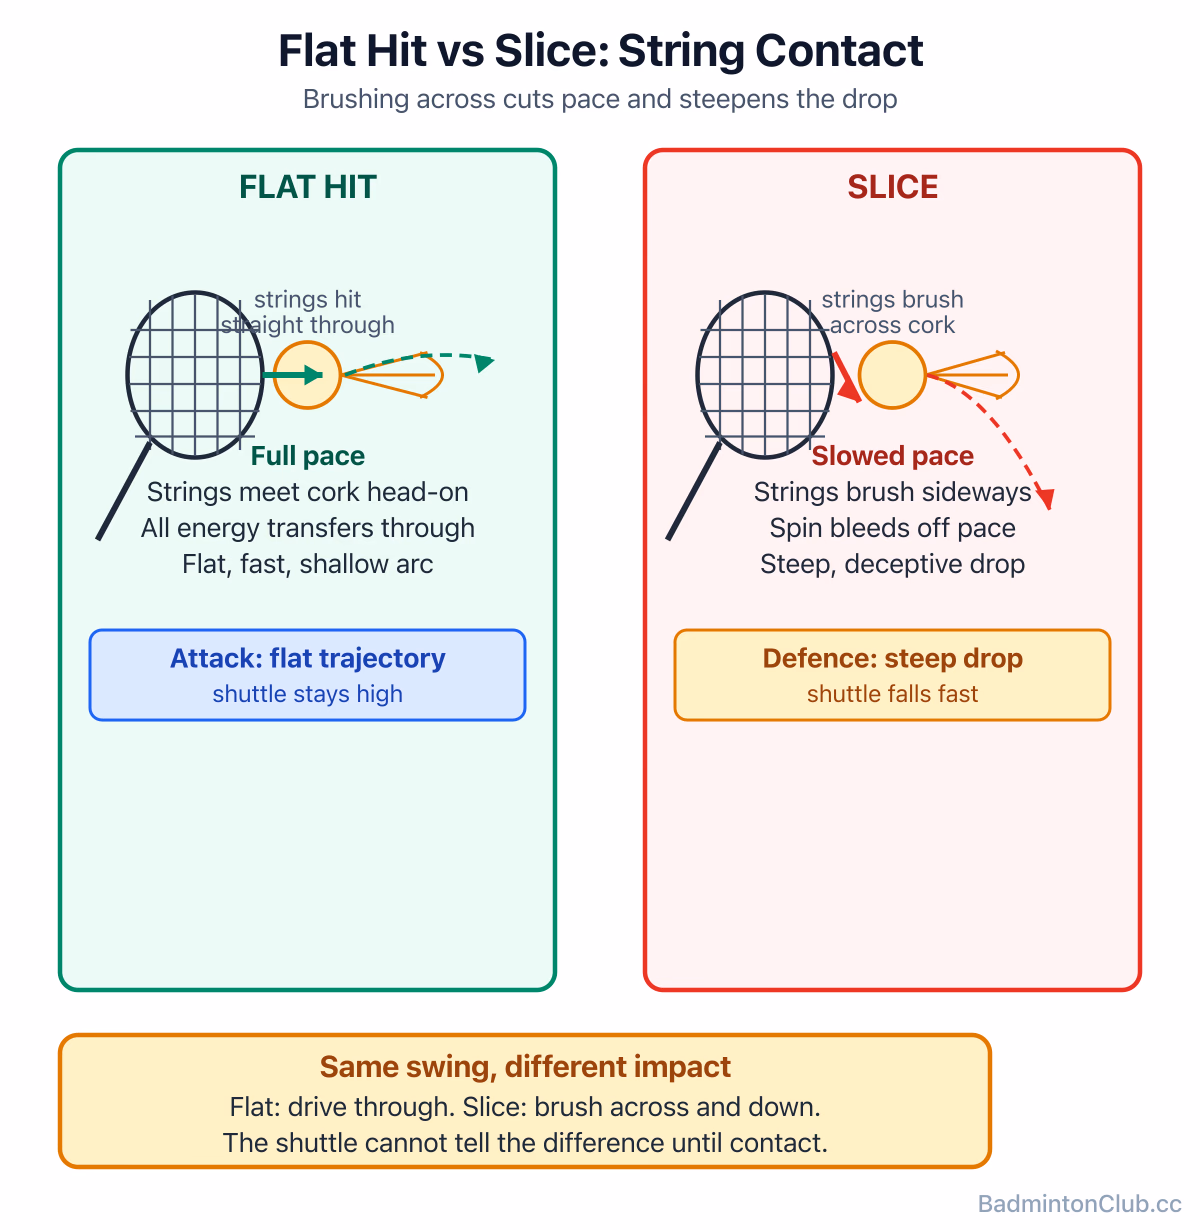
Learn how to hit deceptive slice and reverse-slice drop shots in badminton by brushing across the shuttle with a full smash-speed arm. Covers the straight slice, the cross-court reverse slice, common giveaways like the slowed arm, a groove drill for both corners, and string tension tips — ideal for intermediate players ready to add the most disguised drop in the game.
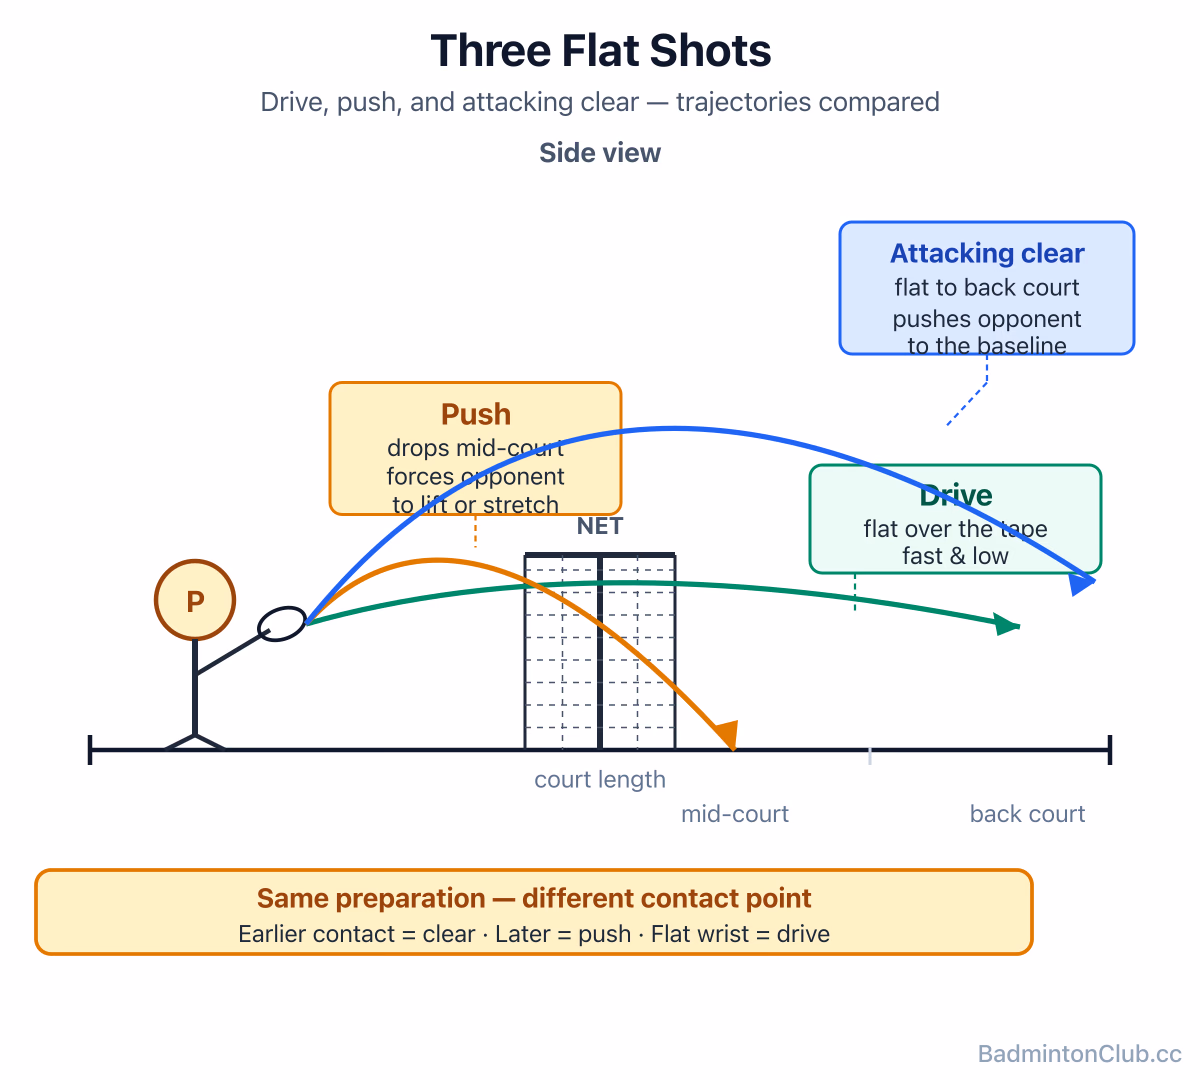
Drives, pushes and the attacking clear are badminton's flat-game weapons — they take time away instead of hitting down. This guide covers the mechanics of each shot, when to use them in doubles, and the two-tempo warm-up habit that sharpens your fast-exchange hands.
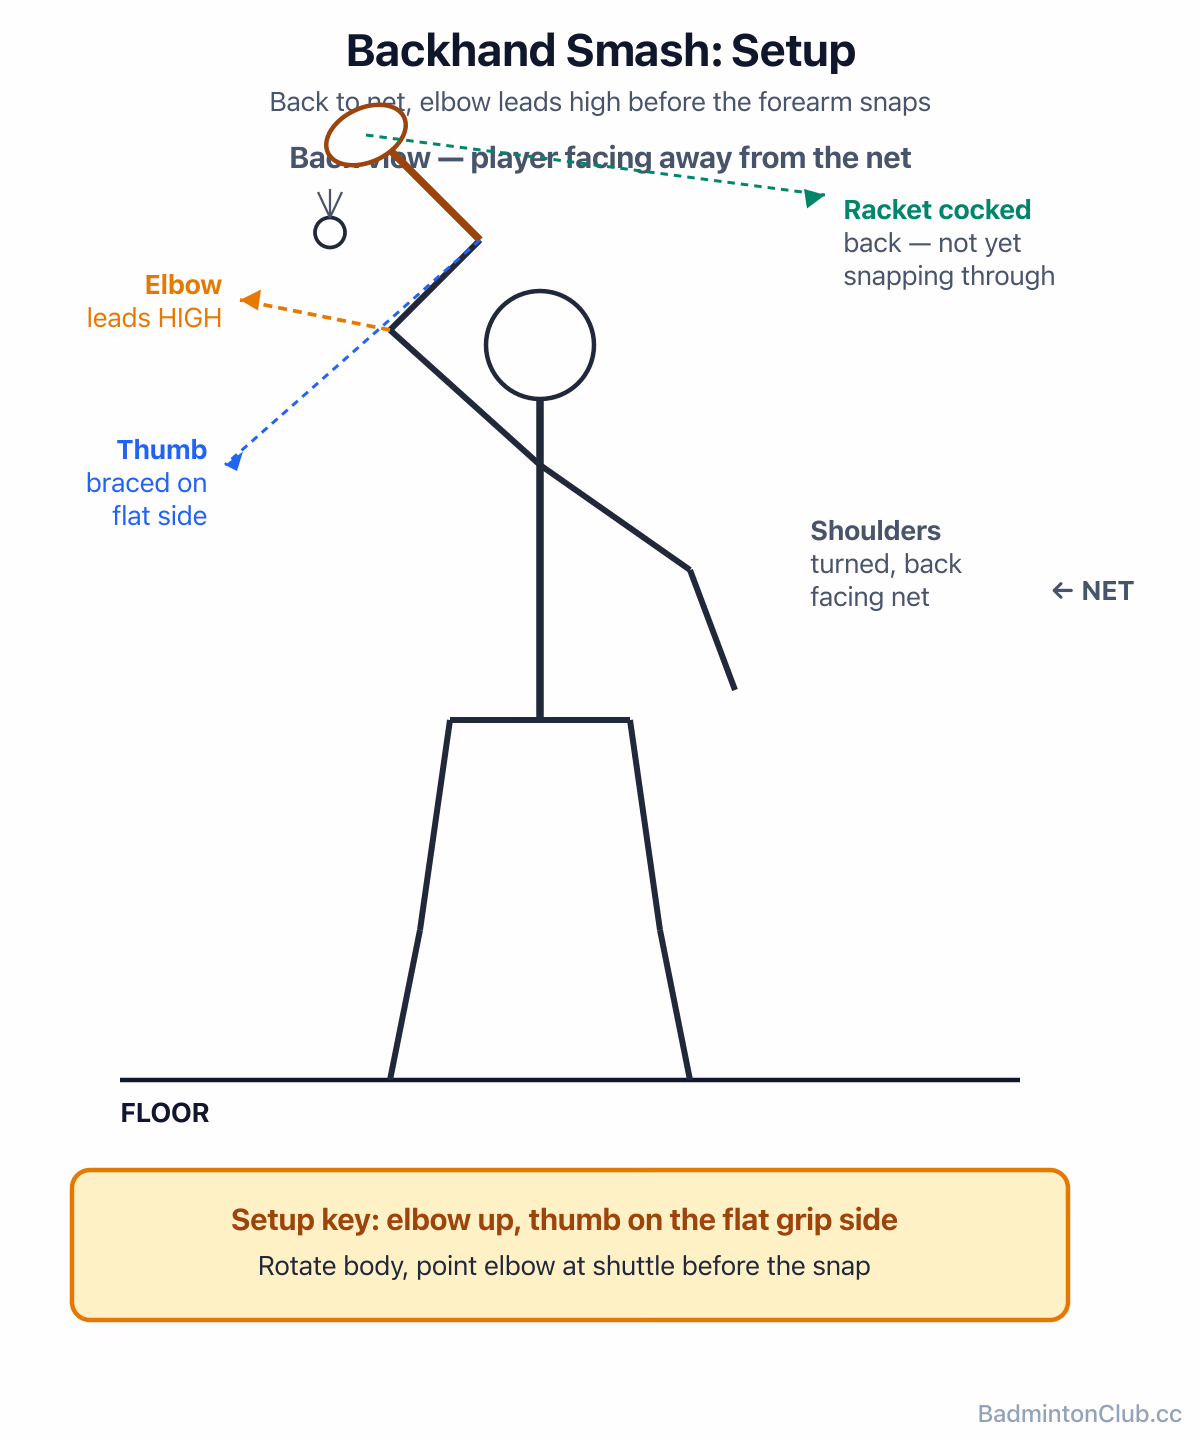
The backhand smash is one of the hardest shots to hit with real pace — almost all the power comes from a sharp forearm supination snap at the top of the reach. This guide covers the mechanics, the grip, the most common faults (swinging with the whole arm, taking the shuttle too late), and the honest truth about when a backhand clear is the smarter choice.
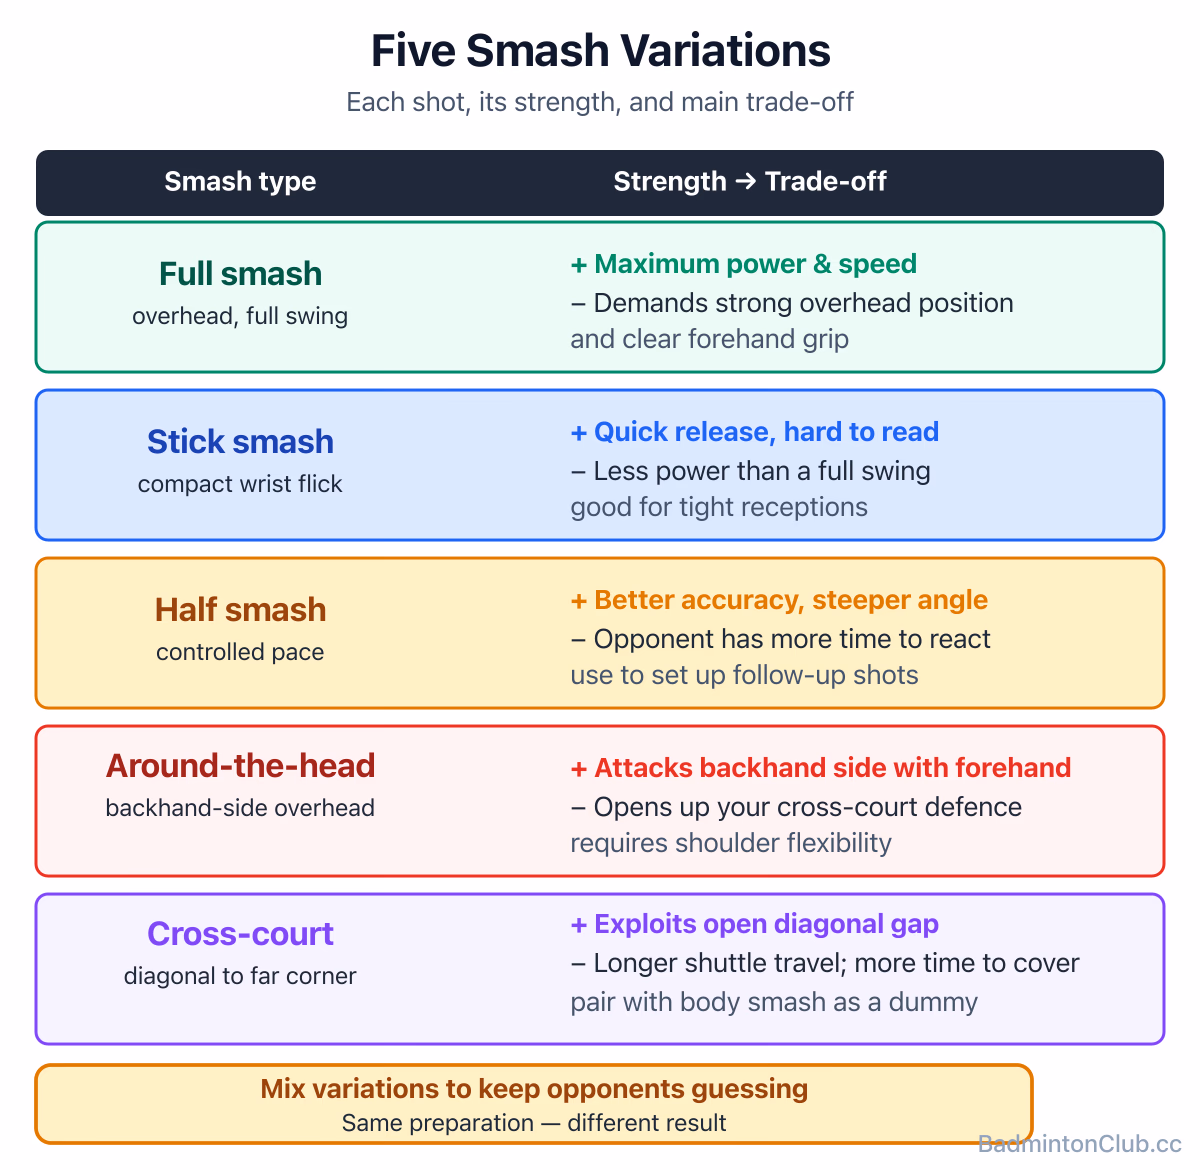
Master five badminton smash variations beyond full power: stick smash uses a compact wrist snap to disguise timing, half smash trades speed for a steeper angle, around-the-head keeps your forehand on the backhand side, body smash jams opponents at the hip, and cross-court smash surprises when the straight one is respected. Includes shot-mix rules and common coaching fixes.