The backhand clear is the shot that exposes every player who hasn't drilled it — a thumb-braced grip, back to the net, and a sharp late forearm snap are what turn a panicked scoop into a genuine reset. This guide covers grip, footwork, the supination snap that creates length, common faults, and a focused drill to build consistency from your backhand rear corner.
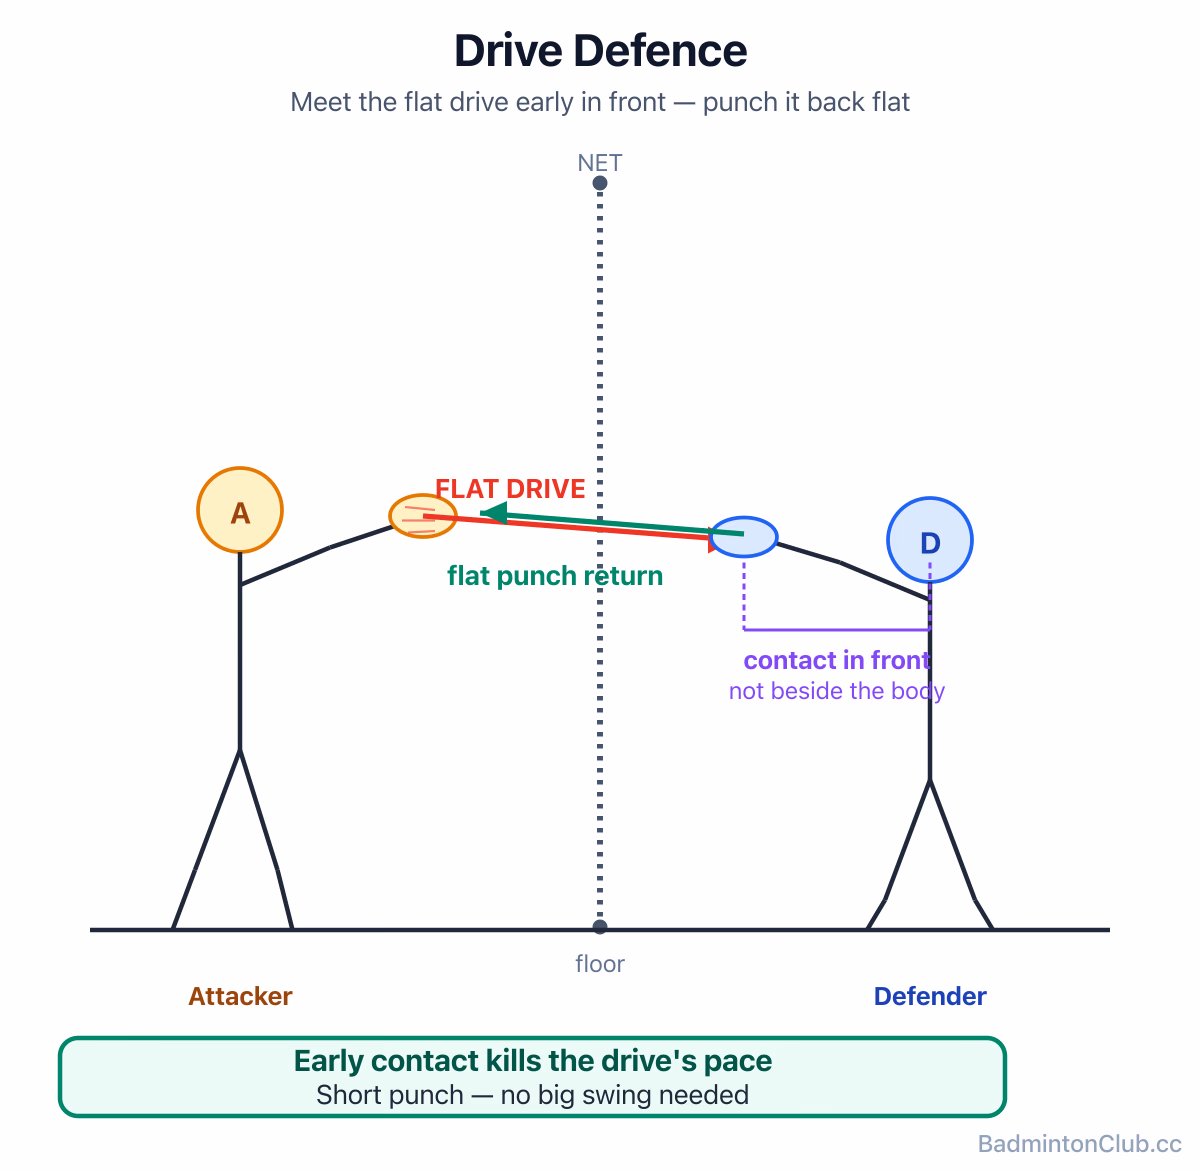
Drive defence turns fast, flat rallies in your favour by meeting the shuttle early and redirecting it rather than lifting. This guide covers drive exchanges, angle redirection, scramble recovery, the defensive dive, and the cross-court "wrong-foot" window — practical technique for club and intermediate players who want to stop being pinned on defence.
The net lift (underhand clear) is your reset button when a front-court exchange goes against you — hit it high, hit it deep, and recover fast. This piece covers lunge mechanics, forearm snap, straight vs cross-court choice, and a targeting trick for aiming past the back line. Practical and unglamorous, it's the shot that quietly keeps you in rallies you have no business still being in.
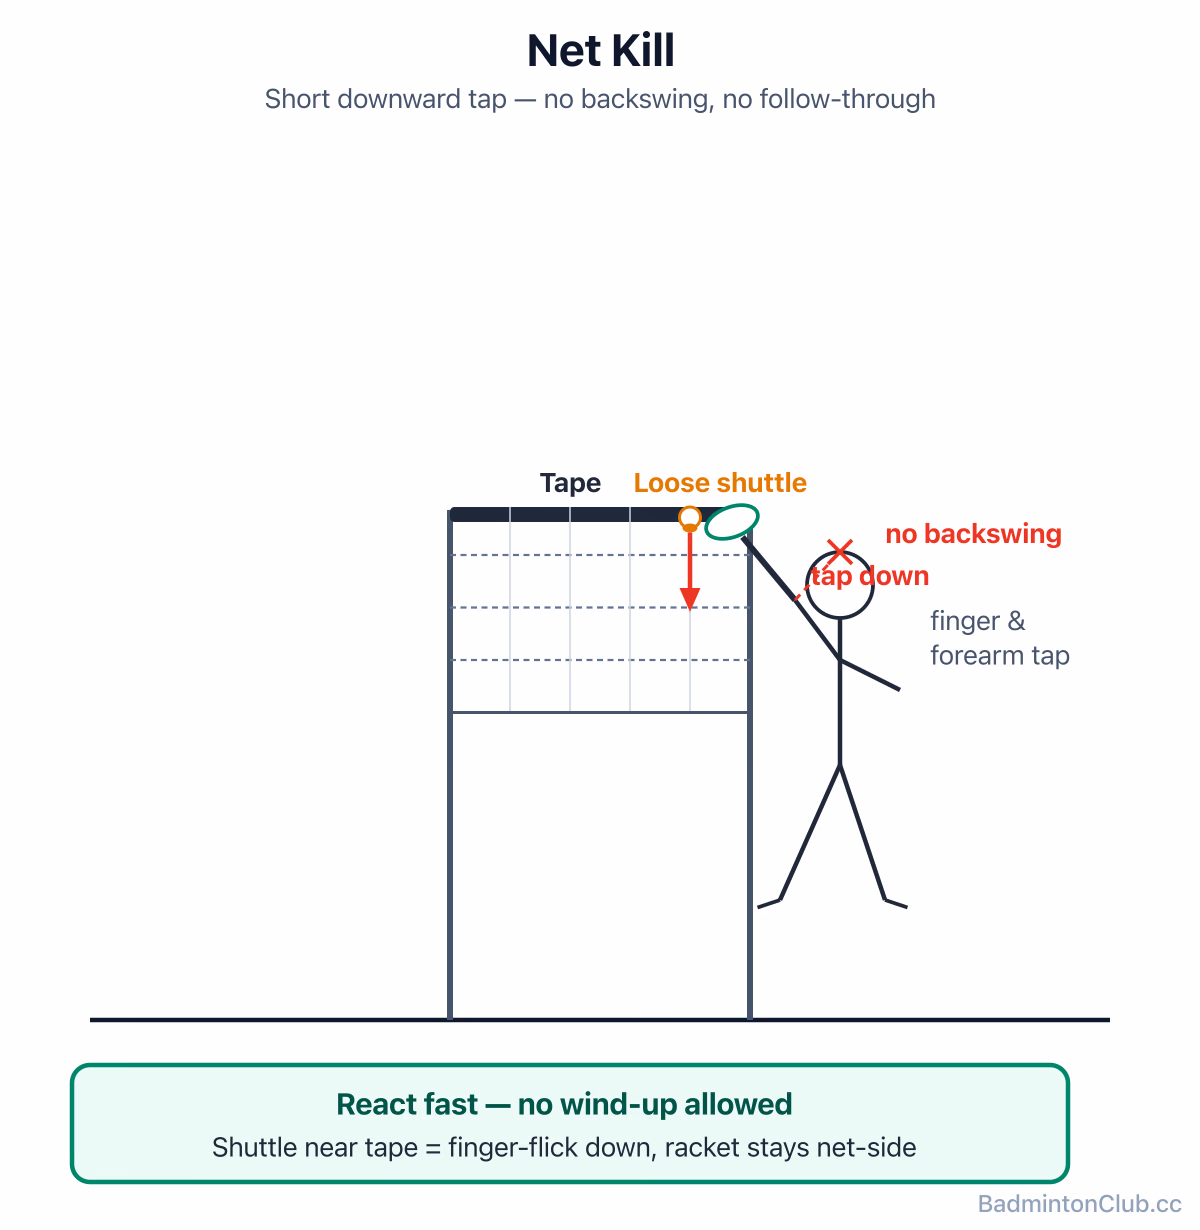
Master the net kill and brush kill — the short, snapping strokes that turn loose shuttles near the tape into instant winners. Covers technique, the sideways brush for tight positions, net tap drills to build finger speed, and the two errors (over-swing and hesitation) that give easy points away. A must-read for doubles players.
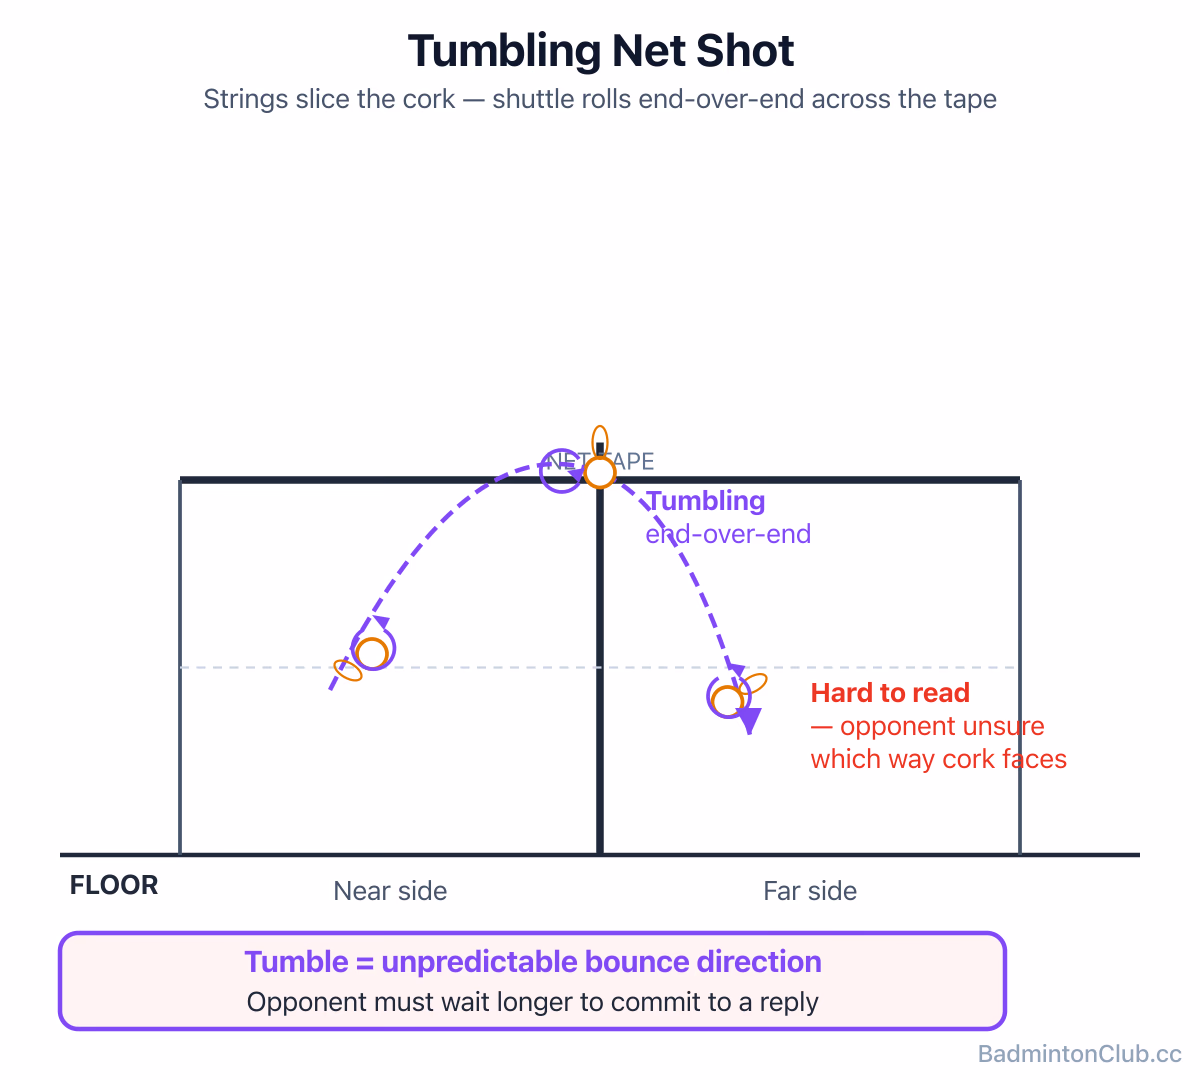
Master the spinning net shot by learning to slice across the cork with soft hands and high contact. This guide covers forehand and backhand technique, the cork-slicing detail most players miss, a drill to groove the tumble, and why the hum you hear — or don't hear — is your best diagnostic tool.
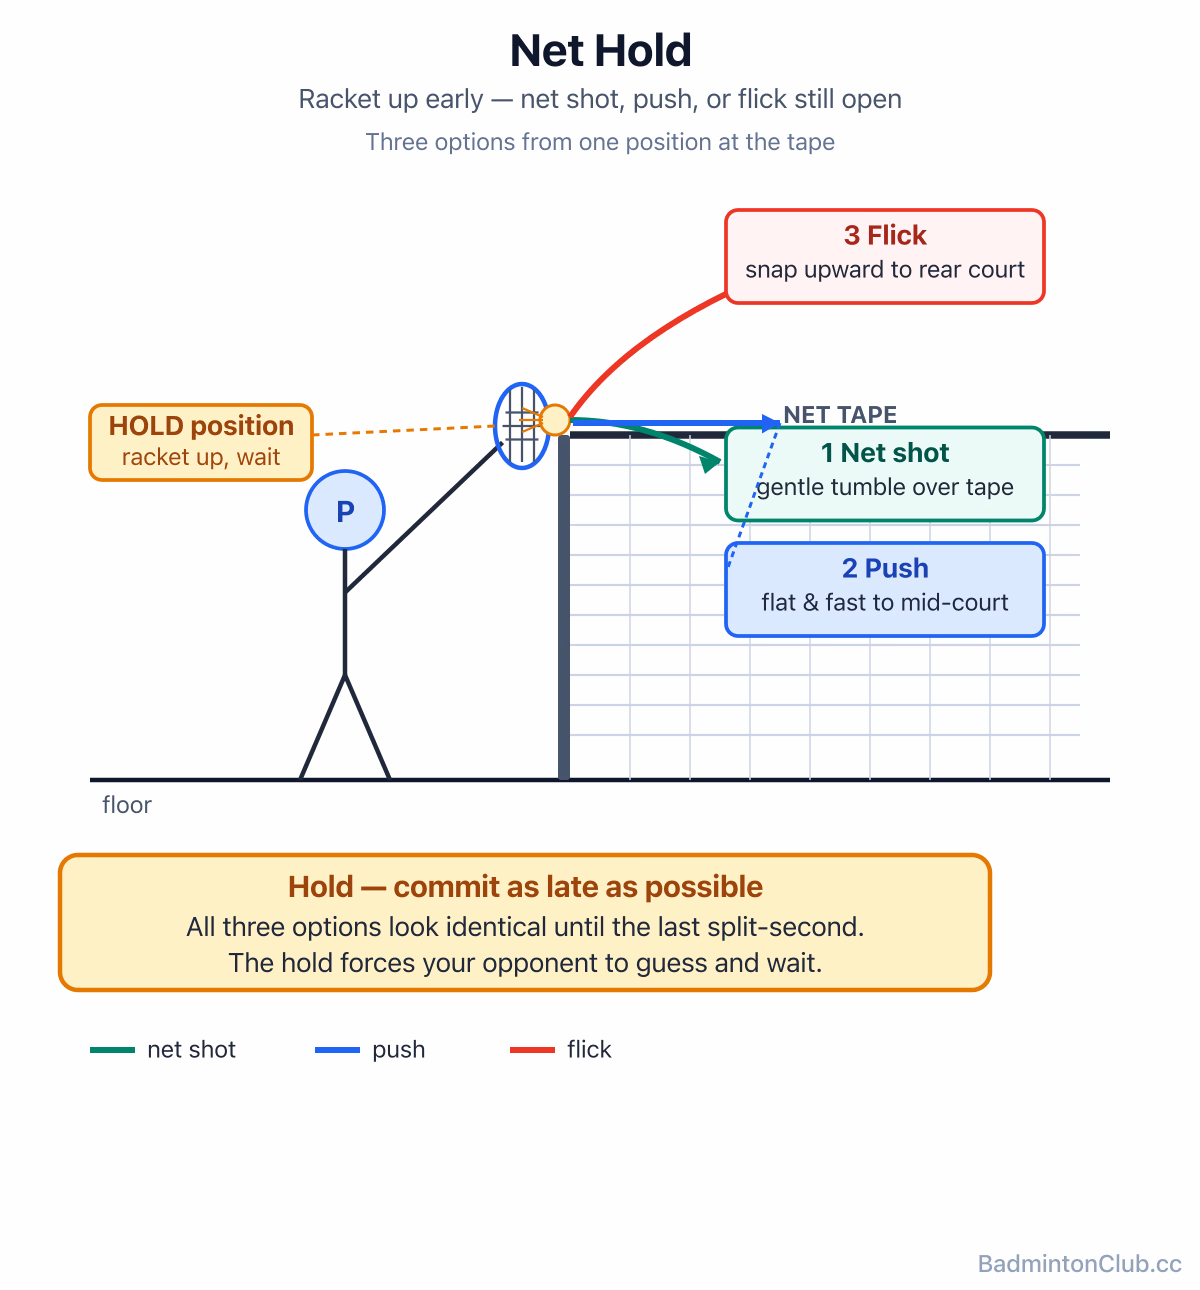
Master deceptive net shots in badminton by learning the hold-and-flick, deceptive push and cross-court flick. Taking the shuttle early keeps every option alive, letting you freeze opponents at the net without needing power or athleticism — just soft hands, a racket-up position and the patience to commit last.
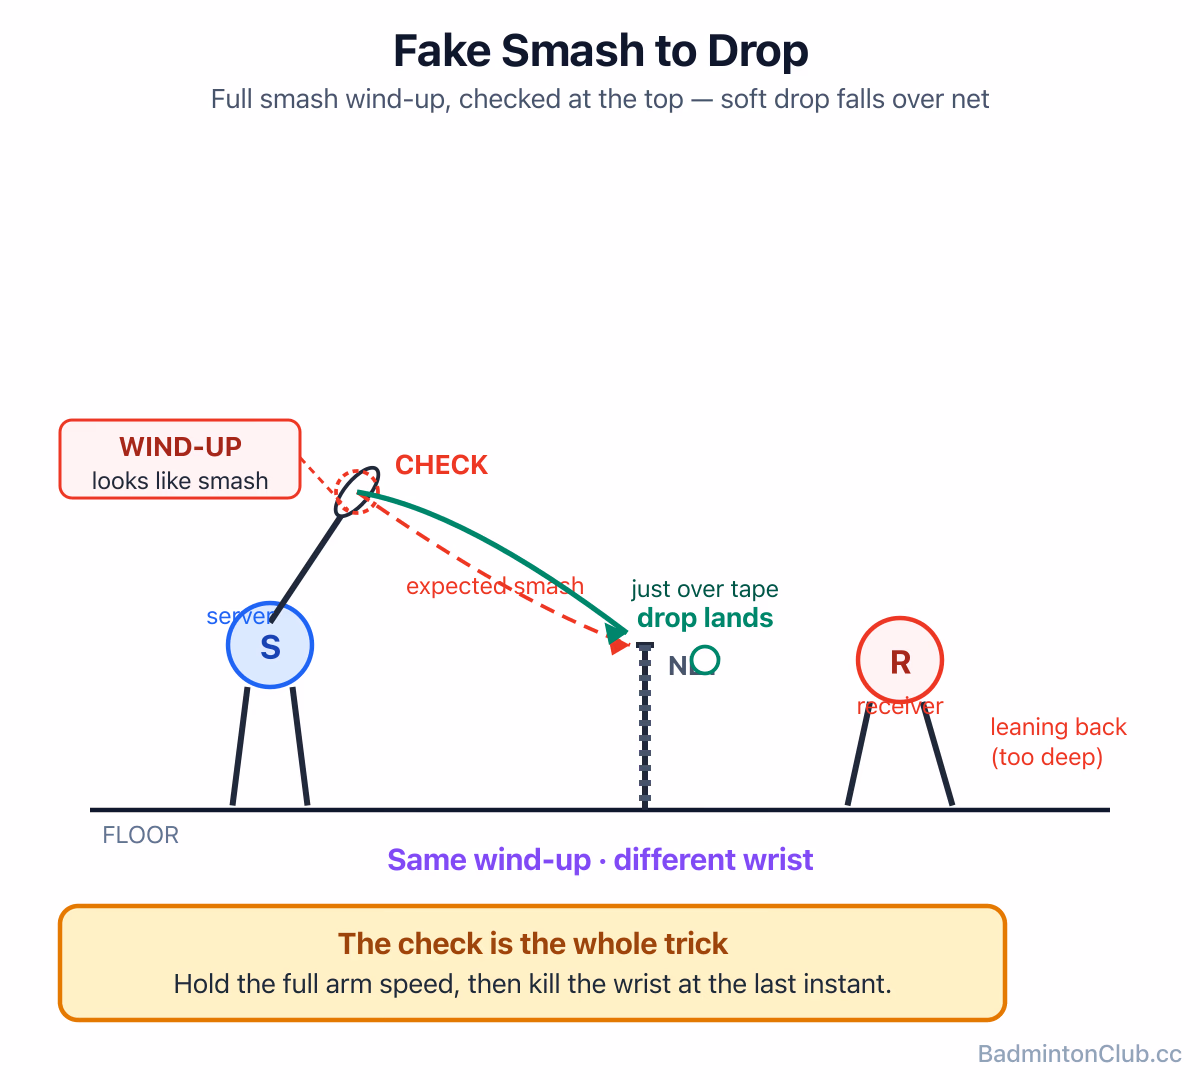
Master the fake smash drop, check smash, and stop drop — three deceptive overhead shots that weaponise the same smash wind-up to freeze defenders. Covers the hold technique, how to hide deceleration, the stop drop's soft-hands mechanics, when to deploy fakes (and how often), and why the threat of a real smash is the foundation for all of it.
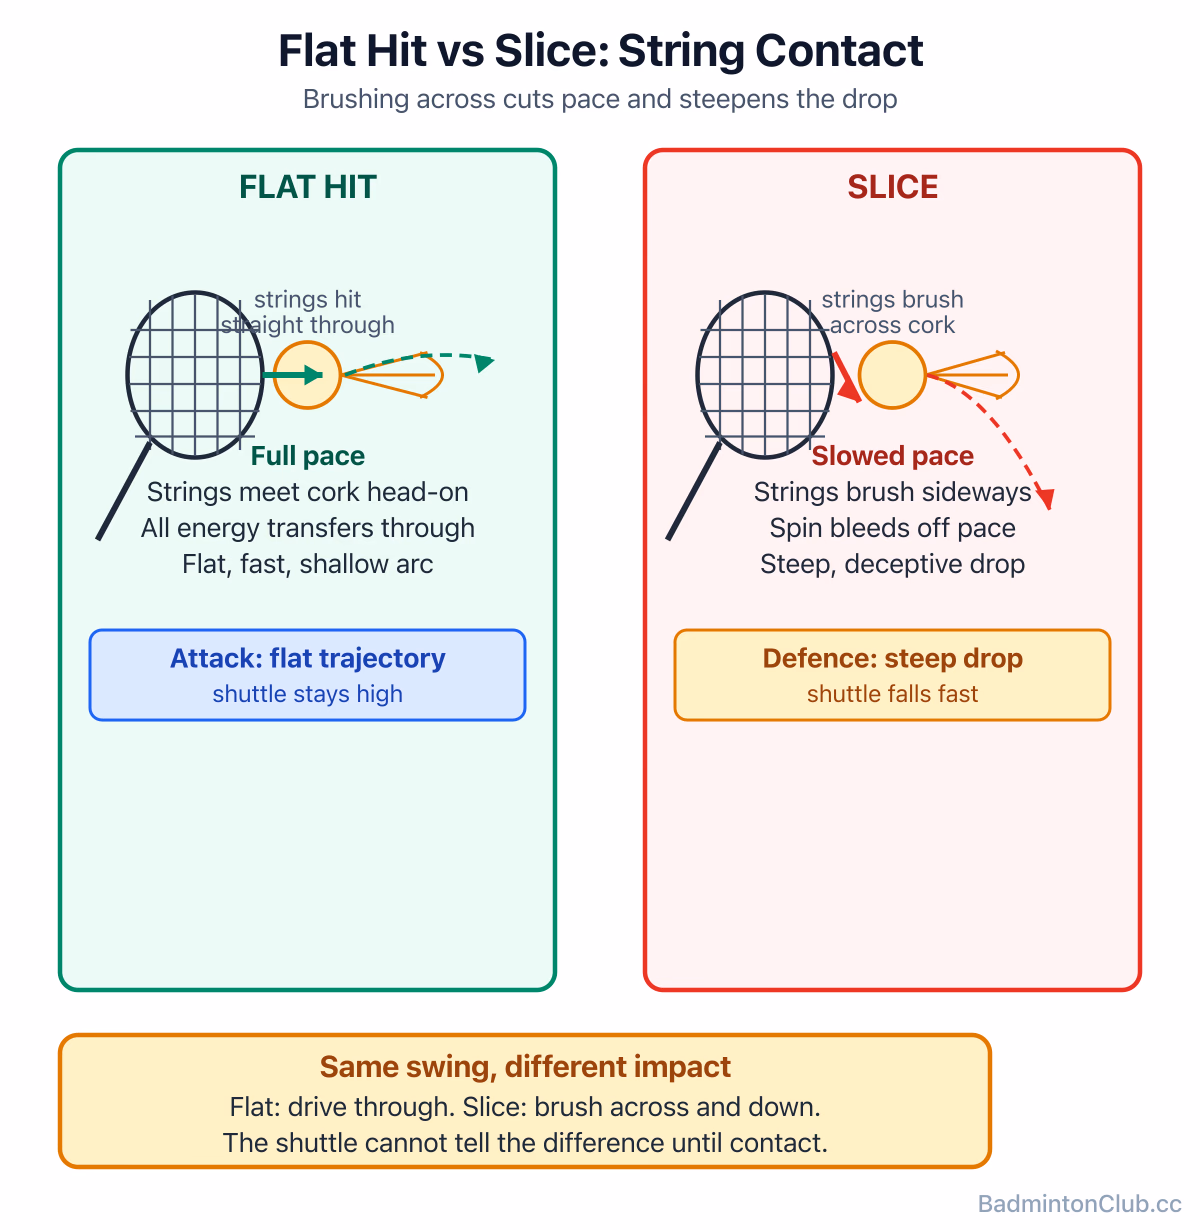
Learn how to hit deceptive slice and reverse-slice drop shots in badminton by brushing across the shuttle with a full smash-speed arm. Covers the straight slice, the cross-court reverse slice, common giveaways like the slowed arm, a groove drill for both corners, and string tension tips — ideal for intermediate players ready to add the most disguised drop in the game.
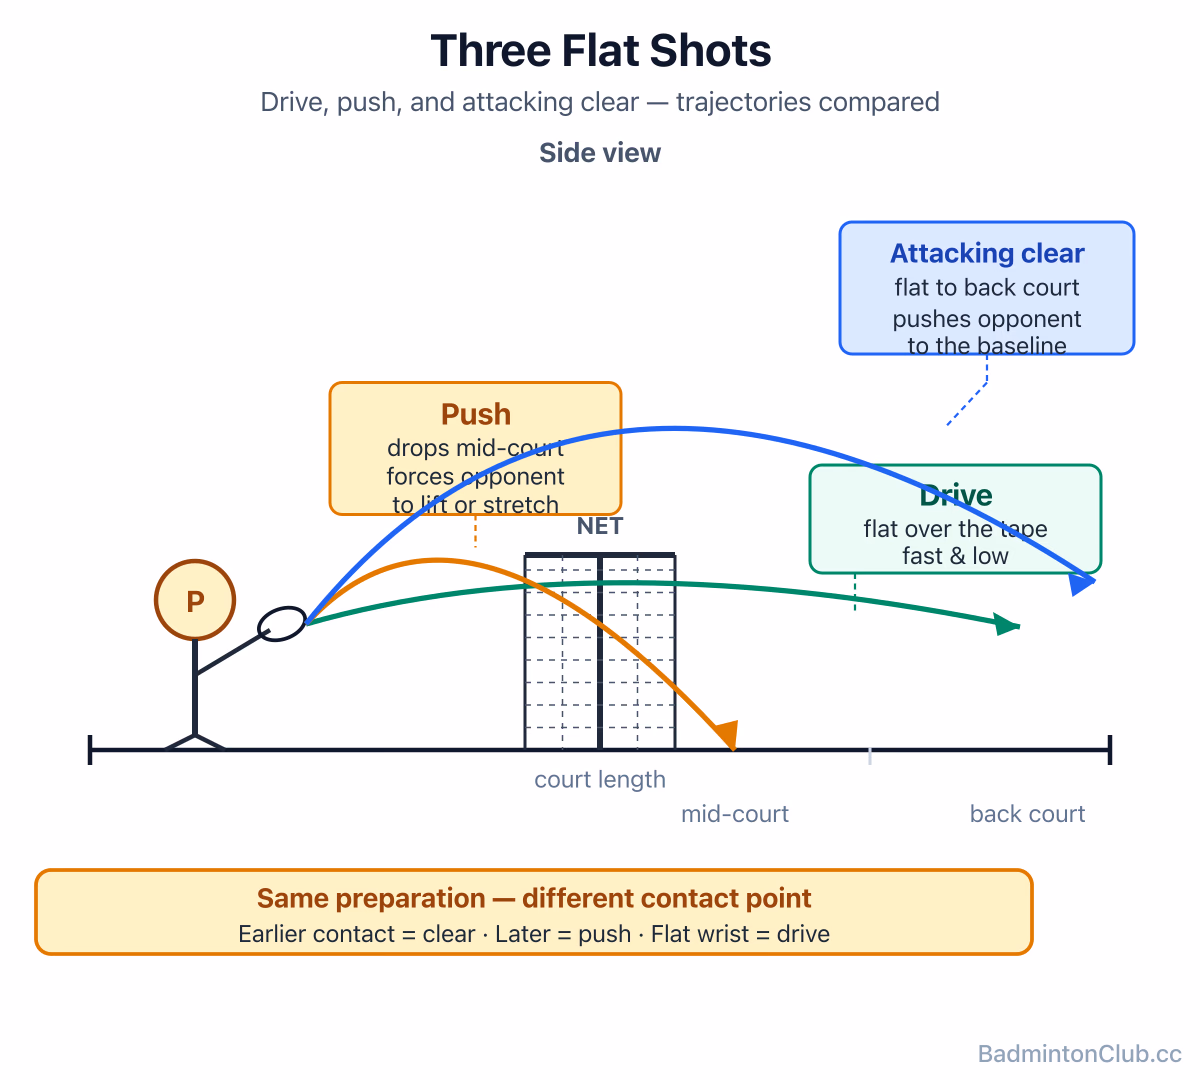
Drives, pushes and the attacking clear are badminton's flat-game weapons — they take time away instead of hitting down. This guide covers the mechanics of each shot, when to use them in doubles, and the two-tempo warm-up habit that sharpens your fast-exchange hands.
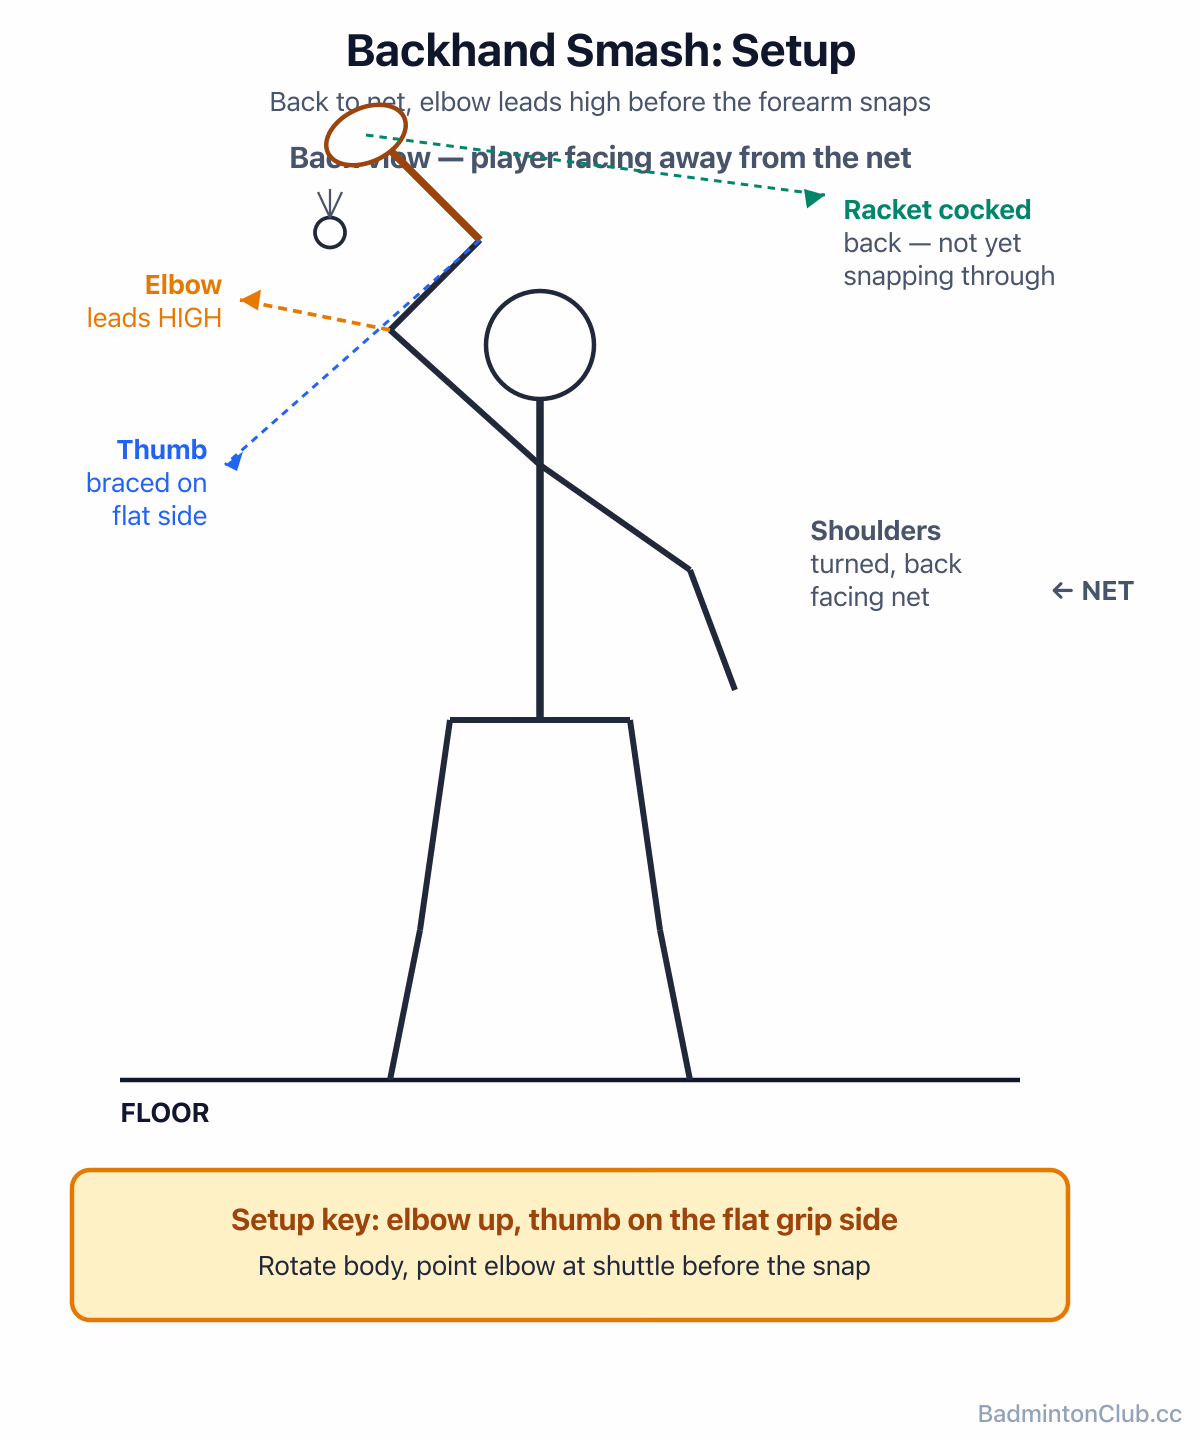
The backhand smash is one of the hardest shots to hit with real pace — almost all the power comes from a sharp forearm supination snap at the top of the reach. This guide covers the mechanics, the grip, the most common faults (swinging with the whole arm, taking the shuttle too late), and the honest truth about when a backhand clear is the smarter choice.
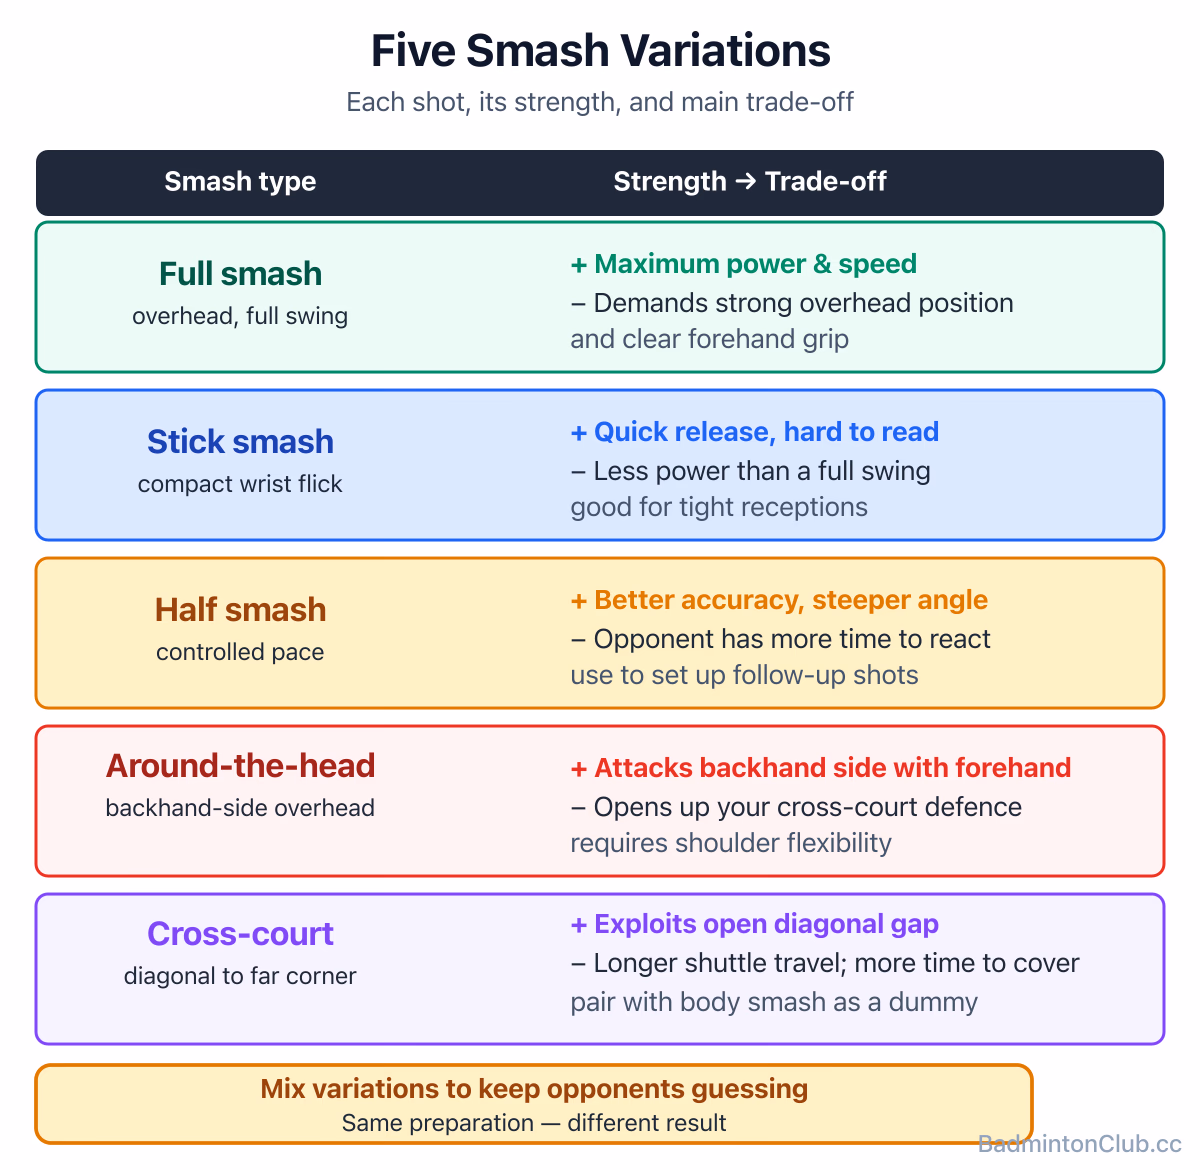
Master five badminton smash variations beyond full power: stick smash uses a compact wrist snap to disguise timing, half smash trades speed for a steeper angle, around-the-head keeps your forehand on the backhand side, body smash jams opponents at the hip, and cross-court smash surprises when the straight one is respected. Includes shot-mix rules and common coaching fixes.
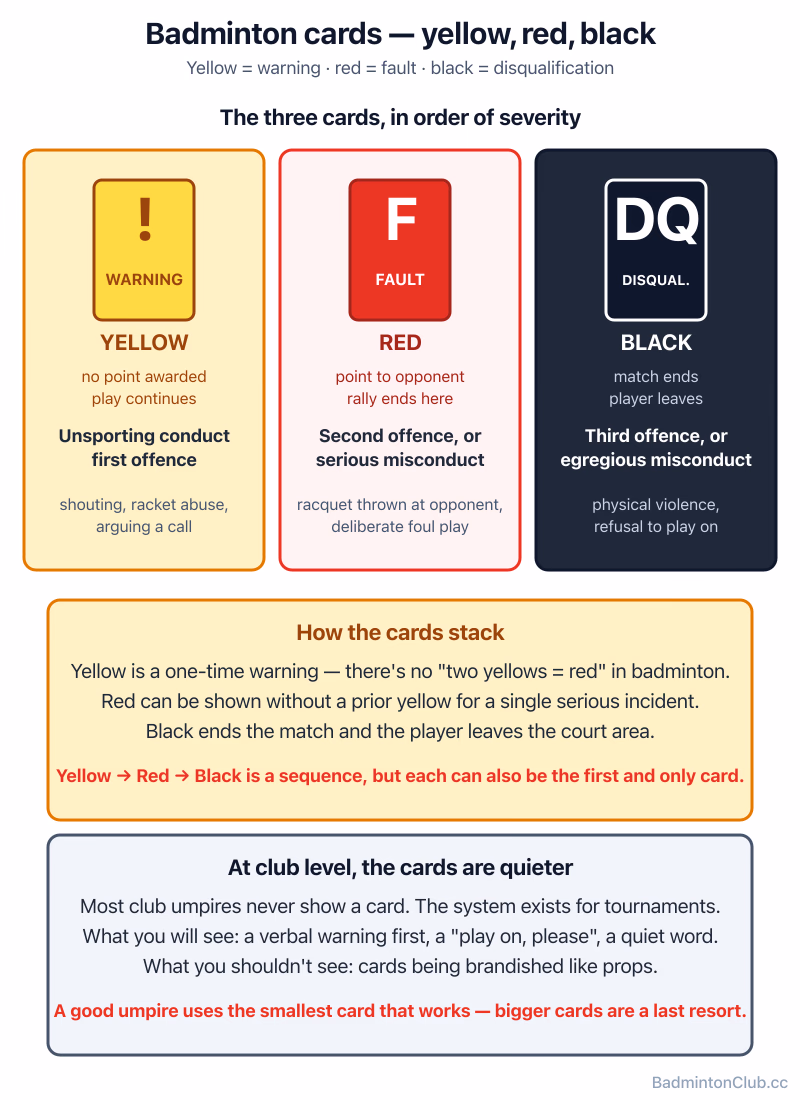
Badminton's yellow, red, and black cards are issued for misconduct — not mistakes. A yellow card is a warning, a red card hands the opponent a point, and a black card means disqualification. This guide covers what triggers each card, which official issues it, and why tournament players need to know the difference between the umpire and the referee.
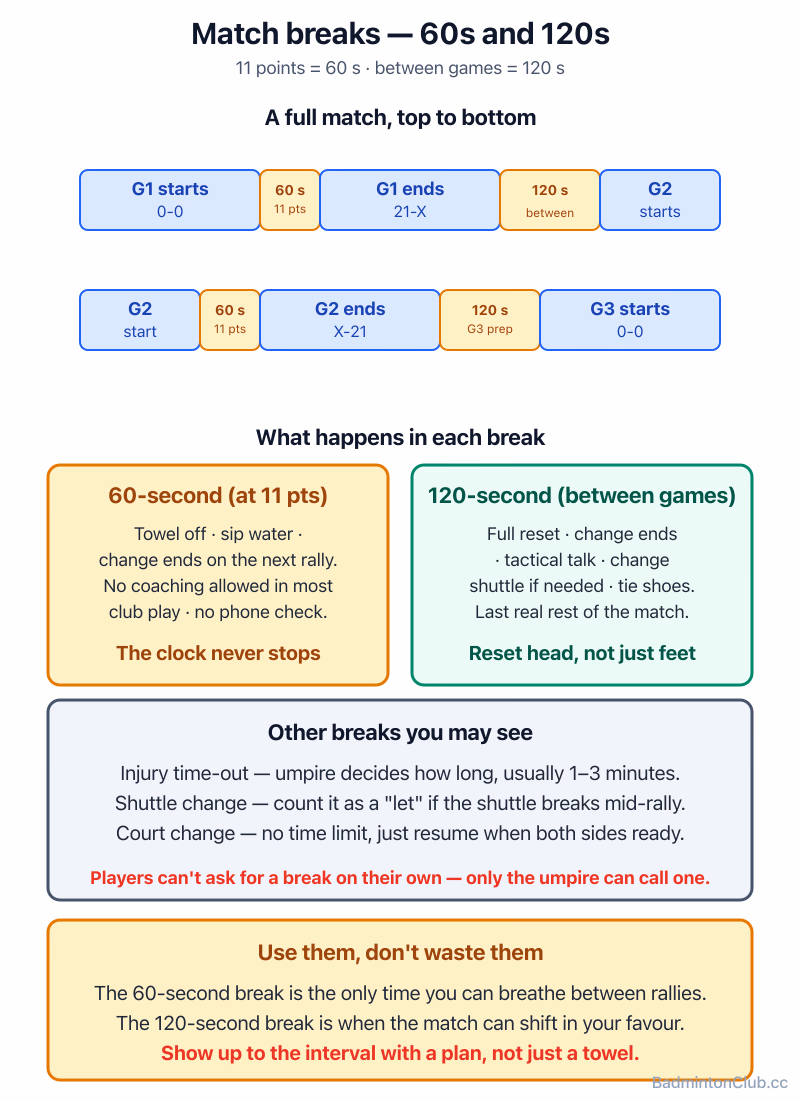
Official BWF interval rules explained: a 60-second break when either player hits 11 points, a 120-second break between games, and when coaches are allowed to give advice. Covers on-court coaching rules, whether players can leave the court, and where to find the full BWF Laws of Badminton PDF — useful for players and umpires at any level.
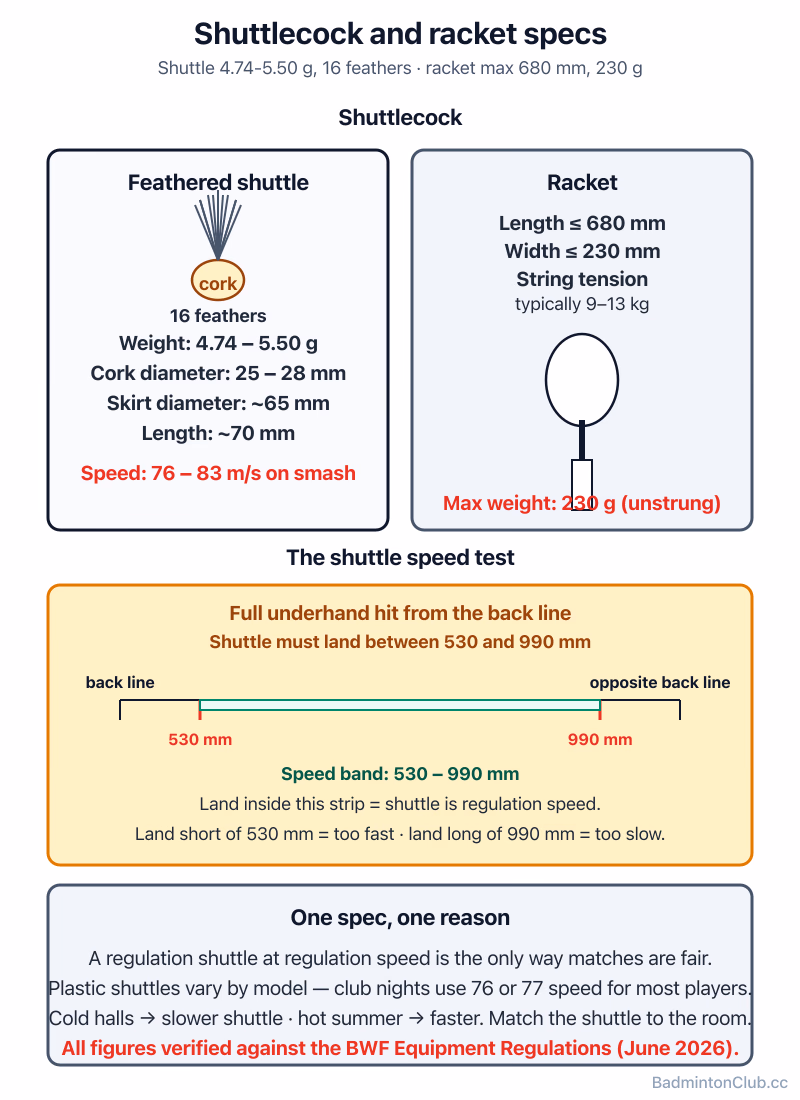
Official BWF specs for shuttlecocks and badminton rackets: a legal shuttle has 16 feathers, weighs 4.74–5.50 g, and must pass the speed test by landing 530–990 mm short of the far back boundary. Racket frames cap at 680 mm long and 230 mm wide. Covers why shuttle speed numbers matter and how to run the speed test before a match.
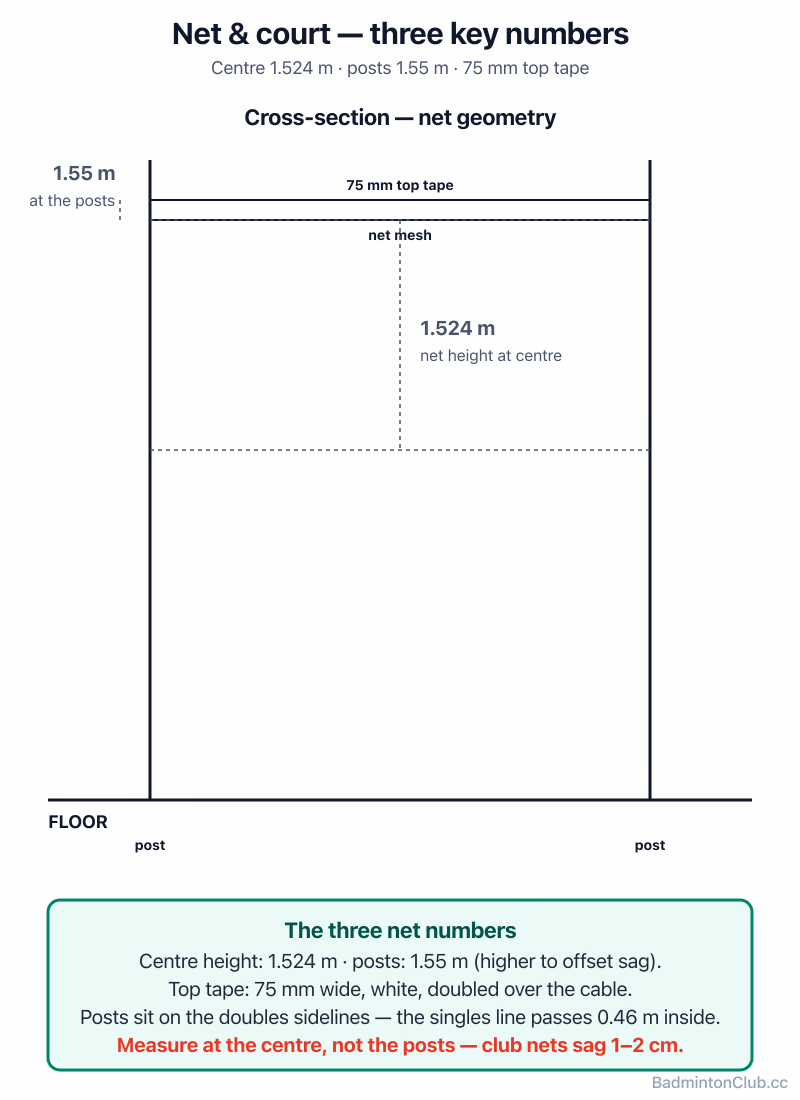
Badminton net height is 1.524 m at the centre and 1.55 m at the posts — most club nets hang too low because players measure the posts and ignore the sag in the middle. This guide covers official BWF net dimensions, post placement rules, court line widths, and a quick setup checklist to make sure your court is regulation before you play.
A let in badminton replays the rally with no score change and the same server serving again. This guide covers every situation that triggers a let — broken shuttle, server too early, outside interference — and clears up a common misconception: a net-cord serve is not a let in badminton, it's live play.
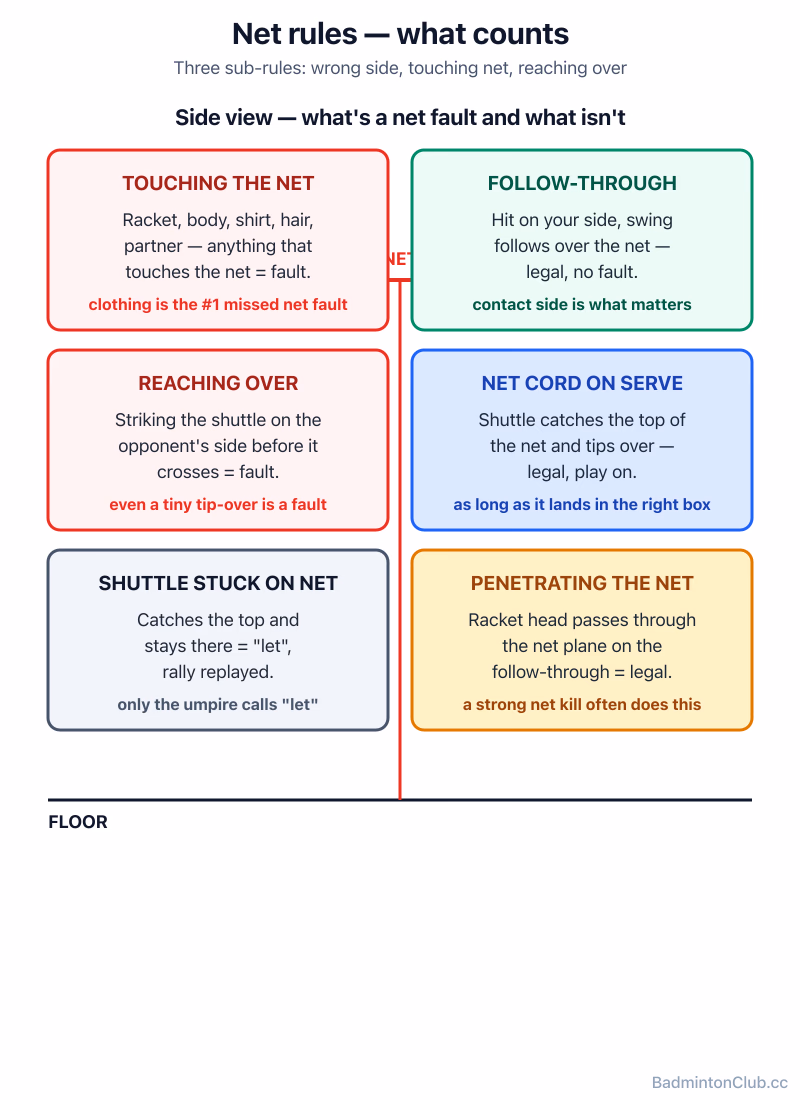
Touching the net with your racket, body, or clothing during a rally is an instant fault in badminton — but your racket can legally follow through over the net after you've hit the shuttle on your own side. This guide explains exactly when a net contact costs you the point, what counts as reaching over illegally, and covers the most-missed rule: clothing faults.
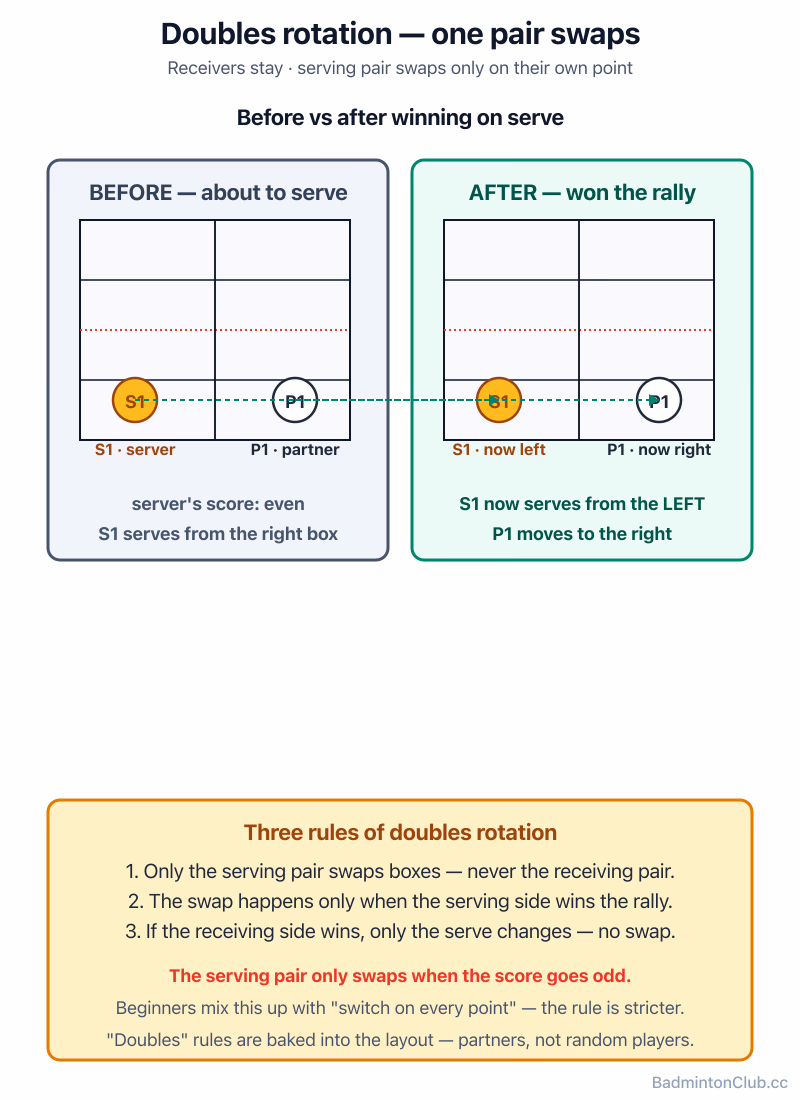
Understand who serves next in badminton doubles and how the rotation works under rally scoring. This guide covers the one rule that resolves most confusion — your side only swaps courts when you score on your own serve — and walks through the FAQ every club player asks.
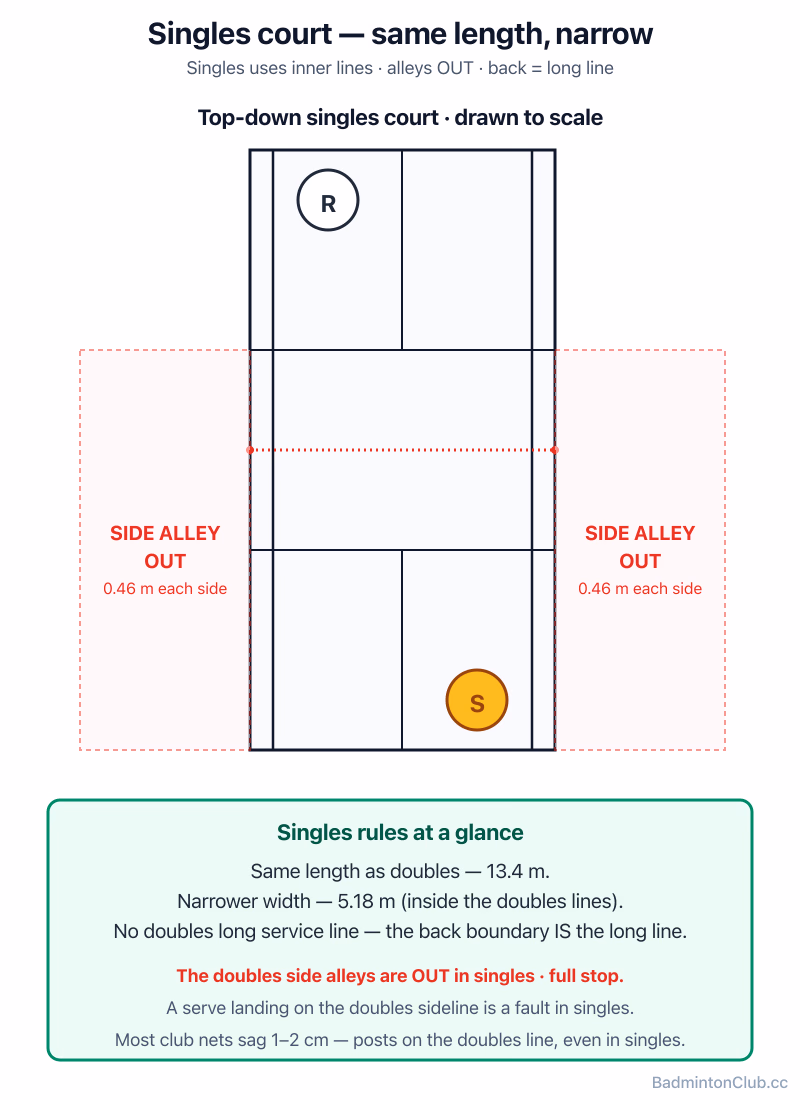
Badminton singles uses the narrower inner court (alleys out) but the full length — including on the serve. Learn which lines are in, how the serve direction works, and the key ways singles differs from doubles in court width and serving rules.
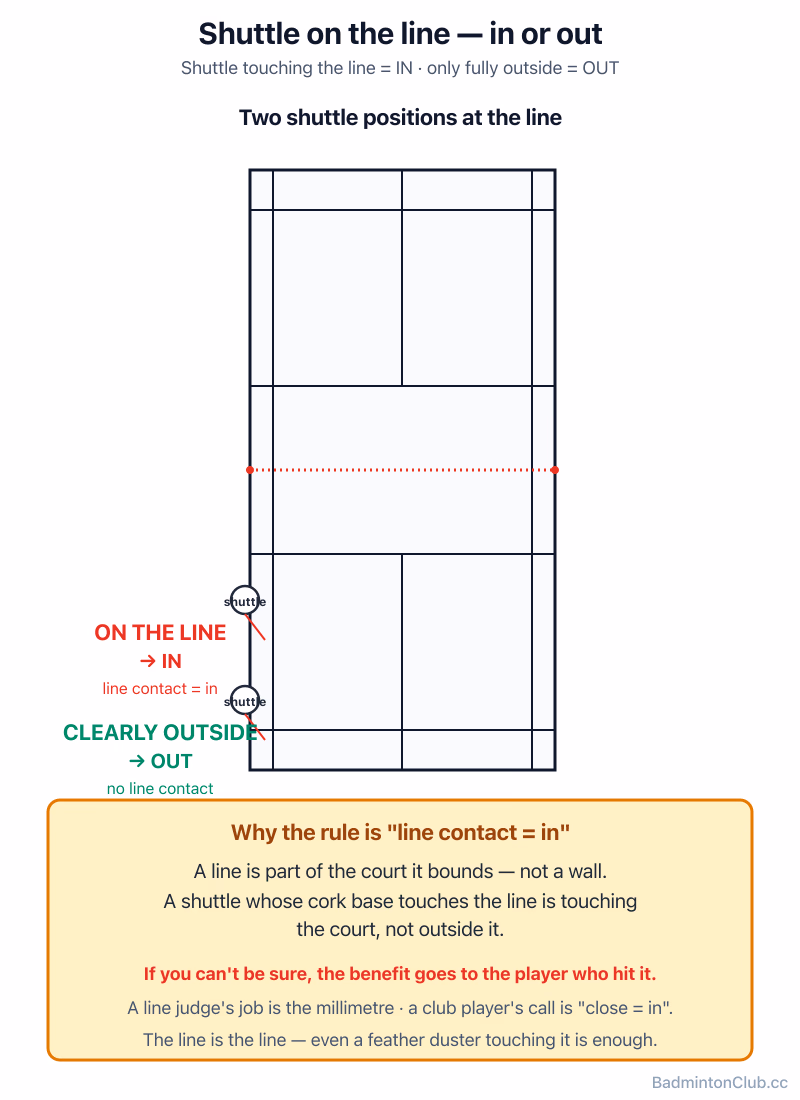
In badminton, any shuttle that touches a boundary line counts as in — the rule is decided by where the base first contacts the floor, not where it skids or leans afterward. This guide explains the exact boundary rule, how line judges apply it, and why singles and doubles use different court lines.
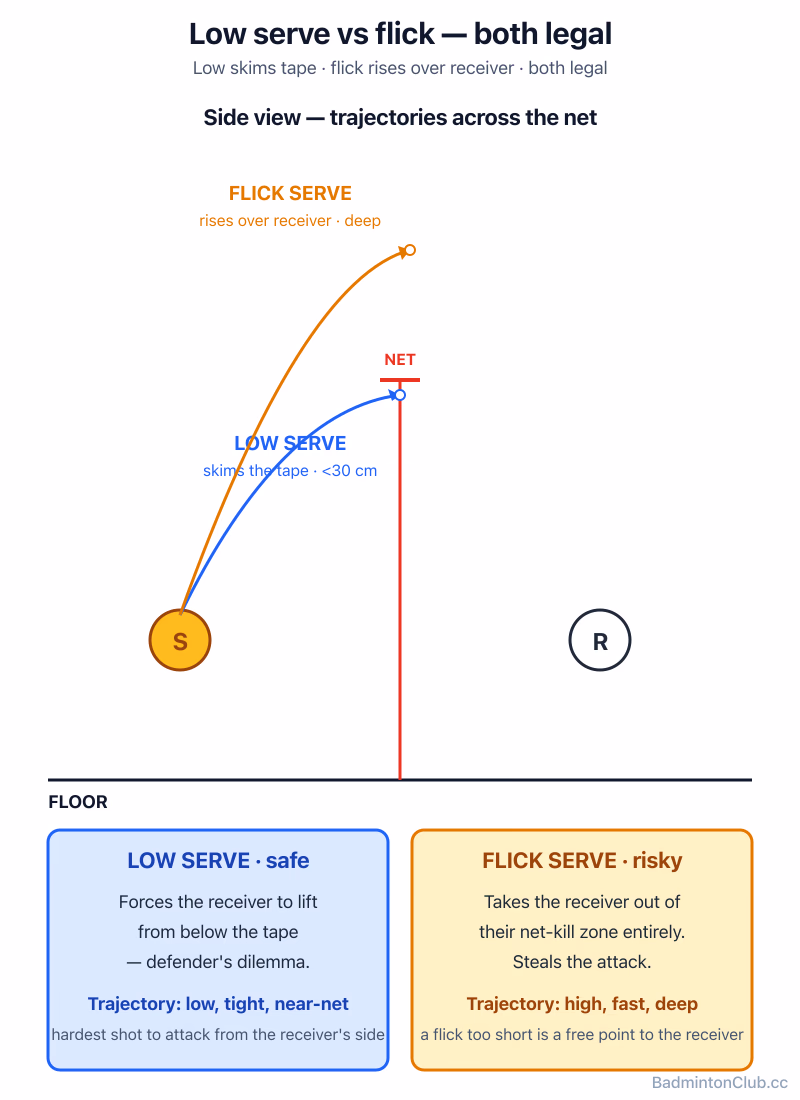
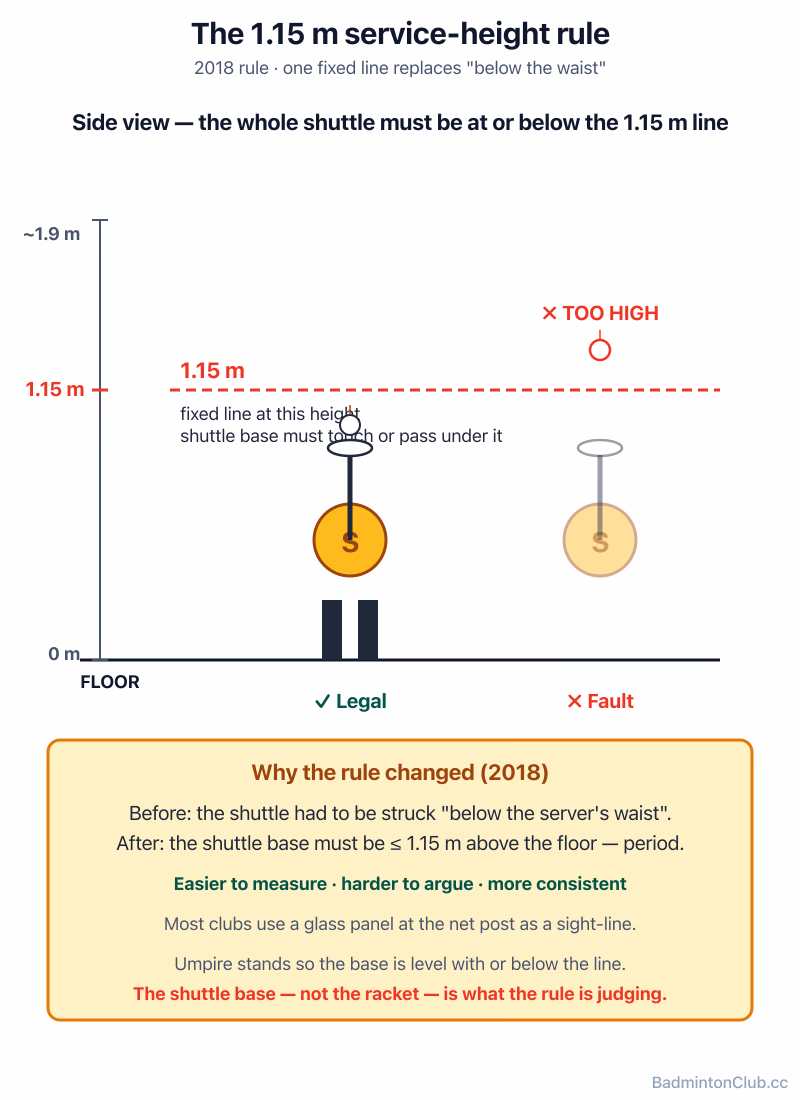
Can you smash a serve in badminton? The server cannot — a serve must go upward and underarm below 1.15 m — but the receiver can absolutely attack or smash a loose serve. The flick serve is legal provided it still meets those contact rules. This piece covers what the server is and isn't allowed to do, why doubles serves hug the net, and when the receiver can pounce.
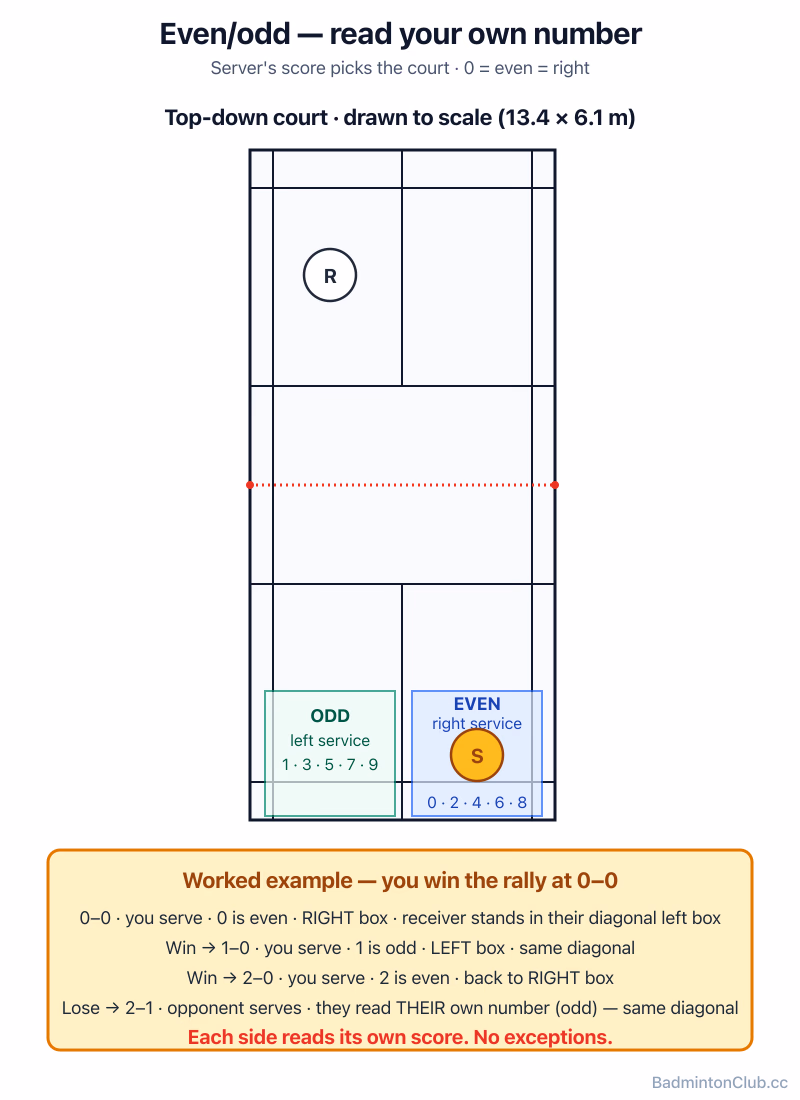
Even score means serve from the right, odd score means serve from the left — and the server's own score is what decides it. This guide explains the even/odd rule for singles and doubles, where the receiver stands, and the one mental habit that stops you serving from the wrong court.
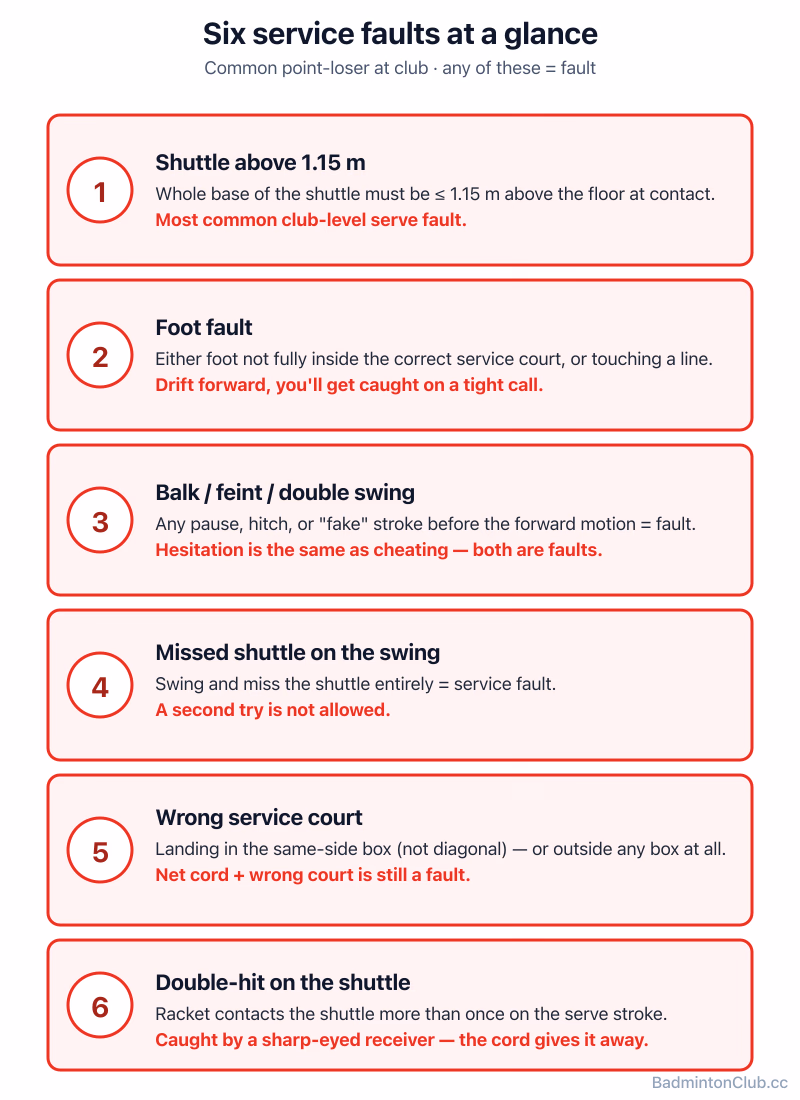
Service faults in badminton cover every illegal serve — wrong height, foot fault, balk, missed shuttle, double hit, or wrong court — and each one hands the rally straight to your opponent. This guide lists every server and receiver fault with a plain-English explanation, so you know exactly what to avoid the next time you step up to serve.
The badminton serve height rule requires the whole shuttle to be below 1.15 metres at the moment of contact. Learn why BWF introduced this fixed line in 2018, how it replaced the old waist-height judgement, and what it means for your low serve and flick serve today.
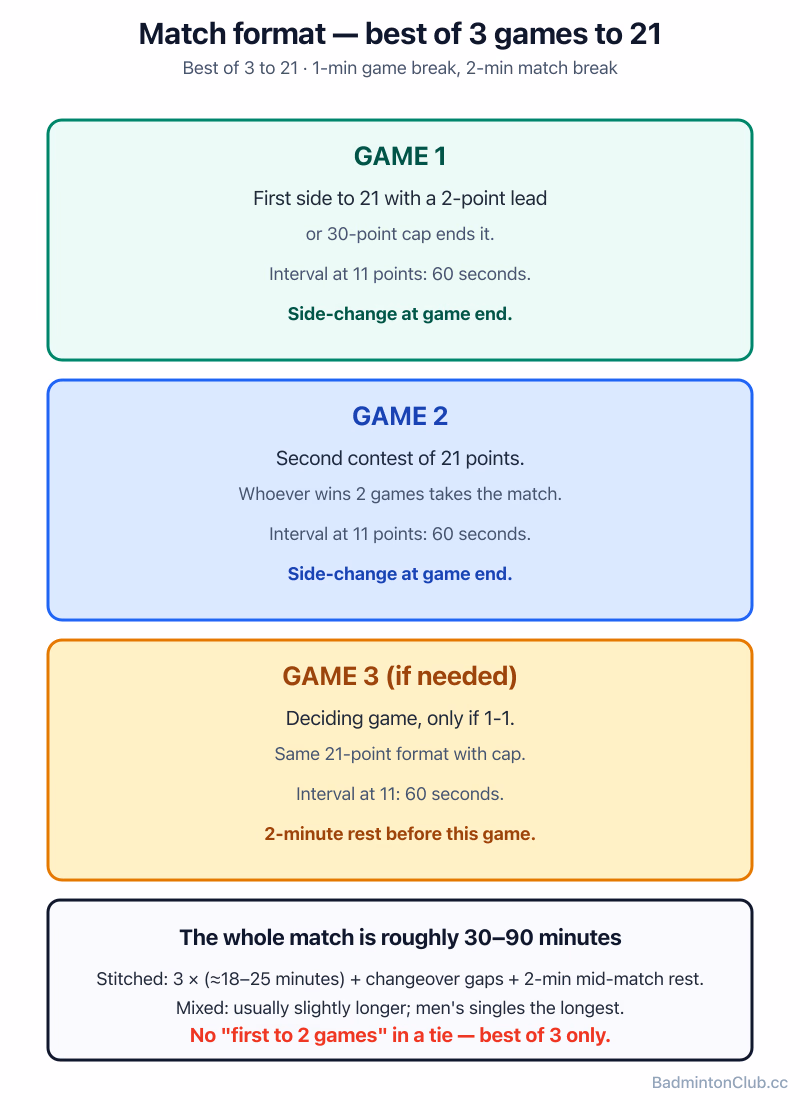
A badminton match is best of three games — first to win two takes the match. Each game goes to 21 points using rally scoring, with a 2-point lead required and a 30-point cap at deuce. Learn the interval rules, end changes, and how long matches really last.
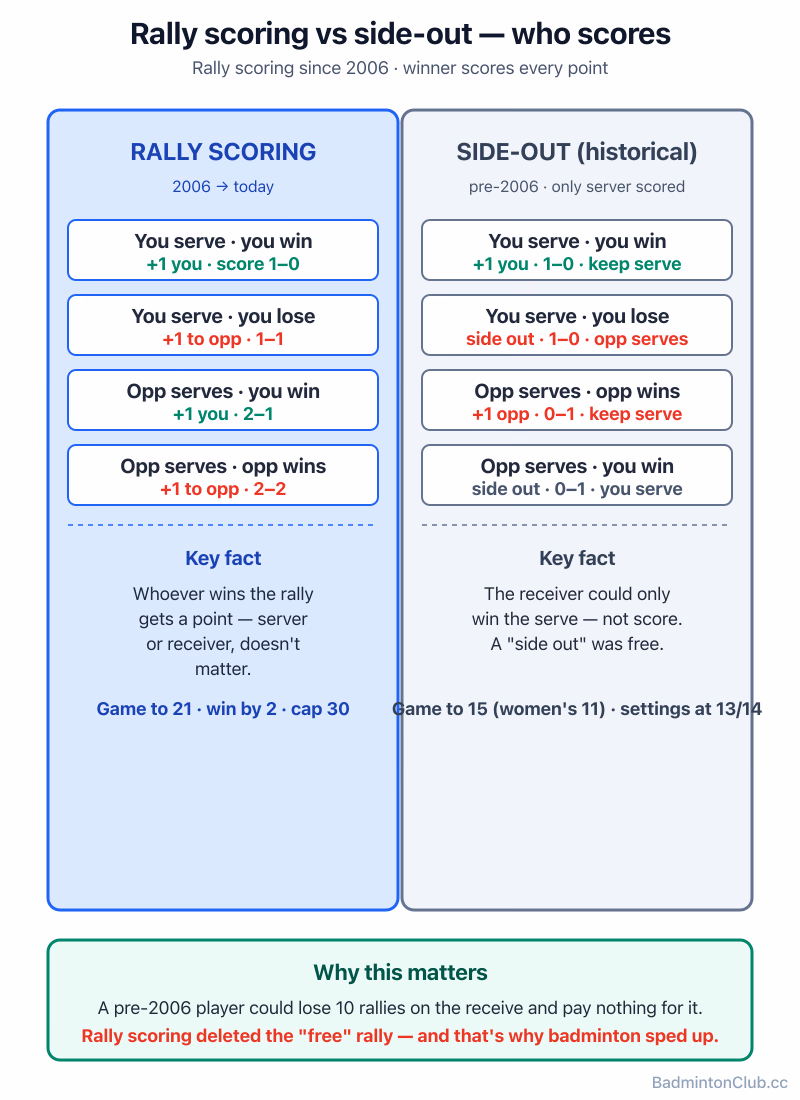
Rally scoring means every rally produces a point — yes, you can score on your own serve in badminton. This article explains how the 21-point rally system works, what changed from the old 15-point side-out era, and why every rally now matters more than ever.
At 20–20 in badminton, the game goes to deuce — you must win by 2 clear points, up to a hard cap of 30. Learn exactly how the deuce rule works, what "setting" means historically, and why 29–29 is decided by a single sudden-death point. Essential for players who want to know the end-game rules cold.
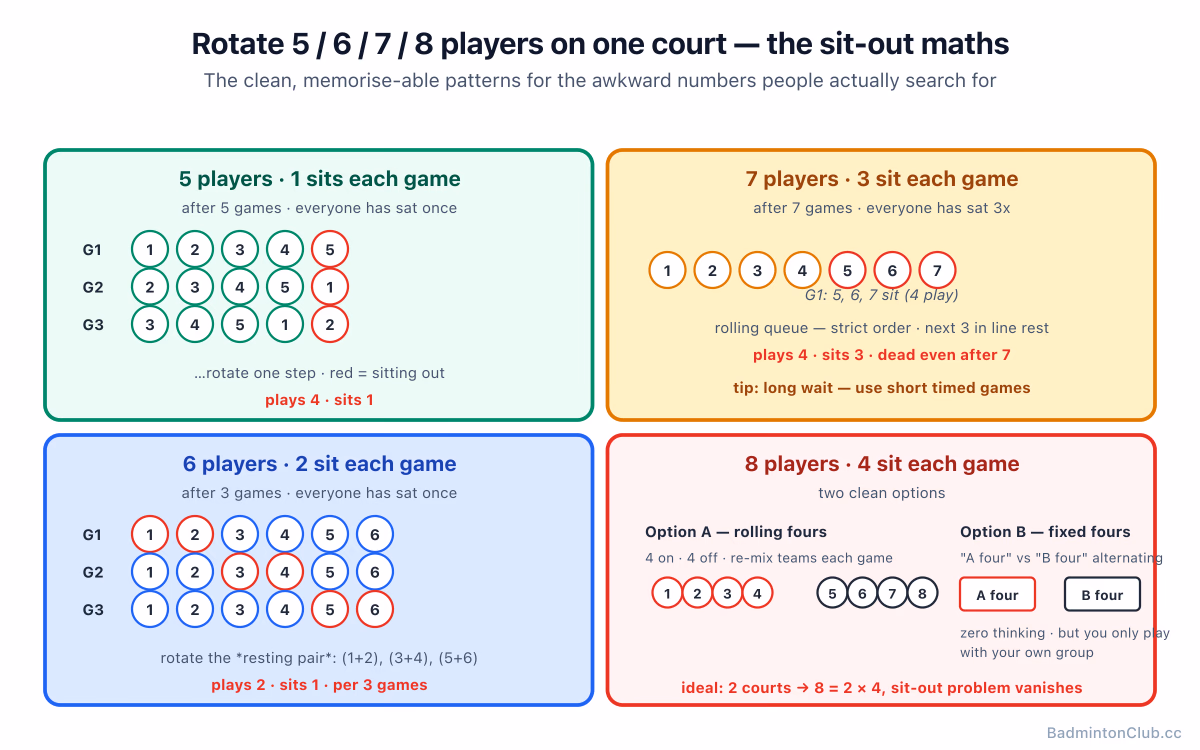
Fair sit-out rotations for 5, 6, 7, or 8 players sharing a single badminton court — rolling patterns that keep everyone equal without arguments. Covers the exact cycle length per player count, practical tips for writing the order down, and when a second court or a rotation app makes more sense.
Mexicano pairs players by live score standings each round so games naturally get tighter as the night goes on — no organiser judgement needed. Learn the rules, scoring quirk, pros and cons, and how it compares to other club rotation formats. Great for groups of 8–24 who want every rally to count.
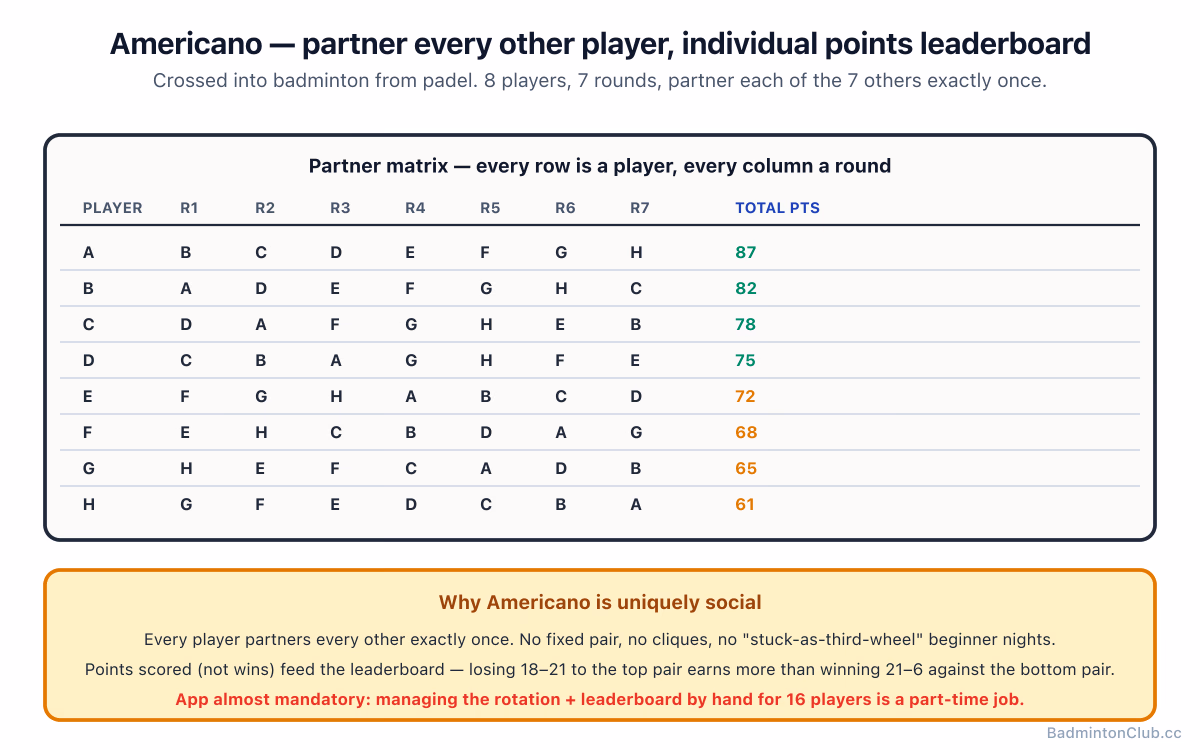
Badminton Americano is a rotating-partner format where everyone plays with everyone and individual points build a personal leaderboard — the most social competitive format on the court. Learn the rules, scoring, ideal group sizes, and how to run it smoothly with or without an app. Ideal for clubs wanting a night that mixes abilities without fixed teams.
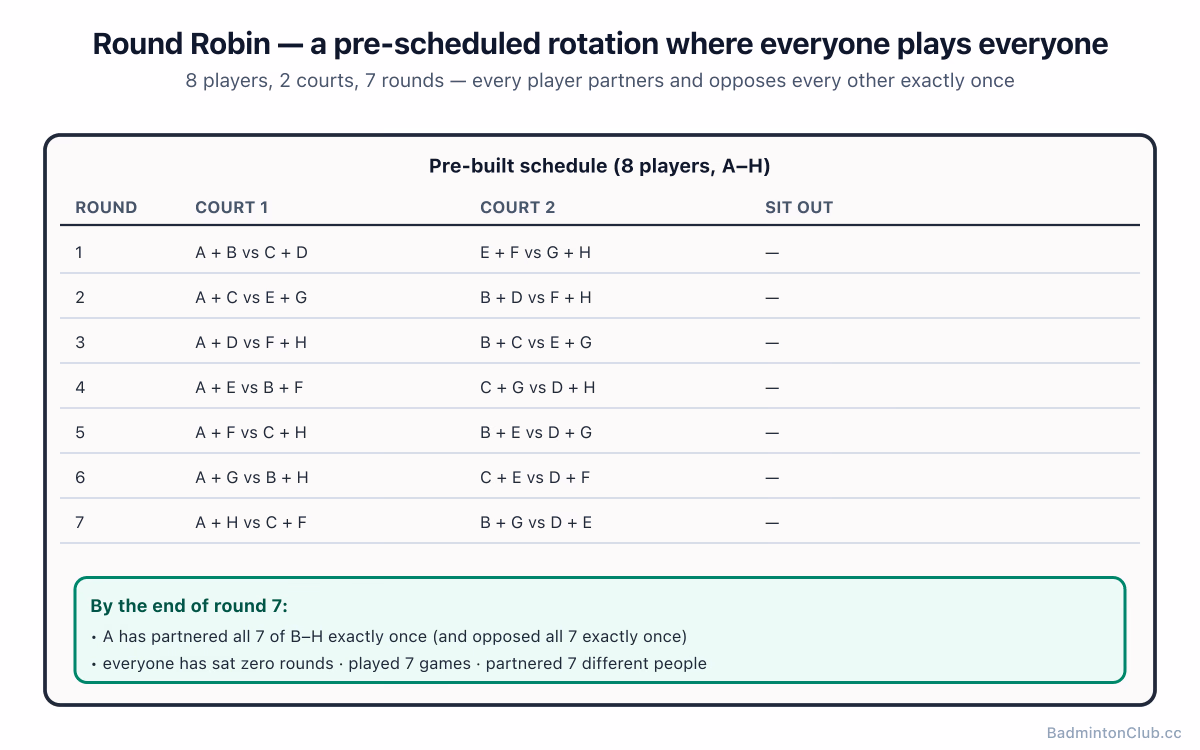
Round robin and Swiss system scheduling give every player an equal share of games, partners, and sit-outs — ideal for club mixers and one-night tournaments. This guide covers how each format works, the key differences between a static spreadsheet and a live generator, and when Swiss pairing beats a full round robin for a fixed group.
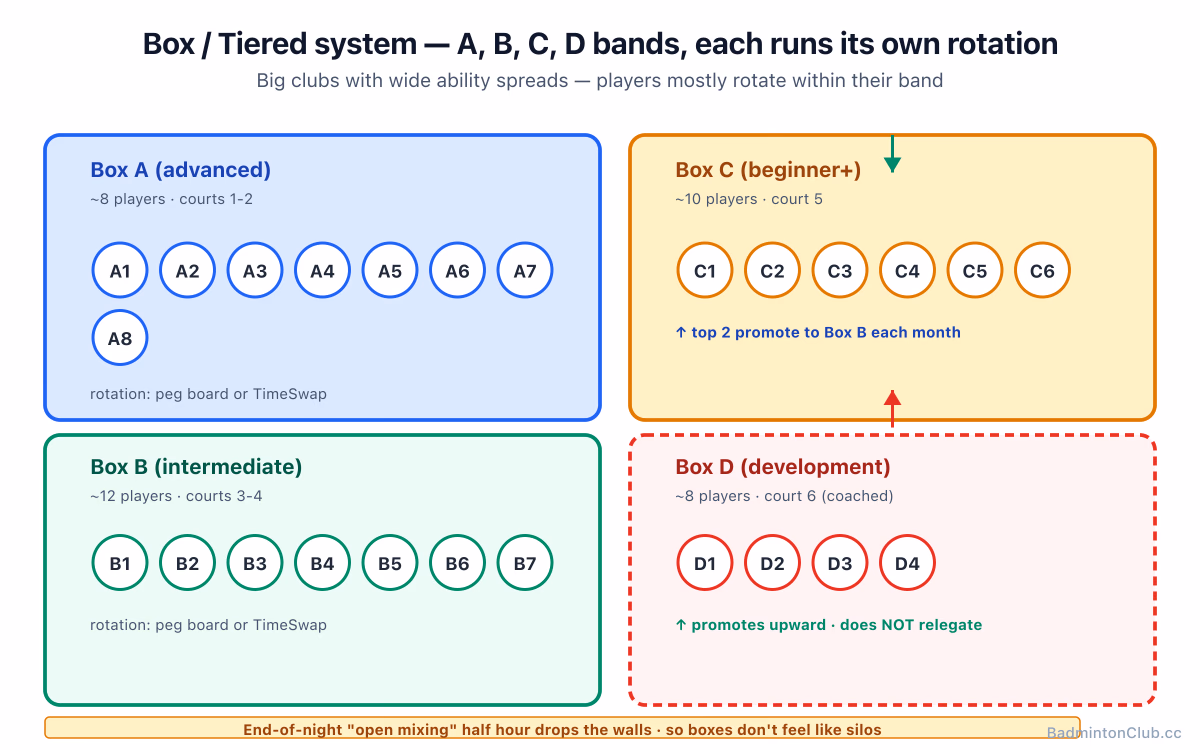
A box (tiered) league divides club members into skill bands — A through D — so every player gets balanced, competitive matches. This guide covers grading players without friction, running promotion-relegation overlays that keep the system fair, and combining box tiers with a free-mixing finale. Ideal for clubs of 40-plus players with a wide spread of abilities.
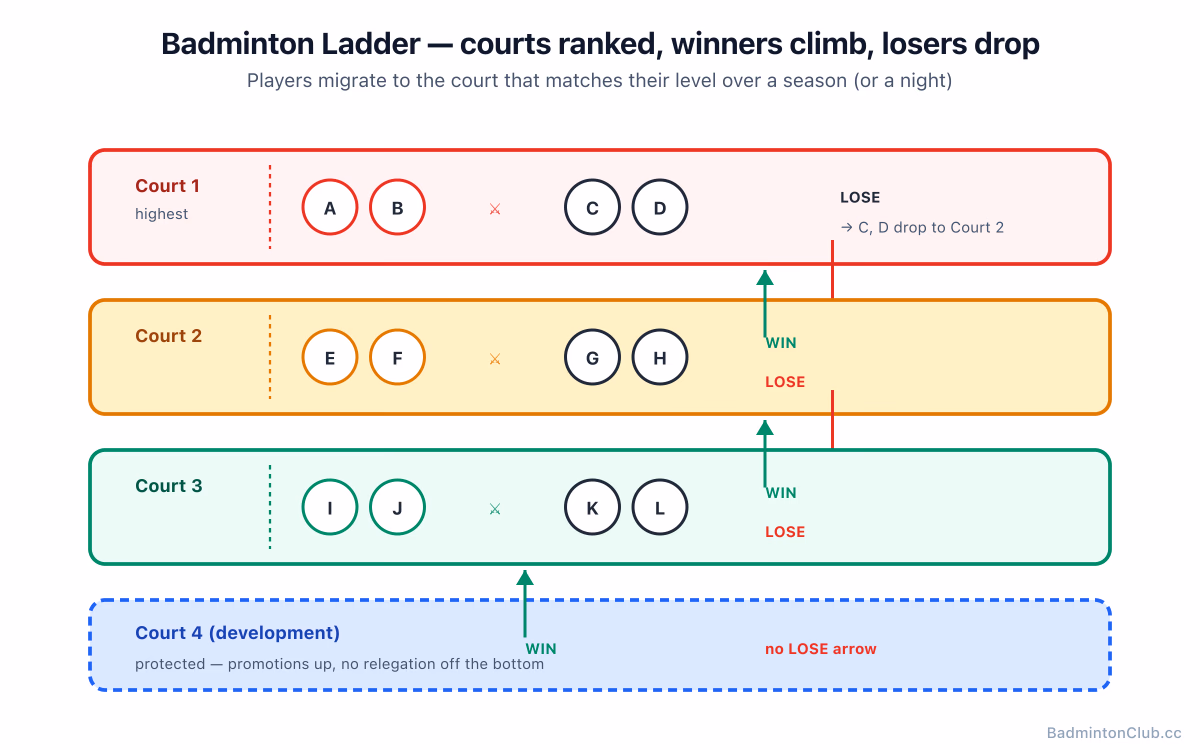
A badminton ladder system ranks courts by ability — winners move up, losers drop down, and players naturally settle where they belong. This guide covers how ladder leagues work, the yo-yo problem and its fixes, protecting beginners with a development court, and when a ladder fits your club better than other rotation systems.
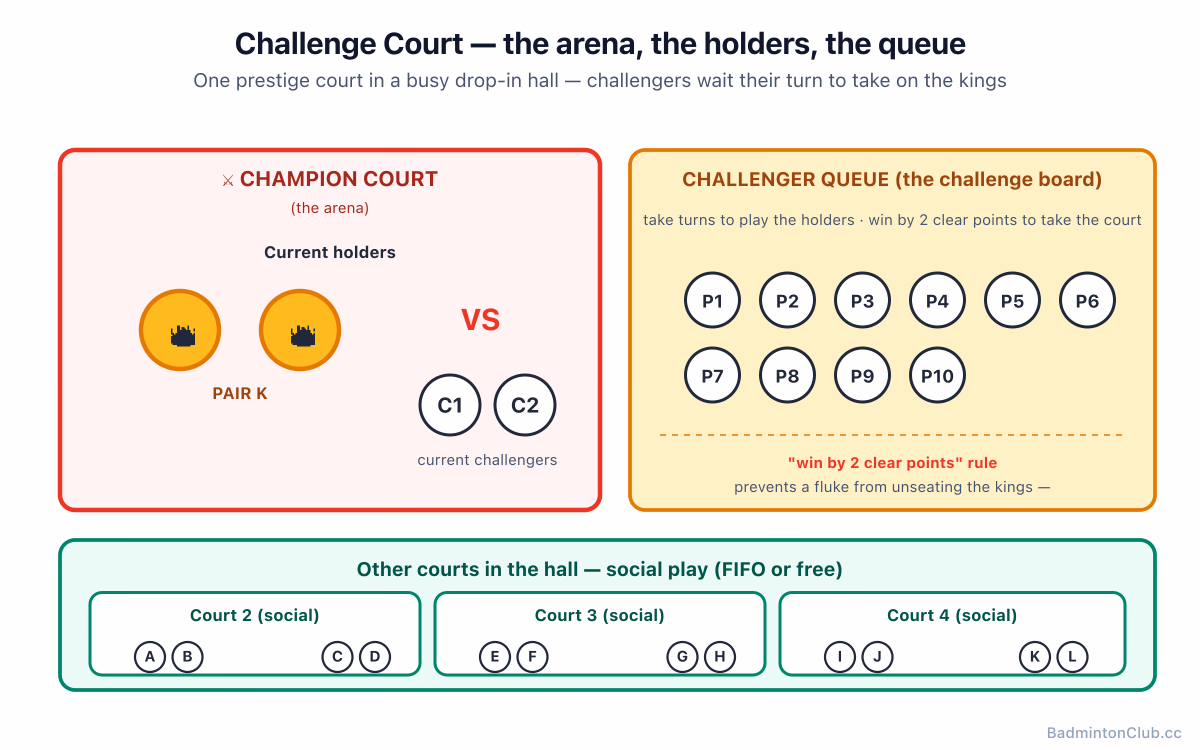
Challenge Court (Champion Court) is the Asian drop-in hall format where winning pairs hold one prestige court and challengers queue to unseat them. Learn how the 2-clear-points rule, defense caps, and challenger etiquette make it work — plus when it shines as a feature court alongside social courts and when it falls flat for beginners.
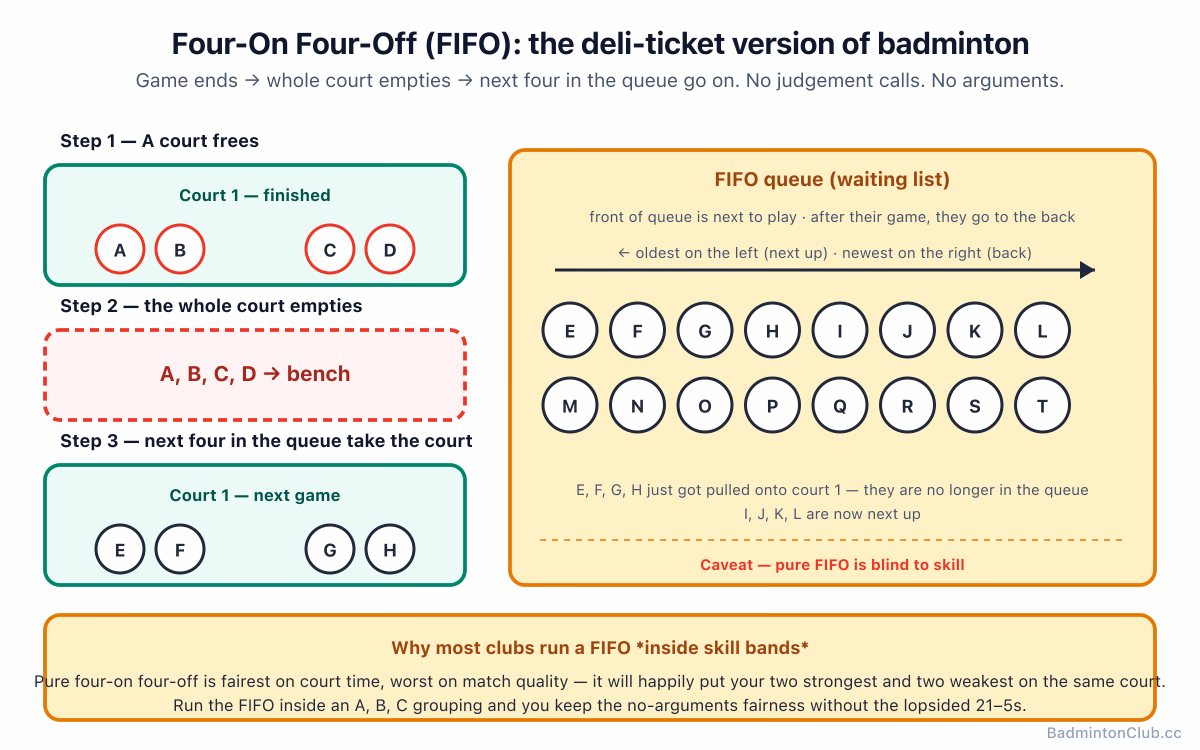
Four-on four-off is the fairest badminton rotation for equal court time: every game ends, all four players leave, and the next four in the queue come on. This guide explains how strict FIFO works, why it suits beginner and school clubs best, how running it inside skill bands fixes the mismatch problem, and when to switch to a different system for competitive continuity.
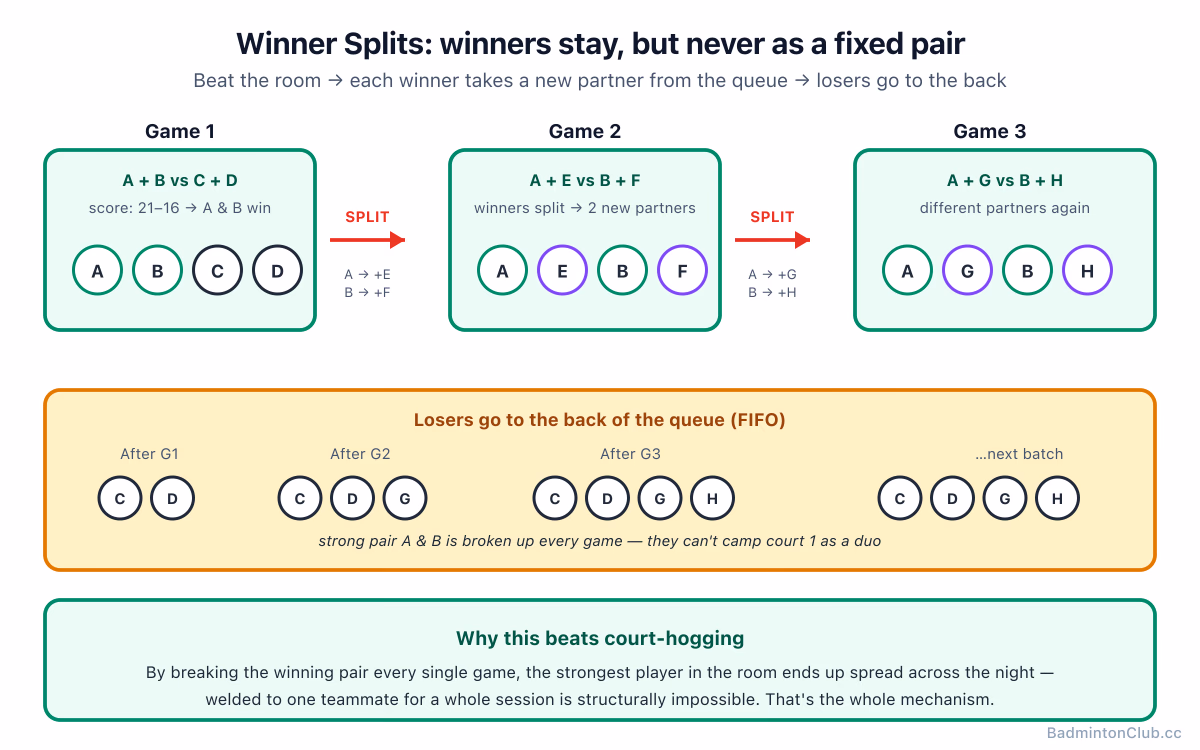
Winner Splits breaks up the winning pair every game so no duo can dominate, making it one of the most social club-night formats. Learn the rules, the stronger-winner refinement, pros and cons, and why it keeps newcomers coming back — ideal for 8–20 players on 1–4 courts.

Domain: BadmintonClub.cc — the .cc doubles as our brand promise: Connection & Court Control